
Published 2020-11-05.
Last modified 2025-04-11.
Time to read: 10 minutes.
av_studio collection.
I have written eighteen articles about Pro Tools. They are somewhat ordered, but largely are meant to be read in any order.
- Pro Tools Overview
- Pro Tools Installation and Preferences
- HUI & MCU
- Pro Tools Keyboards and Hot Keys
- Avid Control, EuControl and EuCon
- Pro Tools Modes and States
- Pro Tools Sessions
- Pro Tools Beats, Bars and Click Tracks
- Pro Tools Operations
- Pro Tools Workspaces and Catalogs
- Pro Tools Sessions
- Pro Tools Editing
- Pro Tools Effects
- Pro Tools Automation
- Pro Tools MIDI
- Pro Tools GrooveCell & Xpand!2
- EZdrummer 3 & Pro Tools
- Pro Tools Issues
- Click track
- Drum tracks
- Bass track
- Chords track
- Melody track
Toontrack EZ Drummer 3 (EZD3) is a mature product that works very well standalone, and also as a Pro Tools stereo virtual instrument. EZD3 supports the traditional track creation sequence shown to the right.
EZD3’s Bandmate feature allows composers to invert the songwriting sequence. You can start with just the melody or just the chords. EZD3 quickly analyzes the melody or chords and breaks the song into sections like intro, verse, pre-chorus, chorus, outro, etc. With guidance from the composer, EZD3 builds a rhythm track using desired styles.
A Mixed Review
While EZD3 is functionally very capable, the user interface is primitive and does not use modern operating system capabilities. Documentation does not appear to have been created to be read; instead, it was apparently written by marketing personnel.
The quality of this software is good. As is often the case, I made many statements in this article that sound critical, but every program has room for improvement. EZdrummer 3 is a terrific program and one of my favorites, but new users are likely to experience a needlessly frustrating and confusing experience.
There are two types of software in this world:
- Software that people do not use
- Software that people complain about
Learning EZD3
Instructional videos are great for getting an overall understanding of how a sophisticated product like EZD3 works. Written manuals are best for providing detailed reference material on specific topics. Unfortunately, although Toontrack provides both kinds of information, they do not cross-reference each other.
Instructional Videos
The best video to start learning EZD3 is not by Toontrack but was made by Emily Harrys from Get Offset and was sponsored by Sweetwater:
Here is a video by Toontrack that discusses an essential aspect of EZD3, the Grid Editor.
Here is a video by Toontrack that demonstrates EZD3’s killer feature, Bandmate.
The next 2 videos show the traditional way that Pro Tools and EZD3 work together, and the third video’s title is self-explanatory. This article, however, shows a faster and easier way of working.
Online Manual
To continue the EZD3 learning experience, select the Help / Operation Manual menu item.
This causes www.toontrack.com/manual to open in your web browser.
The online manual said the material was for EZdrummer v3.0.3 (released June 2022),
but when I checked in November 2023 the current version was v3.0.6.
Just one more indication that Toontrack does not give their documentation enough love.
I expected to see a link to the next page at the bottom of each page of the online manual, but that is not provided. Instead, one must scroll up to the top of the page, where the navigation menu is displayed. The current page is not highlighted in the menu. There is no way to click on “go to next page”; you must know where you are in the table of contents and click on the page you want to see next. As you can see, the online manual navigation is primitive.
Weak Documentation Planning
The Toontrack YouTube channel seems to assume that viewers already know the previous generation, EZdrummer 2 (EZD2). Many references are made to changes since EZD2 and drill into certain aspects of the program, and there are many videos that talk about EZD2.
However, I did not find a single video from Toontrack that was explicitly aimed at new EZdrummer 3 users who want to see a simple but complete sequence that shows how to work with the current product to produce a completed drum track.
Is EZD3 essentially the same as EZD2? I think so, but Toontrack is not saying. Instead, the Toontrack videos sell past the close. The viewer is left with piecing together the information from various videos into usable product knowledge and trying things until they figure out what they want to do. This presents a significant barrier to adoption.
The product would benefit from an experienced documentation manager guiding the generation of documentation.
Inaccessible User Manual
The help information can be viewed as a single large HTML page that contains a search box.
The single-page HTML document can be printed or saved in PDF format from the operating system’s print dialog. On my computer, which has a 16-core Intel i7-13700K and 64 GB of RAM, there was a noticeable pause while preparing the print preview, then I was able to save it to my computer.
I used to make the PDF available from this website, but it got more traffic that I wanted to pay for. It would be better if Toontrack provided a premade PDF for download instead of having every customer compute it each time they fetch it.
The PDF contains 157 pages, but it has no table of contents or index. The PDF looks exactly like the web pages — including the search and shopping cart icons, which appear on the first page but do not work in the PDF.
Fixing the Print Stylesheet
The PDF content is set in what appears to be 14-point type, which is large for a printed document.
Using the CSS print media type
would allow the font properties to be optimized for printing,
instead of the font properties that Toontrack apparently chose for optimal readability on a mobile phone.
Happily, there is a way to modify the stylesheet used for printing. The MyStyle plugin for the Google Chrome browser can inject custom styles for any web address. With the plugin installed and active, pressing CTRL-M toggles the visibility of the MyStyle custom stylesheet panel. Paste the following into the MyStyle panel.
@media print {
  #site-navigation { /* ignored when printing, unsure why */
    display:none;
  }

  .manual-print-version p,
  .manual-print-version li {
    font-size: 12pt;
    font-family: Merriweather, serif;
    line-height: 1.3;
  }
}
Be sure to toggle the visibility of the My Style panel by pressing CTRL-M before you generate a print preview. The smaller font size reduces the number of pages from 157 to 155.
I do not know why the shopping cart and search box icons remain visible perhaps they are controlled by JavaScript.
You can modify the custom stylesheet to suit your taste. For example, you can use the stylesheet all the time, not just when printing, by deleting the lines highlighted in yellow, above.
Scaling Detachable Windows
The section in the manual on Navigation discusses how to detach tabs into separate windows. That is nice, but the contents of the windows cannot be scaled independently. The View / Scale menu item allows all the windows to be scaled larger or smaller, but all windows share the same scale, which may not be desirable. For example, I would like the Grooves window to be scaled down 50% relative to the scale of the Grid Editor window. EZD3 window management is primitive.
Customizing a Drum Rack
In many DAWs, for example Ableton Live, the term drum rack is used to indicate that a collection of samples has been mapped to a control surface’s pads. EZD3 calls this a drum kit.
To modify an EZD3 drum kit, merely drag and drop a sample onto an displayed instrument. Simple!
To save an EZD3 drum kit:
- Click on Studio Basic at the top right of the EZdrummer 3 window.
- Click Drum Kits / Save As...
- Enter the name.
- Click Save.
Working with EZD3 & Pro Tools
The two programs interact very well.
Adding An EZD3 & Track
Setting up an EZD3 instrument track within Pro Tools is simple to do and works very well:
-
Create a stereo instrument track (CTRL-Shift-N),
using ticks instead of samples.
Ticks are the default for MIDI and instrument tracks because they need to conform to the song tempo.

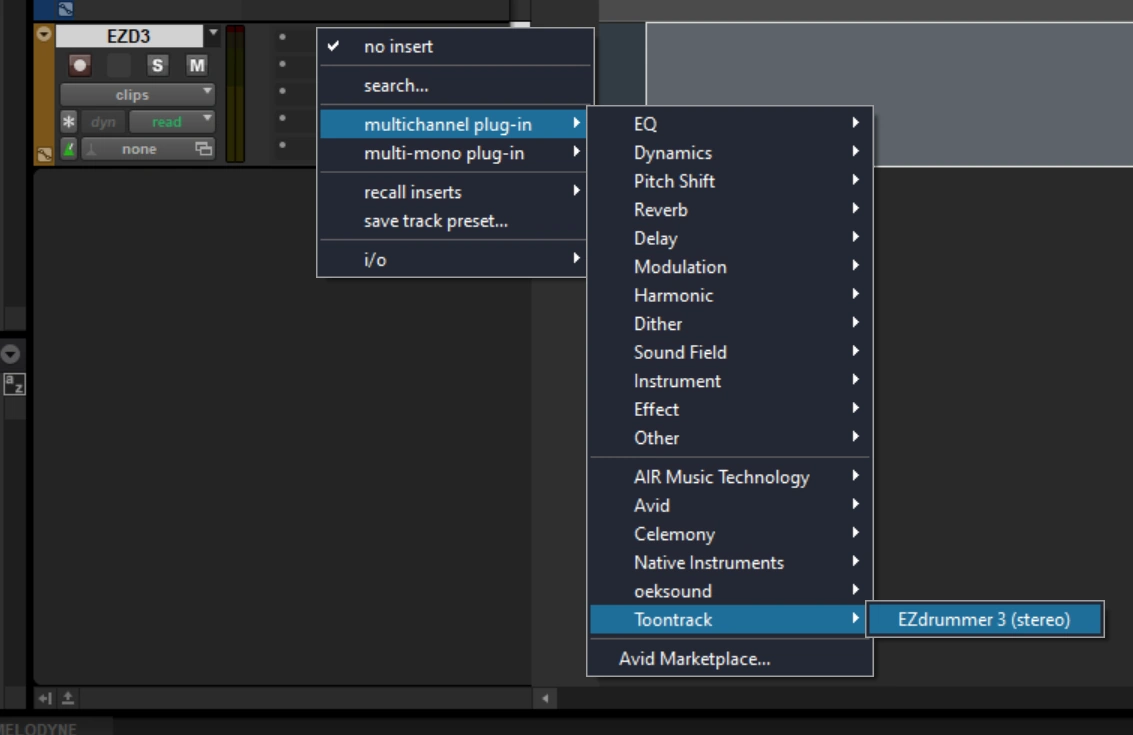
-
Choose EZ Drummer 3 as an insert.
-
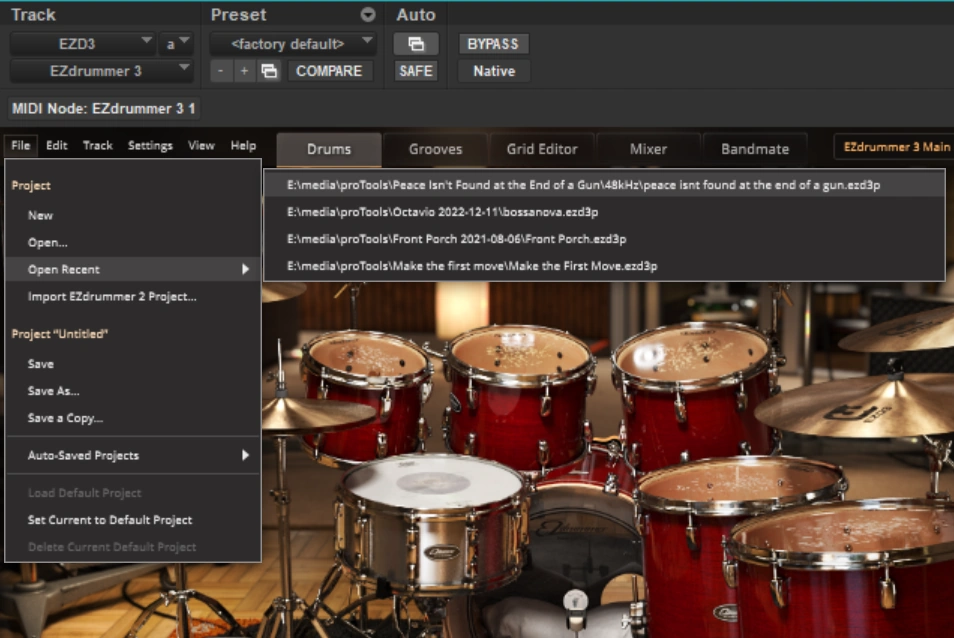
If you already have a drum pattern saved, load it from within EZD3,
using File / Open... or Open Recent.
- Pro Tools controls the EZD3 transport.
Providing A Pro Tools Clip to EZD3 Bandmate
This section details the sequence for selecting an audio clip in Pro Tools and passing it to EZD3’s Bandmate tab/window to build a rhythm track from it.
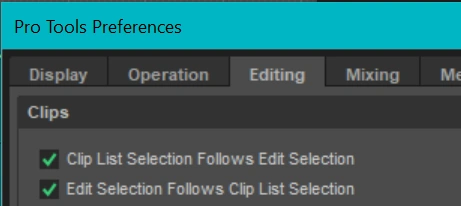
In order for the sequence to work, ensure that the Clip List Selection Follows Edit Selection preference is enabled.
You probably also want the converse preference to be enabled, Edit Selection Follows Clip List Selection.
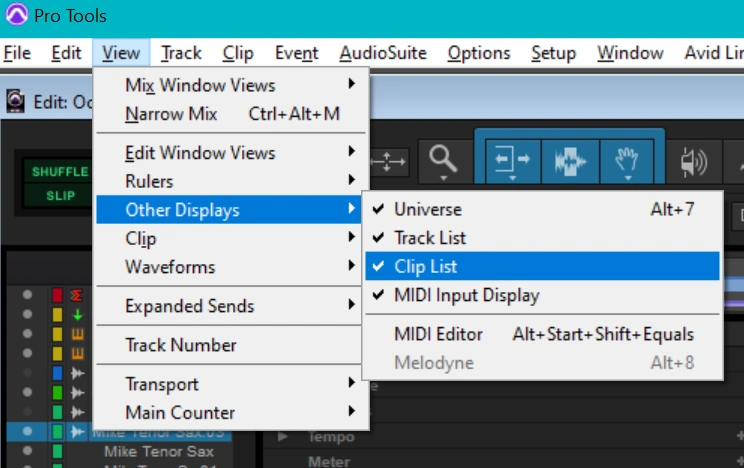
Also ensure that the clip list is visible (View / Other Displays / Clip List).
Now we can pass a clip from Pro Tools to the EZD3 insert.
- Select the clip in the Pro Tools Edit window by clicking on its lower half (you should see a hand icon before clicking).
- The clip should now be selected in the clip list.
-
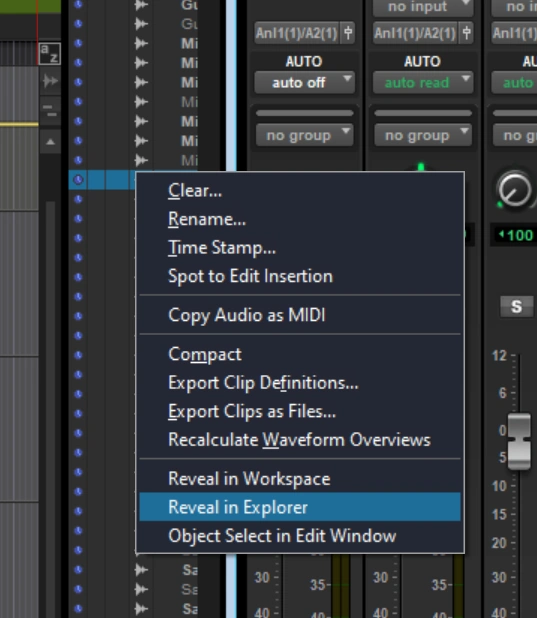 Right-click on the clip.
If using Windows, select Reveal in Explorer, or if using macOS select Reveal in Finder.
Right-click on the clip.
If using Windows, select Reveal in Explorer, or if using macOS select Reveal in Finder.
- On the Pro Tools track that has the EZD3 insert, open EZD3 by clicking on the EZDrummer3 insert.
- Select the Bandmate tab.
-
Drag the clip from Windows Explorer / macOS Finder to the Bandmate drop area.
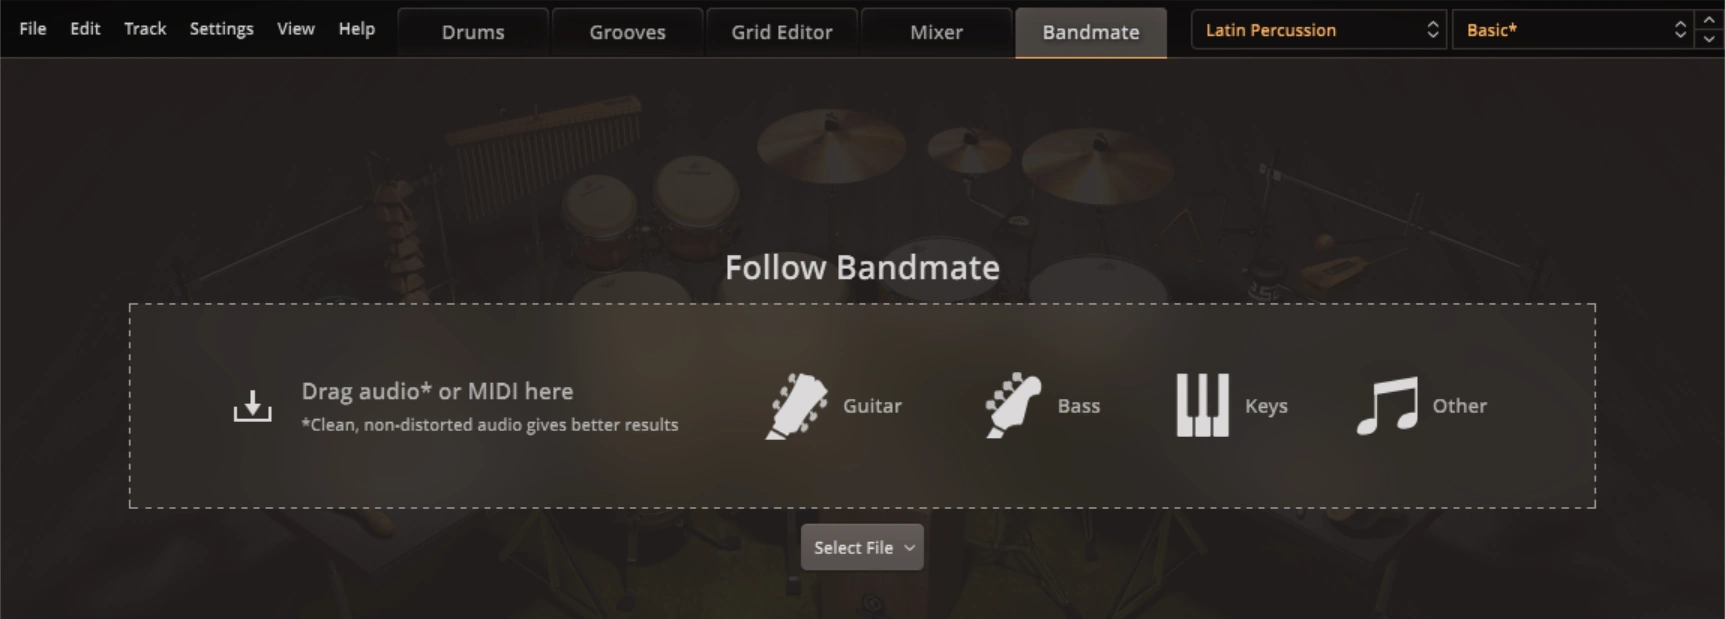
-
Use the preview transport at the top of the Bandmate tab to preview the result so far.
Notice that the result is actually composed of many segments.
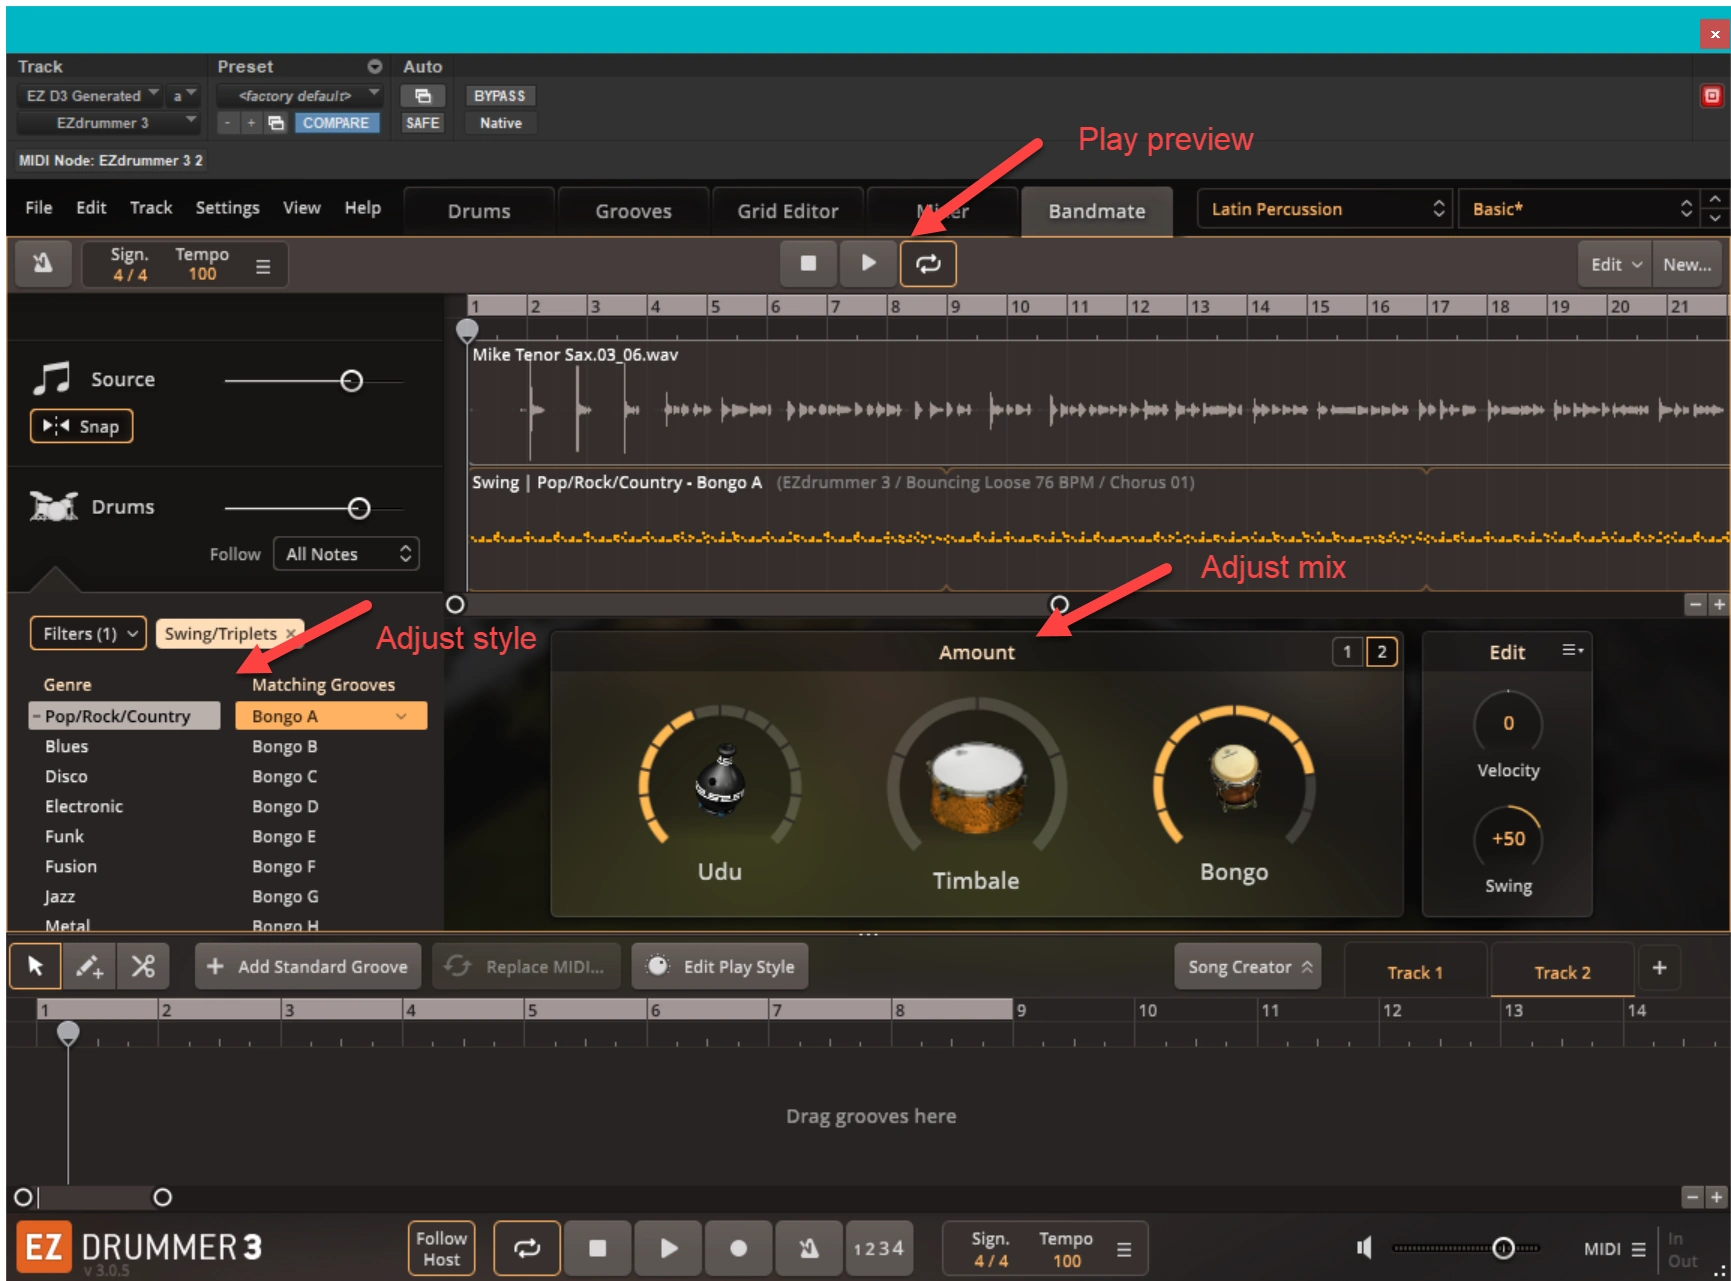
-
Drag the entire preview (all the segments) to the work area at the bottom of the Bandmate window,
as shown in the following video (no audio, sorry).
Using External MIDI Devices
I was pleasantly surprised at how easy it was to have external MIDI devices trigger EZD3’s virtual instruments. This worked equally well when using EZD3 standalone and when using EZD3 when embedded within Pro Tools. I tested with two MIDI instruments: an ancient Roland Handsonic HPD-15, and an Akai Professional MPK Mini MK3 25-key USB MIDI keyboard controller.
The next section discusses using an external MIDI device with EZD3 without Pro Tools (standalone). The section after that discusses using an external MIDI device with EZD3 when it is embedded within Pro Tools. The third section following discusses how to map MIDI notes between the MIDI instrument and EZD3 and how dynamics can be processed.
Standalone EZD3
- Launch EZD3.
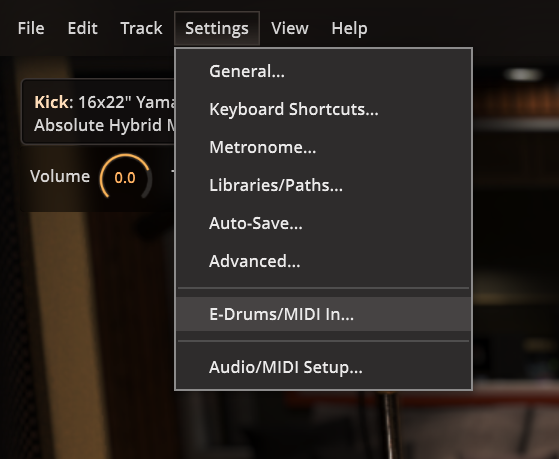
- On the EZD3 top toolbar, select the Settings / E-Drums/MIDI In... menu item. MIDI note mapping and dynamics are described after the next section.
Pro Tools With EZD3
Set the MIDI preferences in Pro Tools for EZD3 as you would for any other virtual instrument.
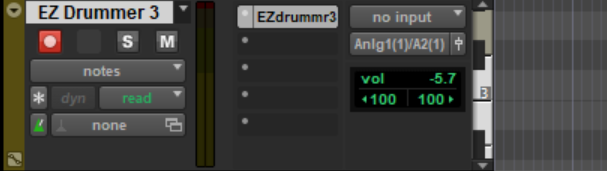
- Create a stereo instrument track for EZD3 as described above.
- No input is required for the track; EZD3 connects directly with the MIDI instrument. The screenshot below demonstrates this.
-
Record arm the new Pro Tools track.
I often forget this step and then wonder why the MIDI device is not producing sound.
- Click on the EZdrummr3 insert in the new Pro Tools track to view the EZD3 window.
MIDI note mapping and dynamics are described next.
MIDI Mapping and Dynamics
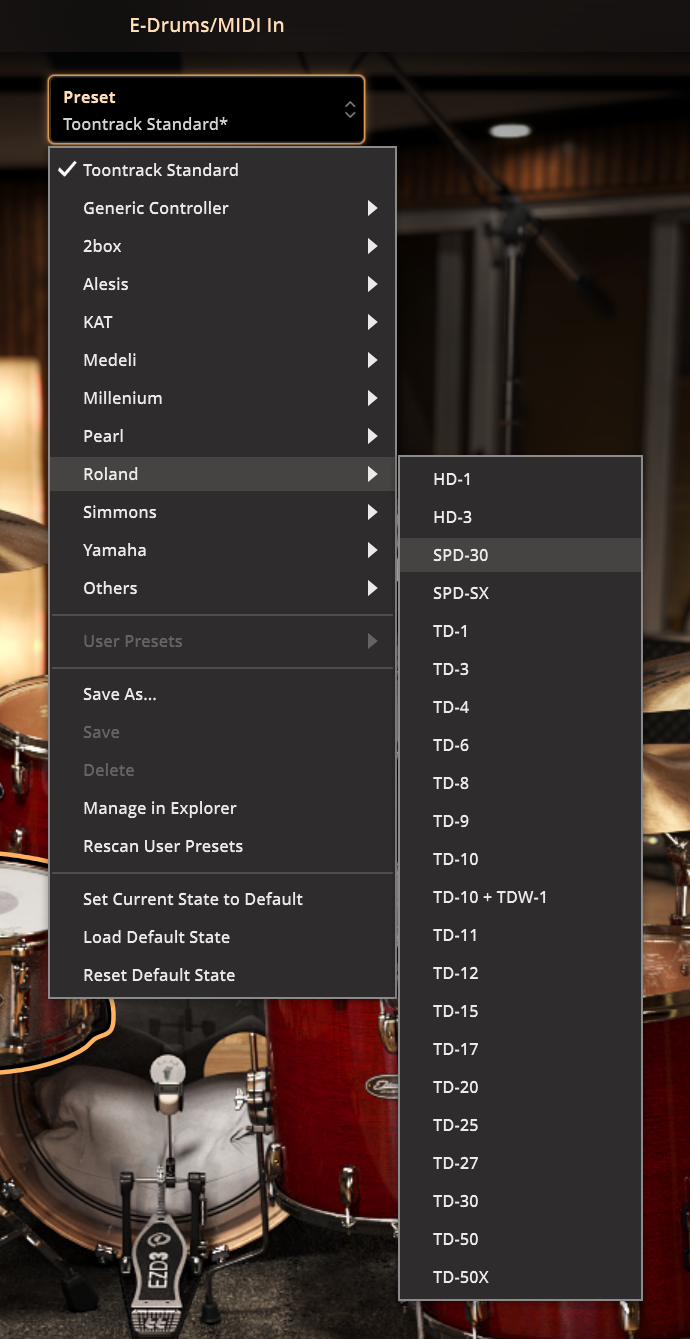
Near the top of the EZD3 window, you will see the Preset, which by default is Toontrack Standard. Select this item, and it will expand. Now you can choose the manufacturer and model of your MIDI device. My ancient Roland HPD-15 worked perfectly when I selected the Roland SPD-30, as shown.
On the EZD3 top toolbar, select the Settings / E-Drums/MIDI In... menu item. The EZD3 Settings / E-Drums/MIDI In... menu item works just the same when embedded in Pro Tools as it does when EZD3 is used standalone.
Two panels open up, as shown:
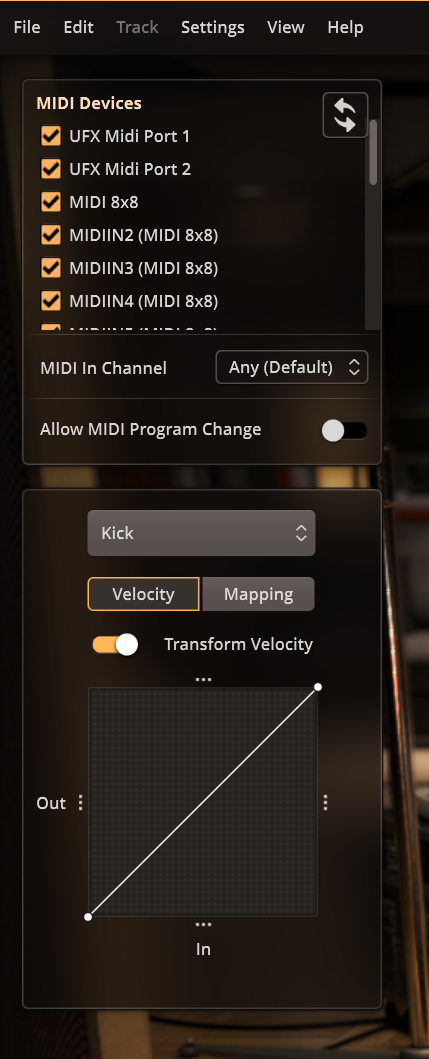
In the upper panel, notice that MIDI In Channel is set to Any (Default). That is good, unless you want to operate other MIDI devices at the same time. Most drums are preset to work on MIDI channel 10, but I previously changed my Roland HPD-15 to transmit on MIDI channel 1.
I would leave Allow MIDI Program Change disabled, unless you have a reason to enable it.
The lower panel responds when you use your MIDI device to generate a signal. This panel reports the EZD3 virtual instrument that is activated, along with a velocity curve. This is helpful when setting up. Notice the small triple dots on all four sides of the graph. Sliding those dots causes the line graph to change.
- Set up a noise gate by dragging the left set of dots upward.
- Set a peak limit by dragging the top set of dots downward.
- Moving the right set of dots makes the line steeper, which causes the MIDI instrument to become more sensitive.
- Moving the left set of dots makes the line steeper, which also causes the MIDI instrument to become more sensitive while maintaining the noise floor.
- Clicking anywhere on the line causes a new point to be created on the line, and dragging that point changes the slope of the connected line segments.
- Right-clicking on a one of the points that you created shows a menu item labeled Remove node.
Saving User Presets
To save user presets:
- Click on Studio Basic at the top right of the EZdrummer 3 window.
- Click User presets / Save As...
- Enter the name.
- Click Save.
Workaround For No Notation Support

EZdrummer 3 has no built-in support for displaying or saving notation from a drum project.
The only export it supports is MIDI–
I saved the EZdrummer 3 drum track for the song I was working on as MIDI, then imported the MIDI file into Guitar Pro.
Guitar Pro can create a notated document from the MIDI file, make the notation look pretty on a page, and save it as a PDF.
Guitar Pro can also play the music annotation, which is helpful when you want to verify that no mistakes were made.
Fancy Timing
I wrote a follow-on article that discusses positive and negative swing, quantization and microtiming.
I have written eighteen articles about Pro Tools. They are somewhat ordered, but largely are meant to be read in any order.
- Pro Tools Overview
- Pro Tools Installation and Preferences
- HUI & MCU
- Pro Tools Keyboards and Hot Keys
- Avid Control, EuControl and EuCon
- Pro Tools Modes and States
- Pro Tools Sessions
- Pro Tools Beats, Bars and Click Tracks
- Pro Tools Operations
- Pro Tools Workspaces and Catalogs
- Pro Tools Sessions
- Pro Tools Editing
- Pro Tools Effects
- Pro Tools Automation
- Pro Tools MIDI
- Pro Tools GrooveCell & Xpand!2
- EZdrummer 3 & Pro Tools
- Pro Tools Issues


