
Published 2023-01-01.
Last modified 2024-12-10.
Time to read: 5 minutes.
av_studio collection.
I have written eighteen articles about Pro Tools. They are somewhat ordered, but largely are meant to be read in any order.
- Pro Tools Overview
- Pro Tools Installation and Preferences
- HUI & MCU
- Pro Tools Keyboards and Hot Keys
- Avid Control, EuControl and EuCon
- Pro Tools Modes and States
- Pro Tools Sessions
- Pro Tools Beats, Bars and Click Tracks
- Pro Tools Operations
- Pro Tools Workspaces and Catalogs
- Pro Tools Sessions
- Pro Tools Editing
- Pro Tools Effects
- Pro Tools Automation
- Pro Tools MIDI
- Pro Tools GrooveCell & Xpand!2
- EZdrummer 3 & Pro Tools
- Pro Tools Issues
These are my notes on Pro Tools’ GrooveCell, PlayCell, Structure Free, SynthCell and Xpand!2.
Creative Collection Plug-ins
The Pro Tools Creative Collection Plug-ins Guide also discusses other standard Pro Tools instrument plugins:
- Boom, a virtual drum machine featuring a broad range of electronic percussion sounds, paired with a simple, drum-machine-style pattern sequencer.
- DB-33, a virtual organ plug-in that recreates the sounds and controllability of classic tonewheel organs and rotary-speaker cabinets.
- Mini Grand, a simple virtual piano instrument with seven different acoustic pianos.
- Vacuum, a virtual analog monophonic synthesizer plug-in.
- Effects include: Chorus, Distortion, Dynamic Delay, Enhancer, Ensemble, Filter Gate, Flanger, Frequency Shifter, Fuzz-Wah, Kill EQ, Lo-Fi, Multi Chorus, Multi-Tap Delay, Non-Linear Reverb, Phaser, Reverb, Spring Reverb, Stereo Width, Talkbox, and Vintage Filter.
GrooveCell
Pro Tools GrooveCell is a step-sequencer-style drum machine. There is sampling potential in GrooveCell, but it has no facility for creating pitched sampled instruments.
GrooveCell is useful when used within an Edit/Mix Group.
See the GrooveCell Plug-in Guide for more information.
Adding GrooveCell to a Track
The Pro Tools documentation does not mention how to add a GrooveCell track to a project.
-
Create a new track by selecting Track / New Track
(CTRL-Shift-N).
Do not select MIDI Track or Instrument Track.
Instead, notice that the bottom choice is Track Presets.
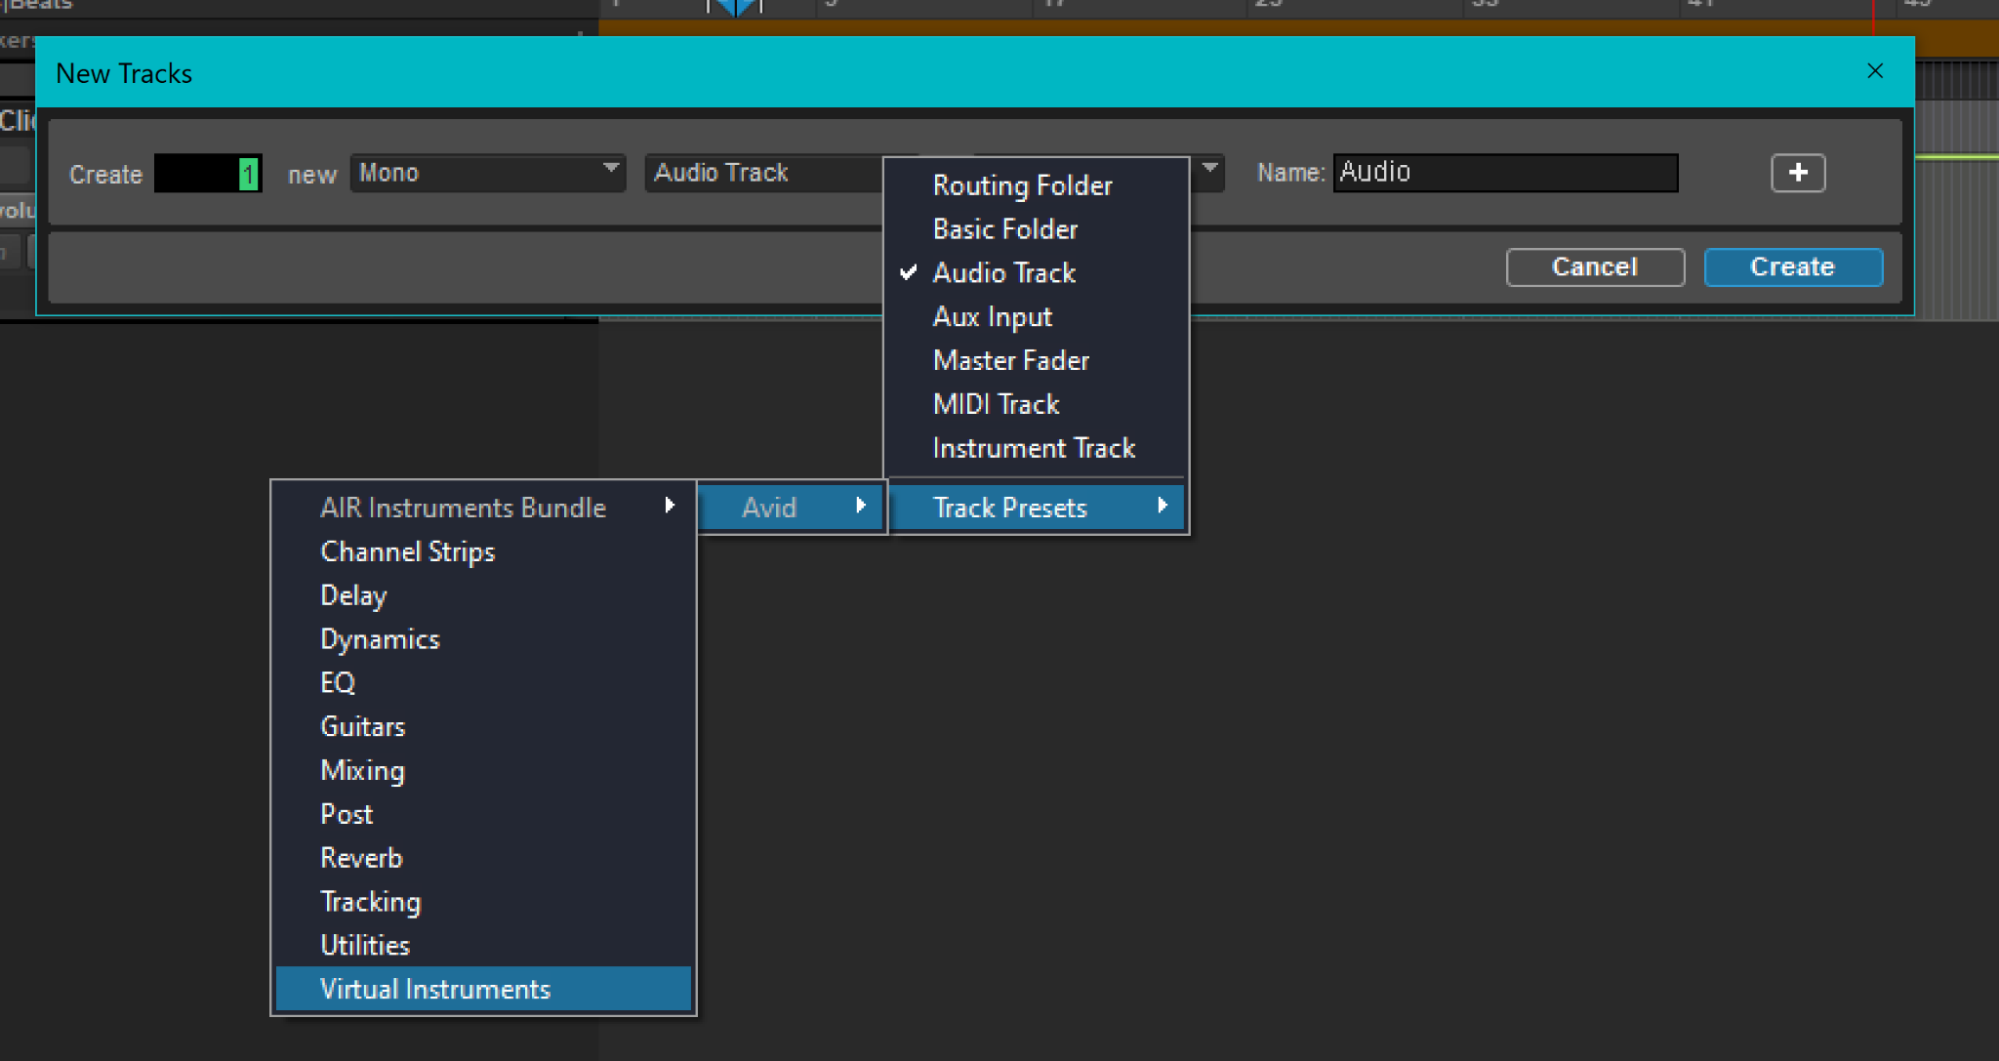
-
Select Track Presets / Avid / Virtual Instruments.
From the next pull-down, which is currently displaying 808 Bass, select GrooveCell.
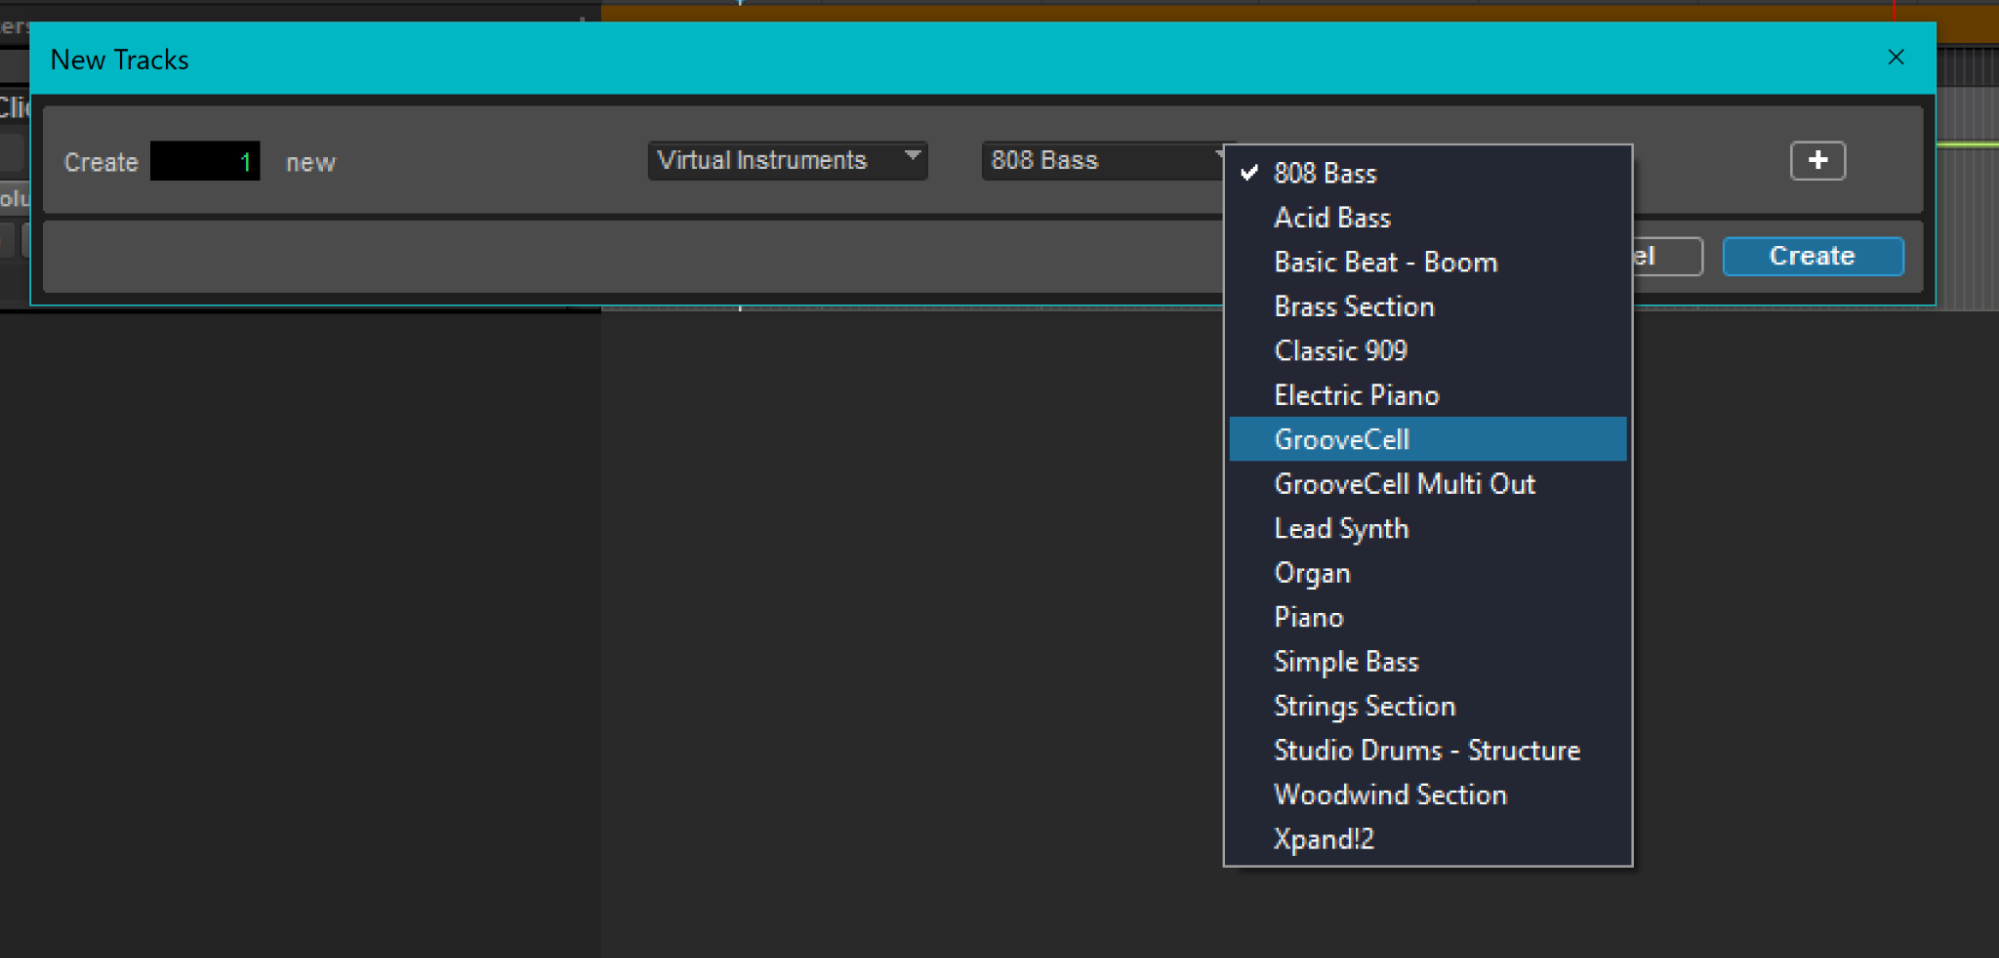
-
Click Create.

Interesting Presets
Preset / Flatpack Kits / Classic 5
External MIDI Controller
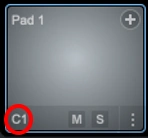 The MIDI note used to perform the pad’s sample can be changed at the bottom left [of each pad].
PlayCell
PlayCell is a sample-based instrument, somewhat similar to Xpand!2, but it is not a sampler like Structure Free, so PlayCell cannot create sounds from custom samples.
PlayCell can can load other instruments, like Kontakt Player, instead of having a fixed palette of instruments like Xpand!2.
Although PlayCell has lots of instruments, it does not provide a way to walk through them all easily, like Xpand!2 does. Instead, several mouse clicks are required to navigate the menu, which is awkward and slow.
My Pro Tools Artist subscription included PlayCell Sessions, but that seems oriented towards video, which is not supported by Artist. One more mystery.
Once loaded, each PlayCell instrument provides multiple presets. All parameters can be mapped to MIDI CCs, as described on page 12 of the Pro Tools PlayCell Plug-in Guide.
Optional Scale Controls
The optional scale controls offer major and minor scales in all keys. Note that flats are presented as sharps (A# instead of Bb, for example). Scale has the following modes of operation:
- No Scale disables the scale feature. Although the modes shown below still appear to be active, they have no affect when this option is chosen.
- View Only greys out the notes that are not in the selected key on the keyboard at the bottom of the UI.
- Mute doesn’t allow notes outside the scale to play.
- Quantize substitutes notes outside the scale for a note that is in the scale.
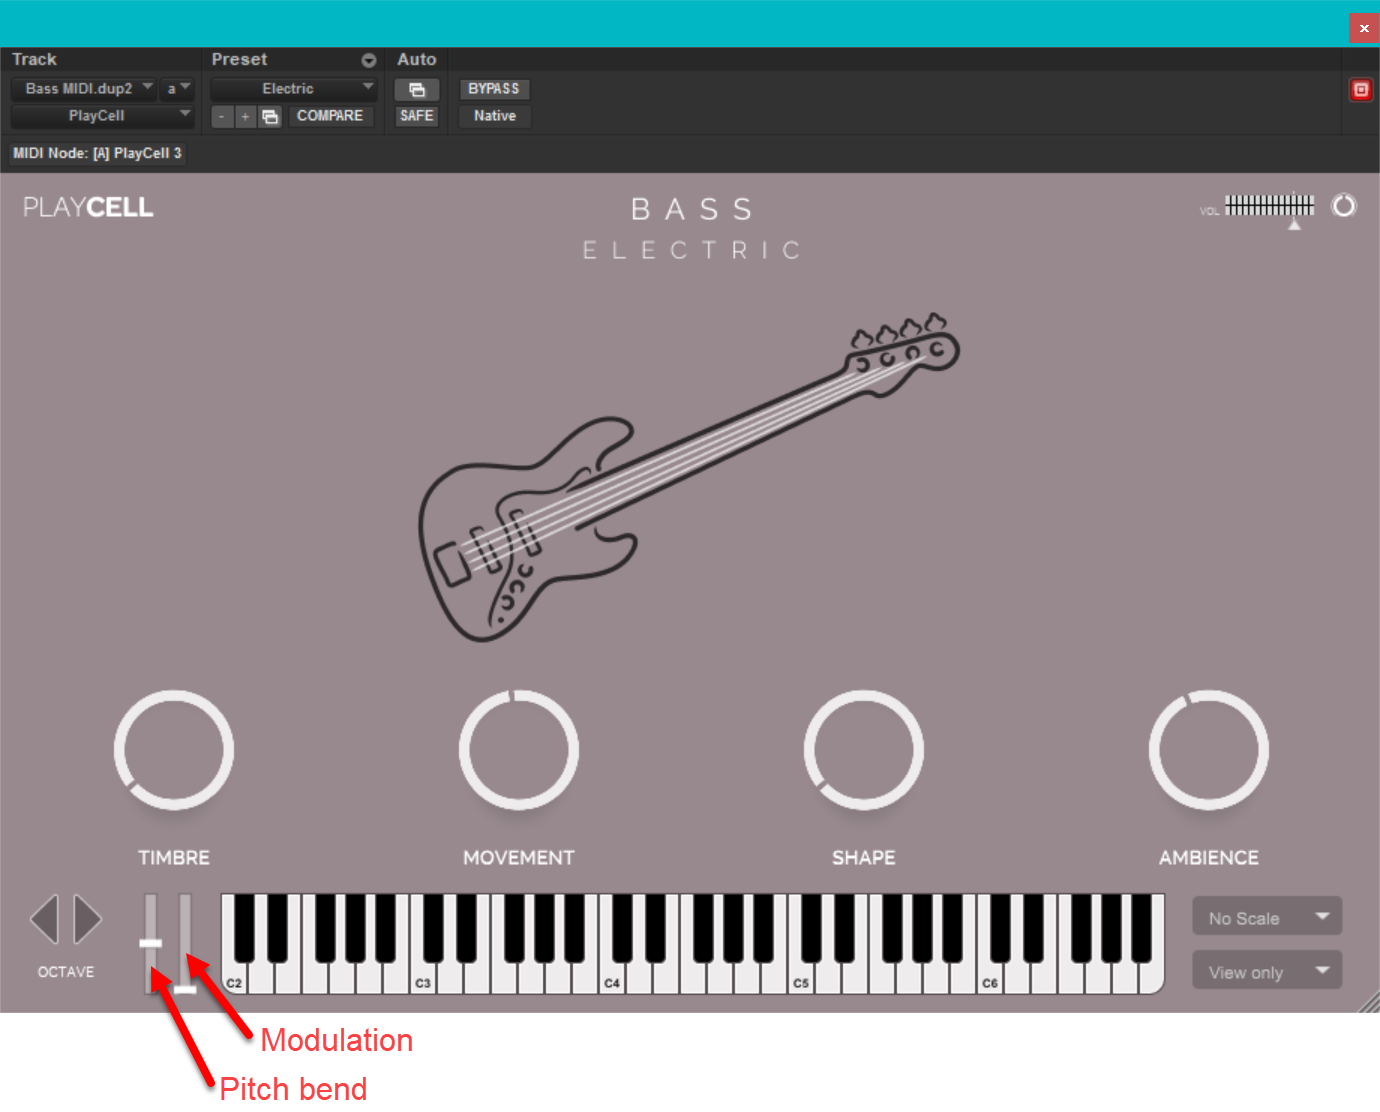
Undocumented Controls
Two controls are not identified in the PlayCell Plug-in Guide: pitch bend and modulation. The following image shows them. I found that the pitch bend and modulation wheels of my Launchkey 49 were automagically mapped to these controls.
References
Installation Problem
Sometimes when Pro Tools opens a project that uses PlayCell, the following warning appears:
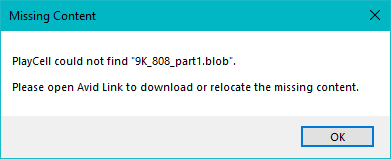
I have no solution. I wonder if the following are related to the problem.
-
The only
.blobfiles on my computer (other than Git-related blobs) reside in%PROGRAMFILES%/. The onlyAvid/ Pro Tools/ System Plug-Ins/ Pro Tools Sketch.aaxplugin/ Contents/ Resources/ Content/ Plugins/ PlayCell/ Kits/ .blobfiles in that directory with808in their name areS_Hyper808_Kit_part1.blobandS_Hyper808_Kit_part2.blob. -
My PlayCell Palette Series folder (with subfolders containing
.tfxfiles) is%HOMEPATH%\. However,Documents\ Pro Tools\ Plug-In Settings\ PlayCell\ C:\Documents\Pro Tools\Plug-In Settings\also has subfolders calledGrooveCell,PlayCellandSynthCell, and they are all empty.
Structure Free
Structure Free is a sample player designed and optimized for Pro Tools, from the Advanced Instrument Research (A.I.R.) group. This product is a free download for all Pro Tools users, no authorization required.
The official documentation for Structure Free is provided in chapter 7 (starting on page 35) of the Pro Tools Creative Collection Plug-ins Guide.
SynthCell
SynthCell is an analog-style subtractive synthesizer plug-in. It features two oscillators, two multi-mode filters, an LFO, envelopes, an arpeggiator, and a variety of effects.
- SynthCell | Virtual Instrument For Pro Tools
- SynthCell Industries.
Xpand!2
Xpand!2 works well on an instrument track. Up to four voices are supported. See the Xpand!2 User Guide and chapter 9 (starting on page 55) of the Pro Tools Creative Collection Plug-ins Guide.
This section shows how to make a MIDI percussion track using Xpand!2, but the process is the same for other types of instruments with Xpand!2.
Step-by-step
-
Make a new stereo instrument track (CTRL-Shift-N);
this track will accept MIDI input data and output an audio signal.
I called this track Beats.

-
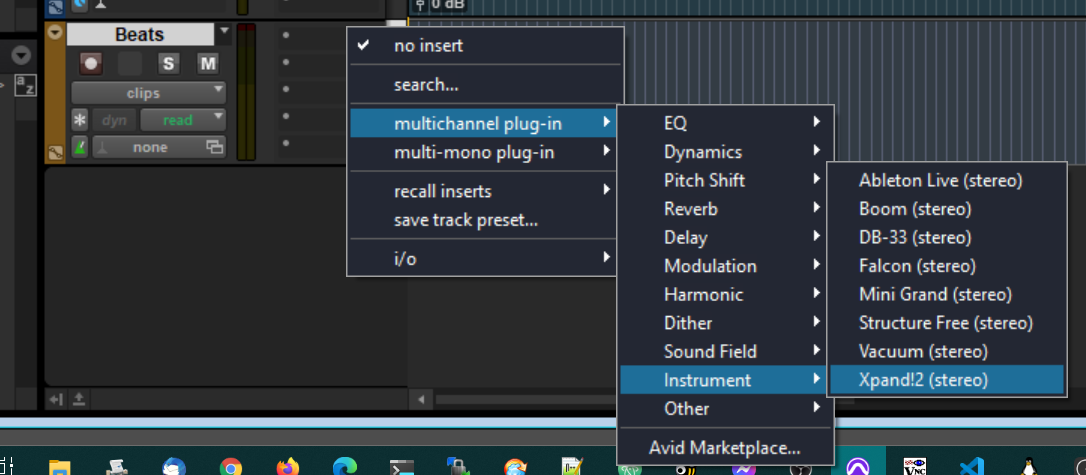
Click on an empty insert slot for the new track, select multichannel plug-in / Instrument / Xpand!2 (stereo).
-
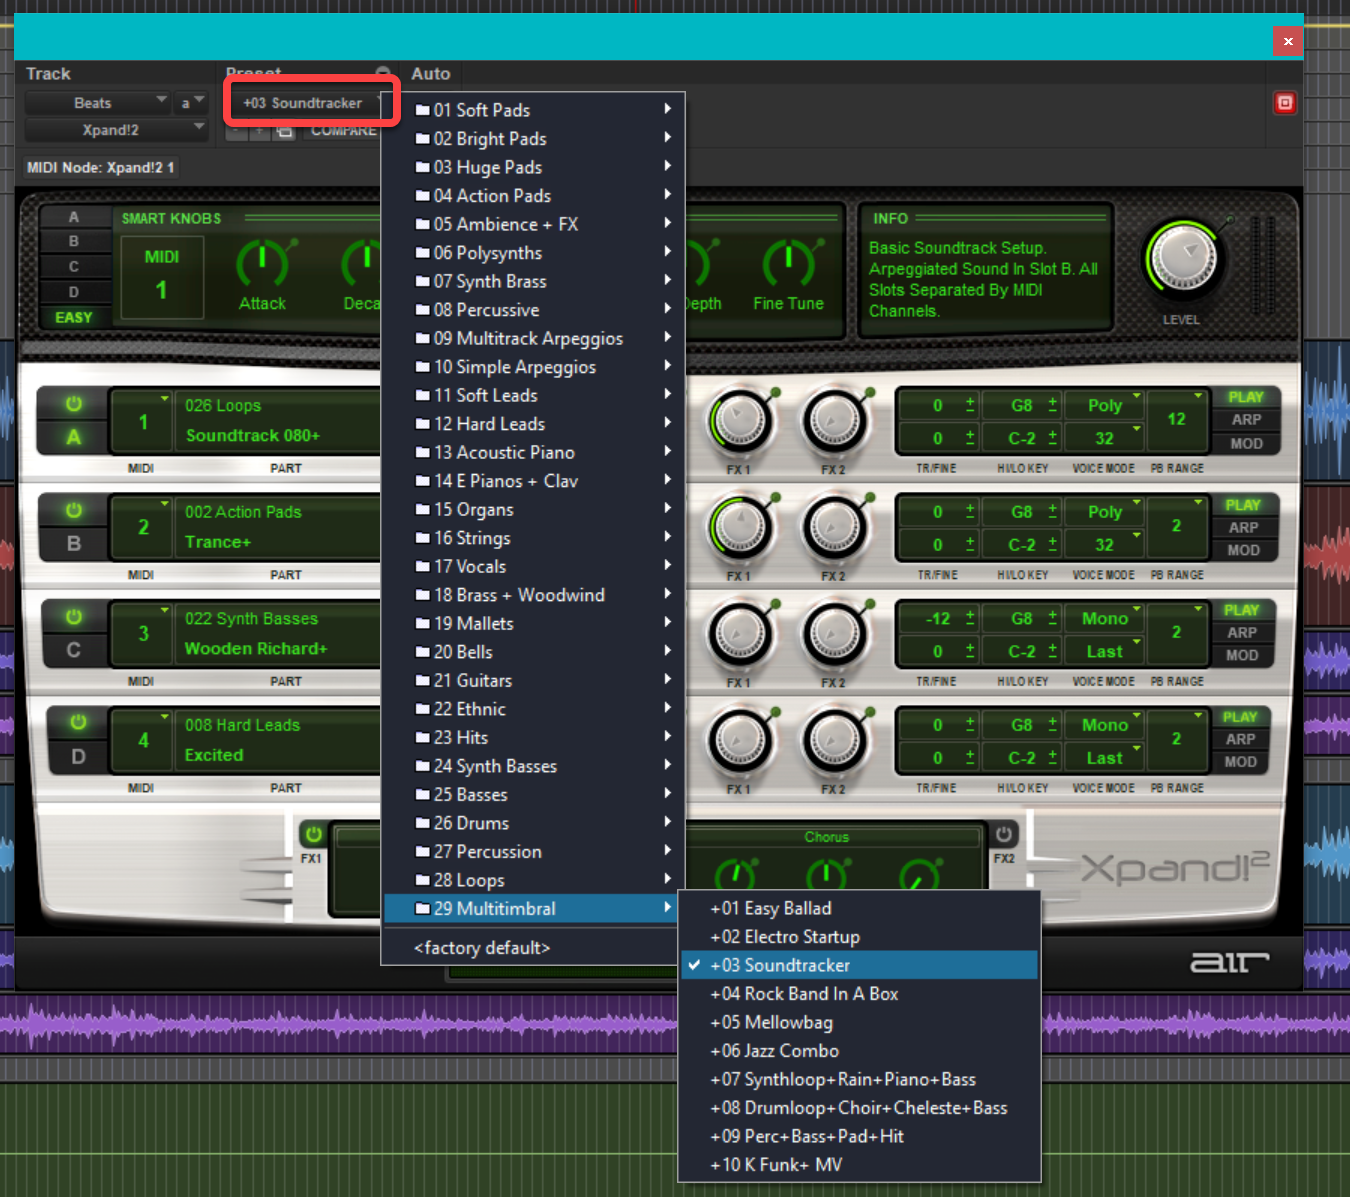
From the Preset pull-down menu at the top of the Expand!2 dialog, select 29 Multitimbral / 03 Soundtracker:
-
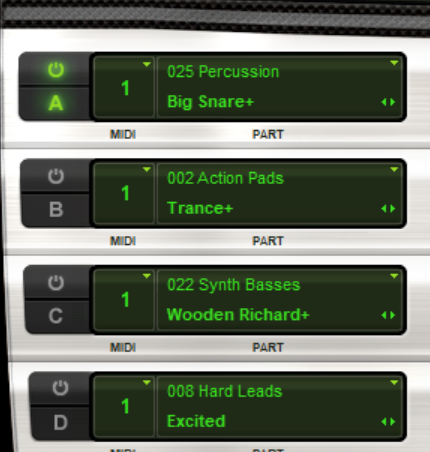
Turn off Xpand!2 instruments B, C and D.
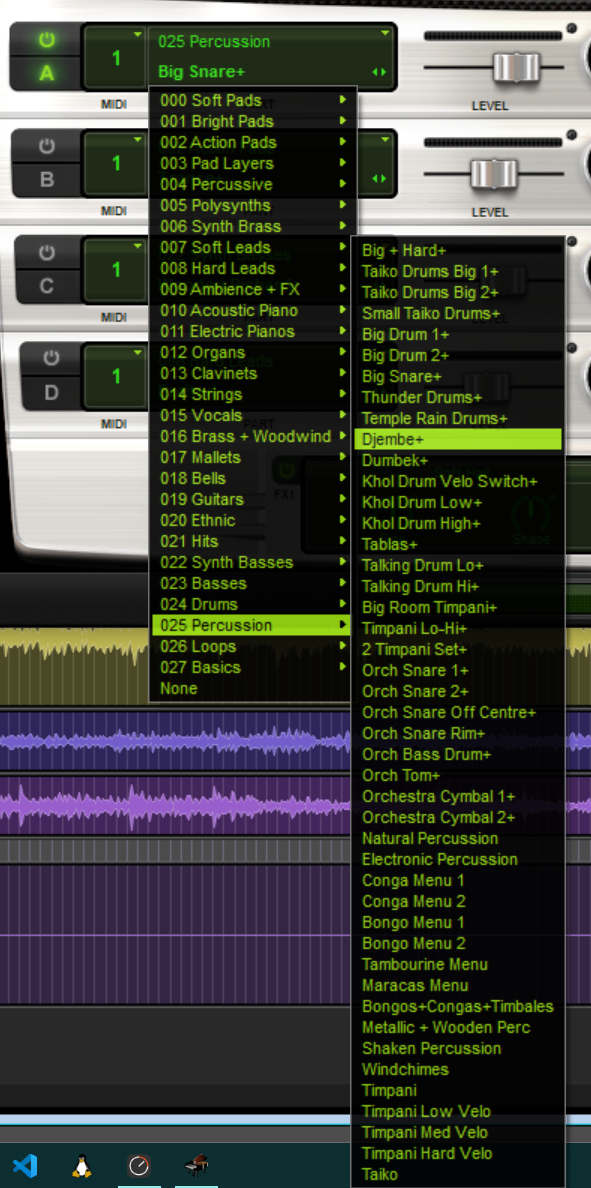
-
Click on the displayed instrument for channel A and select 025 Percussion / Djembe+
-
Make a new MIDI track (CTRL-Shift-N)
By default, MIDI tracks accept input from all MIDI sources. This means all MIDI devices transmitting on any channel should be ‘heard’ by this MIDI track.
-
Assign the new MIDI track’s output to channel 1 of the instrument track that has Xpand!2 loaded.
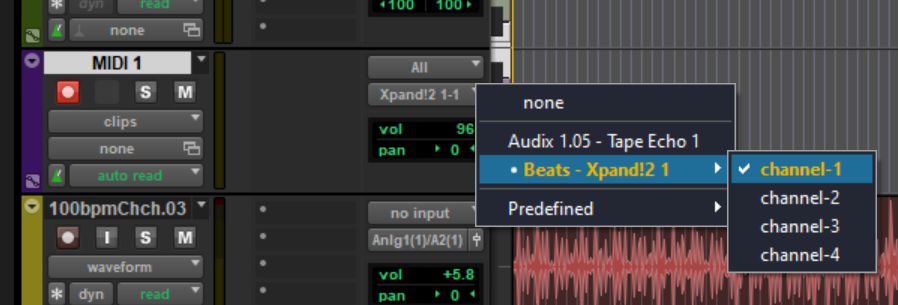
-
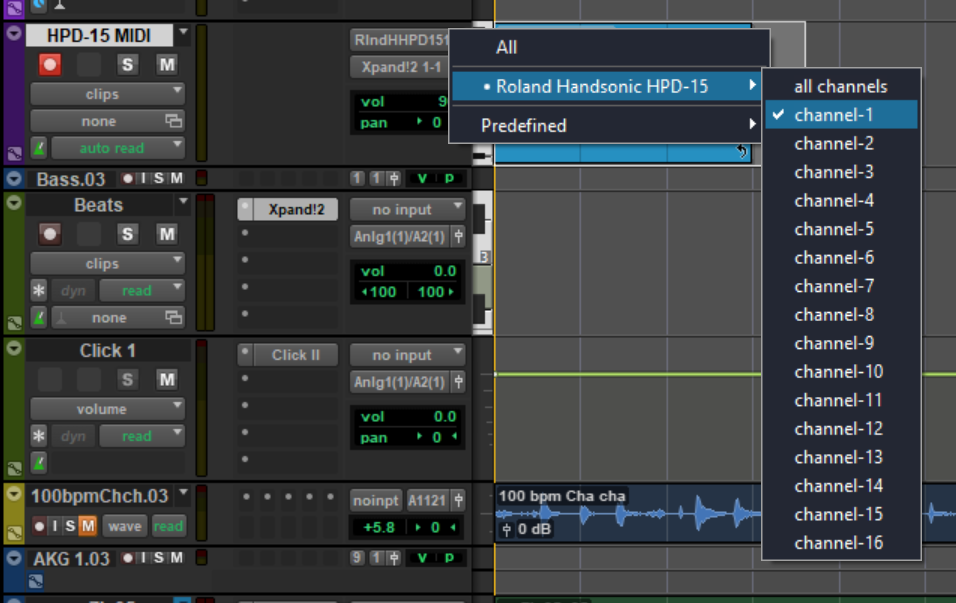
Once an input device works, you can assign the new MIDI track input to a specific hardware or software device,
so other MIDI inputs do not accidentally get routed to this track.
The following setting causes the VMPK to work, and disables all other MIDI devices,
such as the Roland HPD-15.
The following setting disables the VMPK and enables the Roland HPD-15 because the drum pad is connected to the MIDIPLUS 8x8 input 1: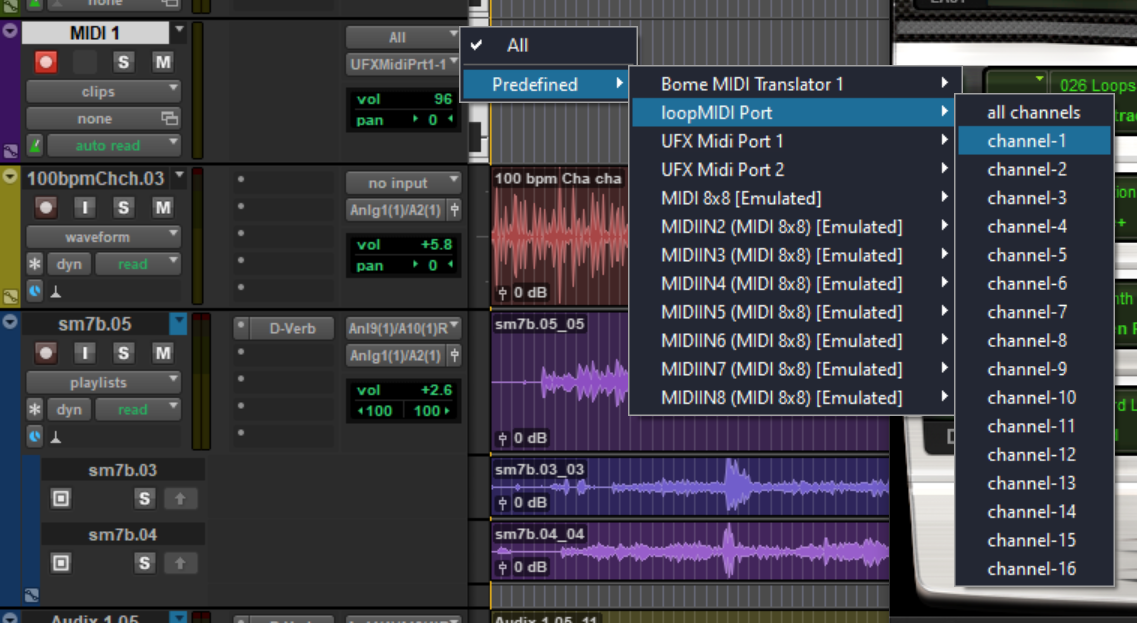
If Pro Tool MIDI devices were defined, they would appear before the predefined choices: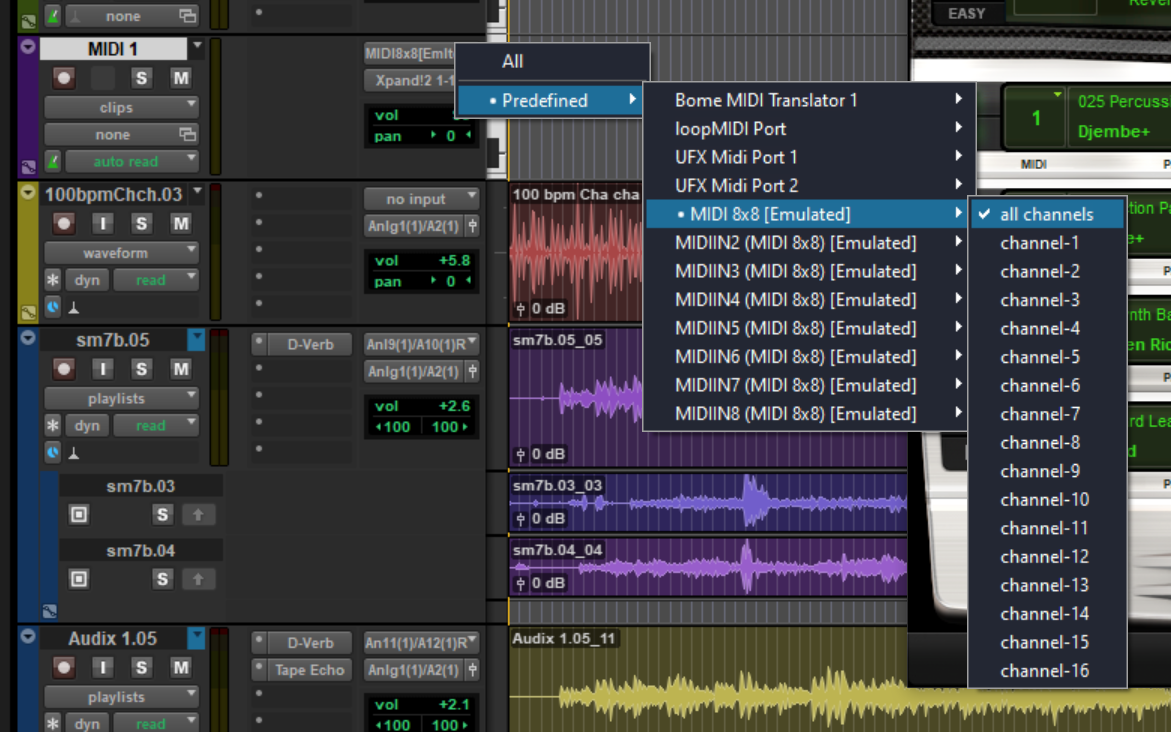
-
Assign the new MIDI track’s output to channel 1 of the instrument track that has Xpand!2 loaded.
Videos
I have written eighteen articles about Pro Tools. They are somewhat ordered, but largely are meant to be read in any order.
- Pro Tools Overview
- Pro Tools Installation and Preferences
- HUI & MCU
- Pro Tools Keyboards and Hot Keys
- Avid Control, EuControl and EuCon
- Pro Tools Modes and States
- Pro Tools Sessions
- Pro Tools Beats, Bars and Click Tracks
- Pro Tools Operations
- Pro Tools Workspaces and Catalogs
- Pro Tools Sessions
- Pro Tools Editing
- Pro Tools Effects
- Pro Tools Automation
- Pro Tools MIDI
- Pro Tools GrooveCell & Xpand!2
- EZdrummer 3 & Pro Tools
- Pro Tools Issues
-
Make a new stereo instrument track (CTRL-Shift-N);
this track will accept MIDI input data and output an audio signal.
I called this track Beats.


