Published 2022-02-13.
Last modified 2022-02-22.
Time to read: 4 minutes.
jekyll collection.
This article is the first in a three-part series,
and describes how to install and use the
jekyll_bootstrap5_tabs plugin,
demonstrated in the above video, in a Jekyll website.
The second article
describes in detail how the Jekyll plugin was constructed and published as an open-source Ruby gem.
The Debugging Jekyll Plugins with an IDE
demonstrates how to set breakpoints in the Jekyll plugin using Visual Studio Code and examine data structures.
The jekyll_bootstrap5_tabs Ruby gem
(which I will call “the Jekyll plugin” for this series of articles)
provides a convenient way of creating tabbed sections in websites generated by Jekyll 4,
which use Bootstrap 5 for the user interface.
Gems are actually uncompressed Unix tar files.
Live Example
Try it yourself now! Below is a small but complete Bootstrap 5 web page, included as an
iframe.
The Jekyll plugin was installed for this website (mslinn.com).
Here is the result of including the Jekyll plugin in the website;
you can click on the tabs right now to see how Bootstrap 5 tabs work:
Stylesheet
Bootstrap 5.1.3 does not provide good styling for tabs, so you have to obtain or create CSS to improve the Bootstrap tabs’ appearance. Below is the CSS I used to style the above tabs:
:root {
  --mslinn-tab-color: #ccc;
  --mslinn-tab-hover-color: #eee;
  --mslinn-tab-active-color: white;
  --mslinn-tab-background-color: #9A8872;
  --mslinn-tab-background-active-color: rgba(216, 162, 1, 0.28);
  --mslinn-background-color: #edd9ad;
}

@media screen {
  .nav .nav-tabs {
    padding-left: 0;
  }

  li.nav-item {
    margin-bottom: 0;
    text-indent: 0;
    margin-left: 0;
    margin-right: 1px;
  }

  .nav-tabs .nav-link,
  .nav-tabs > li {
    border-top-left-radius: .45rem;
    border-top-right-radius: .45rem;
    font-weight: bold;
  }

  .nav-tabs a {
    text-decoration: none;
  }

  .nav-tabs > li {
    background-color: var(--mslinn-tab-background-color);
  }

  .nav-tabs > li > a {
    color: var(--mslinn-tab-color);
  }

  .pill-content > .pill-pane,
  .tab-content > .tab-pane {
    background-color: var(--mslinn-background-color);
  }

  .tab-pane {
    padding: 1em;
    margin-bottom: 1em;
  }

  #demo .tab-pane {
    height: 275px;
  }

  .tab-pane > *:last-child {
    margin-bottom: 0;
  }

  .tab-pane > *:last-child {
    margin-bottom: 0;
  }

  .tab-content > .tab-pane,
  .pill-content > .pill-pane {
    background-color: var(--mslinn-background-color);
  }

  .nav-tabs .nav-link.active {
    color: var(--mslinn-tab-active-color);
    background: var(--mslinn-tab-background-active-color);
  }

  .nav-tabs > li > a:hover,
  .nav-tabs > li > a:focus {
    color: var(--mslinn-tab-hover-color);
  }

  .nav-tabs > .active > a,
  .nav-tabs > .active > a:hover,
  .nav-tabs > .active > a:focus {
    background-color: var(--mslinn-tab-background-color);
    color: var(--mslinn-tab-color);
  }
}

@media print {
  .nav-tabs {
    display: none;
  }
}
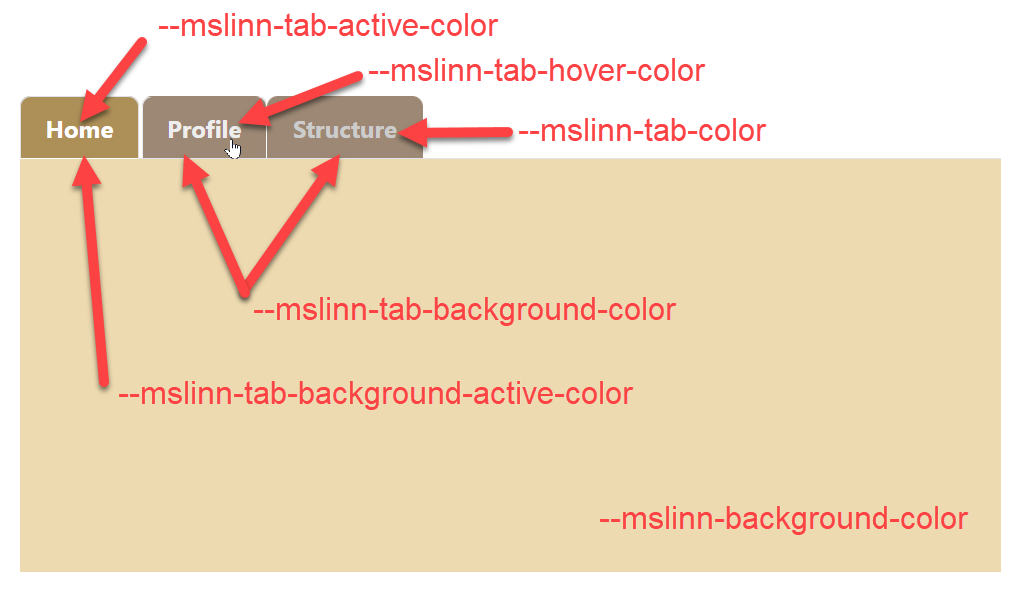
Several CSS variables
are used in the CSS to make it easy for people to customize the stylesheet colors.
If you want different colors for your website, just modify the values of the variables.
They are defined in the :root section of the CSS file and
have names that start with --mslinn.
The following image shows where the CSS variables are applied:
HTML5 Source
Below is the HTML source for the page that I hope you clicked on above, enhanced with Jekyll front matter, which causes Jekyll to preprocess the Liquid markup that follows, that was rendered above as the working example:
---
---
<html>
<head>
{% assign nowMillis = site.time | date: '%s' %}
<link href="https://cdn.jsdelivr.net/npm/bootstrap@5.1.3/dist/css/bootstrap.min.css" rel="stylesheet"
integrity="sha384-1BmE4kWBq78iYhFldvKuhfTAU6auU8tT94WrHftjDbrCEXSU1oBoqyl2QvZ6jIW3" crossorigin="anonymous">
<link href="{{ '/blog/jekyll/bootstrap5_tabs.css?v=' | append: nowMillis }}" rel="stylesheet">
</head>
<body style="margin: 1em;" id="demo">
<h2>Bootstrap 5 Tab Demo</h2>
{% tabs test pretty %}
{% tab test#Home %}
<p style="float: left; vertical-align: middle;">
We shall not cease from exploration<br>
And the end of all our exploring<br>
Will be to arrive where we started<br>
And know the place for the first time.<br>
– T. S. Elliot
</p>
<div style="float: right;"><a href="https://en.wikipedia.org/wiki/File:Go-home-2.svg" target="_blank" rel="nofollow">
<img src="https://upload.wikimedia.org/wikipedia/commons/4/47/Go-home-2.svg" style="width: 200px; height: auto;">
</a></div>
{% endtab %}
{% tab test#Profile %}
<p style="float: left; vertical-align: middle;">I am he as you are he as you are me<br>
And we are all together<br>
See how they run like pigs from a gun<br>
See how they fly<br>
I'm crying
<br> – John Lennon</p>
<div style="float: right; vertical-align: middle;"><a href="https://en.wikipedia.org/wiki/File:Circle-icons-profile.svg" target="_blank" rel="nofollow">
<img src="/blog/jekyll/John_Lennon.webp" style="width: auto; height: 200px;"></a>
</div>
{% endtab %}
{% tab test#Structure %}
<h2>Jekyll Tab Tags Outline</h2>
<pre style="background-color: rgb(211, 211, 211, .4); color: darkgreen; padding: 1em;">
{% raw %}{% tabs demo %}
{% tab demo#First %}
Content of first tab.
{% endtab %}
{% tab demo#Second %}
Content of first tab.
{% endtab %}
{% endtabs %}{% endraw %}</pre>
{% endtab %}
{% endtabs %}
<script defer src="https://cdn.jsdelivr.net/npm/bootstrap@5.1.3/dist/js/bootstrap.bundle.min.js"></script>
</body>
Installation
Installing Jekyll
I assume that you already have a Jekyll 4 website set up. If not, here are the instructions.
You might prefer to set up a proper Ruby development environment instead of opting for the minimum, and then trying to expand its capabilities later. If you would like more background on setting up a Ruby development environment, please work through my article Setting Up a Ruby Development Environment before installing Jekyll.
Installing the Plugin
To install the jekyll_bootstrap5_tabs plugin,
first add this line to the Jekyll project's gemfile:
gem 'jekyll_bootstrap5_tabs'
Here is the Gemfile for mslinn.com:
source 'https://rubygems.org'

ruby '>= 3.1.0'

gem 'aws-sdk-cloudfront'
gem 'aws-sdk-s3'
gem 'colorator'
gem 'confidential_info_redactor'
gem 'faraday-retry'
gem 'jekyll', '>= 4.4.1'
gem 'ptools'
gem 'puma'
gem 'rqrcode'
gem 'rugged'
gem 'slugify'
gem 'talk_like_a_pirate'

# Typechecking
gem 'typeprof'
gem 'steep'
gem 'rbs'

# classifier-reborn dependencies for Ubuntu:
# apt install libgsl-dev
# gem 'gsl', git: 'https://github.com/SciRuby/rb-gsl'
# gem 'narray'
# gem 'nmatrix' # Installing this can be problematic, very old code

@my_plugins = ENV.fetch('my_plugins', nil)

def clone(git_project_name)
  target = "#{@my_plugins}/#{git_project_name}"
  `git clone #{git_project_name} #{target}`
  target
end

def gimme(git_project_name)
  ENV.fetch(git_project_name, nil) || clone(git_project_name)
end

# jekyll_eval_filter      = gimme 'jekyll_eval_filter'
# jekyll_flexible_include = gimme 'jekyll_flexible_include_plugin'
# jekyll_href             = gimme 'jekyll_href'
jekyll_kramdown           = gimme 'jekyll_kramdown'
# jekyll_outline          = gimme 'jekyll_outline'
# jekyll_plugin_support   = gimme 'jekyll_plugin_support'
# jekyll_todo             = gimme 'jekyll_todo'

# Does not work yet, so not used yet
def local_gem(name, version = nil, path:nil)
  cmd = %w[name]
  cmd << version if version
  cmd << "path='#{path}'" if path
  'gem ' + cmd.join(', ')
end

group :jekyll_plugins do
  gem 'jekyll_plugin_logger', path: ENV['jekyll_plugin_logger']
  gem 'html-proofer'
  gem 'jekyll_archive_create'
  gem 'jekyll_archive_display'
  gem 'jekyll-assets', git: 'https://github.com/circleci/jekyll-assets'
  gem 'jekyll_badge', '>= 0.1.1'
  gem 'jekyll_basename_dirname', '>= 1.0.4'
  gem 'jekyll_begin_end'
  gem 'jekyll_bootstrap5_tabs', '>= 1.1.0'
  gem 'jekyll_context_inspector'
  gem 'jekyll-docs'
  gem 'jekyll_download_link'
  gem 'jekyll_draft', '>= 3.0.0'
  gem 'jekyll_emoji_tag'
  gem 'jekyll_eval_filter'#, path: jekyll_eval_filter
  gem 'jekyll-environment-variables'
  gem 'jekyll-feed' # if ENV['JEKYLL_ENV'] == 'production'
  gem 'jekyll_flexible_include', '>= 2.0.20'#, path: jekyll_flexible_include
  gem 'jekyll_from_to_until', '>= 1.0.3'
  gem 'jekyll-gist'
  gem 'jekyll_google_translate'
  gem 'jekyll_href', '>= 3.0.1'#, path: jekyll_href
  gem 'jekyll_img', '>= 0.2.6'
  gem 'jekyll_kramdown', path: jekyll_kramdown
  gem 'jekyll_nth'
  gem 'jekyll_outline', '>=1.3.0'#, path: jekyll_outline
  gem 'jekyll_plugin_support', '>= 3.1.5'#, path: jekyll_plugin_support
  gem 'jekyll_plugin_template', '>= 0.3.1'
  gem 'jekyll_pre', '>= 3.0.1'
  gem 'jekyll_quote'
  gem 'jekyll_random_hex'
  gem 'jekyll_reading_time', '>= 1.0.0'
  gem 'jekyll-redirect-from'
  gem 'jekyll_run'
  gem 'jekyll_video'
  gem 'jekyll-seo-tag'
  gem 'jekyll-sass-converter', '=2.2.0'
  gem 'jekyll-sitemap'
  gem 'jekyll-sort'
  gem 'jekyll_sort_natural'
  gem 'jekyll-tagging'
  gem 'jekyll_time_since', '>= 0.1.3'
  gem 'jekyll_todo'#, path: jekyll_todo
  gem 'jekyll-youtube'
  gem 'kramdown'
end

group :test, :development do
  gem 'debug', '>= 1.0.0', require: false
  gem 'pry', '>= 0.14.2'
  gem 'rake', require: false
  gem 'rspec', require: false
  gem 'rubocop', require: false
  gem 'rubocop-jekyll', '>= 0.13.0', require: false
  gem 'rubocop-md', require: false
  gem 'rubocop-performance', require: false
  gem 'rubocop-rake', require: false
  gem 'rubocop-rspec', require: false
end
Now run bundle install to install the new plugin:
$ bundle install
Using public_suffix 4.0.6
Using concurrent-ruby 1.1.9
Using bundler 2.3.5
Using fast-stemmer 1.0.2
Using colorator 1.1.0
Using http_parser.rb 0.8.0
Using eventmachine 1.2.7
Using backports 3.23.0
Using ffi 1.14.2
Using faraday-em_http 1.0.0
Using faraday-em_synchrony 1.0.0
Using faraday-excon 1.1.0
Using faraday-httpclient 1.0.1
Using multipart-article 2.1.1
Using faraday-net_http 1.0.1
Using faraday-net_http_persistent 1.2.0
Using faraday-patron 1.0.0
Using faraday-rack 1.0.0
Using faraday-retry 1.0.3
Using rainbow 3.1.1
Using forwardable-extended 2.6.0
Using rexml 3.2.5
Using mercenary 0.4.0
Using racc 1.6.0
Using parallel 1.21.0
Using ruby2_keywords 0.0.5
Using yell 2.2.2
Using hike 1.2.3
Using tilt 1.4.1
Using liquid 4.0.3
Using rouge 3.28.0
Using safe_yaml 1.0.5
Using unicode-display_width 1.8.0
Using rack 1.6.13
Using ptools 1.4.2
Using multi_json 1.15.0
Using mini_magick 4.11.0
Using jekyll-docs 2.5.3
Using nuggets 1.6.0
Using temple 0.8.2
Using rb-fsevent 0.11.1
Using sassc 2.4.0
Using rubyzip 2.3.2
Using addressable 2.8.0
Using i18n 1.10.0 (was 1.9.1)
Using classifier-reborn 2.2.0
Using em-websocket 0.5.3
Using ethon 0.12.0
Using ruby-filemagic 0.7.3
Using rb-inotify 0.10.1
Using faraday-multipart 1.0.3
Using pathutil 0.16.2
Using kramdown 2.3.1
Using nokogiri 1.13.1 (x86_64-linux)
Using terminal-table 2.0.0
Using rack-protection 1.5.5
Using rack-test 1.1.0
Using sprockets 2.12.5
Using jekyll-tagging 1.1.0
Using slim 3.0.9
Using jekyll-sass-converter 2.1.0
Using fastimage 1.8.1
Using typhoeus 1.4.0
Using listen 3.7.1
Using sass-listen 4.0.0
Using faraday 1.9.3
Using kramdown-parser-gfm 1.1.0
Using nokogumbo 2.0.3
Using sinatra 1.4.8
Using sprockets-helpers 1.4.0
Using sinatra-contrib 1.4.7
Using html-proofer 3.19.3
Using jekyll-watch 2.2.1
Using sass 3.7.4
Using sawyer 0.8.2
Using sprockets-sass 1.3.1
Using jekyll 4.2.1
Using octokit 4.22.0
Using jekyll-admin 0.11.0
Using jekyll-youtube 1.0.0
Using jekyll-environment-variables 1.0.1
Using jekyll-feed 0.16.0
Using jekyll-seo-tag 2.8.0
Using jekyll_bootstrap5_tabs 1.0.0
Using jekyll-assets 1.0.0
Using jekyll-gist 1.5.0
Using jekyll-sitemap 1.4.0 from https://github.com/jekyll/jekyll-sitemap.git (at master@99148a2)
Bundle complete! 20 Gemfile dependencies, 87 gems now installed.
Use `bundle info [gemname]` to see where a bundled gem is installed.
Using the Plugin
Bootstrap 5
A web page set up with Bootstrap 5 is required in order for the jekyll_bootstrap5_tabs plugin to work.
One way to include Bootstrap 5 in a web page is to add the following HTML into the <head> tag:
<link href="https://cdn.jsdelivr.net/npm/bootstrap@5.1.3/dist/css/bootstrap.min.css" rel="stylesheet"
  integrity="sha384-1BmE4kWBq78iYhFldvKuhfTAU6auU8tT94WrHftjDbrCEXSU1oBoqyl2QvZ6jIW3" crossorigin="anonymous">
Without a doubt you'll want to provide a stylesheet for the tabs, because as previously mentioned, Bootstrap 5's tabs look horrible otherwise.
I suggest you modify the CSS variables in the
bootstrap5_tabs.css stylesheet I created
to suit your website's color scheme.
As you iterate towards colors that suit you, you'll need to reload the web page over and over.
Appending the current time (in milliseconds) is a way to prevent your web browser from fetching the stylesheet from the cache.
The following two lines, which cause the Bootstrap tabs stylesheet to be included,
should be placed in the web page <head>,
after the Bootstrap stylesheet itself is included:
{% assign nowMillis = site.time | date: '%s' %}
<link href="{{ 'bootstrap5_tabs.css?v=' | append: nowMillis }}" rel="stylesheet">
Add the Bootstrap 5 JavaScript to the bottom of the HTML file:
<script src="https://cdn.jsdelivr.net/npm/bootstrap@5.1.3/dist/js/bootstrap.bundle.min.js"></script>
You would of course place the web page contents after the <head/> section,
within the <body/> section, as usual.
This next section discusses what that content might look like.
Two New Liquid Tags
The jekyll_bootstrap5_tabs plugin provides two new
Liquid tags: tabs and tab.
Jekyll interprets the Liquid language when embedded into HTML pages.
Following is the short example from the video above.
It should be placed wherever you want within the <body/> tag.
{% tabs demo %}
  {% tab demo#First %}
    Content of the first tab.
  {% endtab %}
  {% tab demo#Second %}
    Content of the second tab.
  {% endtab %}
{% endtabs %}
The outer tabs tag has a name: demo.
This name defines a namespace scope for the inner tab tags.
The inner tab tags reference the outer tags tag (yes, this is redundant),
and introduces the name of the tab that it defines after the
octothorpe
(aka hash mark, number sign, and pound sign: #).
A Bootstrap 5 tab is created for every tab tag,
and the id for each tag is defined by the characters following the octothorpe.
This id is also displayed as the label for the tab,
so if you want it capitalized a certain way,
specify the tag capitalization in the tab tag.
The current implementation does not allow spaces within tab labels. Instead, tab labels may only consist of one word each.
The project README on GitHub
has more information.
Again, to learn more, you can view and download the
source code for tabDemo.html,
which you saw at the top of this web page inside the iframe.
Onwards to Part 2!
The Making a Jekyll Plugin as a Ruby Gem in this series describes in detail how the Jekyll plugin was constructed and published as an open-source Ruby gem.
About the Author

I, Mike Slinn, have been working with Ruby for a long time now. Back in 2005, I was the product marketing manager at CodeGear (the company was formerly known as Borland) for their 3rd Rail IDE. 3rd Rail supported Ruby and Ruby on Rails at launch.
In 2006, I co-chaired the Silicon Valley Ruby Conference on behalf of the SD Forum in Silicon Valley. As you can see, I have the t-shirt. I was the sole chairman of the 2007 Silicon Valley Ruby Conference.
Several court cases have come my way over the years in my capacity as a software expert witness. The court cases featured questions about IP misappropriation for Ruby on Rails programs. You can read about my experience as a software expert if that interests you.
I currently enjoy writing Jekyll plugins in Ruby for this website and others, as well as Ruby utilities.


