
Published 2025-11-03.
Last modified 2025-12-01.
Time to read: 7 minutes.
llm collection.
- Claude Code Is Magnificent, But Claude Desktop Is a Hot Mess
- Gemini vs. Sonnet 3.5 and 4.6 for Meticulous Work
- Google Gemini Code Assist
- Google Antigravity
- AI Planning vs. Waterfall Project Management
- Best Local LLMs for Coding
- Running an LLM on the Windows Ollama app
- Early Draft: Multi-LLM Agent Pipelines
- MiniMax-M2 and Mini-Agent Review
- MiniMax Web Search with ddgr
- LLM Societies
- CodeGPT
This article follows Best Local LLMs for Coding. Here I discuss how I set up one of the currently leading LLMs for coding with Ollama. This was part of my learning experience. Things get much more complicated in the next article, Early Draft: Multi-LLM Agent Pipelines.
Get Started
Paste sllm/glm-z1-9b into the model selector,
then press the model button and press Enter.
The model will download, install and run.
If you open the sidebar, then select settings, then enable Expose Ollama to the network, you will be asked to grant network permissions to the Ollama executable:

Important Settings
Here are some settings that will probably improve your coding experience with
GLM-Z1-9B-0414.
/set parameter repeat_penalty 1.2
/set parameter repeat_last_n 128
/set parameter top_k 50
/set parameter temperature 0.2
Repetition is a known quirk with GLM-4 models in general. The above settings try to ensure that only one copy of an answer is returned to you. This happens because:
-
The community quant (
sllm) uses an older tokenizer/chat template that doesn’t fully suppress loops in long reasoning chains. - GLM-Z1’s “deep thinking” mode can self-reinforce patterns
-
Ollama’s default
repeat_last_nvalue is too low; it only penalizes the last 64 tokens.
You can also type /help.

The currently active settings can be saved as a preset called
coding.
/save preset coding
At the start of every coding chat session,
reload the settings for coding.
/load preset coding
Define Model With Desired Settings
It is easy to define a new model with any desired settings. For example, lets
create a model called glm-z1-fixed with the previously shown
settings:
/create glm-z1-fixed from sllm/glm-z1-9b
/set parameter repeat_penalty 1.2
/set parameter repeat_last_n 128
/set parameter top_k 40
/set parameter top_p 0.95
/set parameter temperature 0.6
/save
From now on search and run glm-z1-fixed instead of
sllm/glm-z1-9b.
No need to load settings.
Agentic Assistance in Visual Studio Code
sllm/glm-z1-9b Ollama model is an instance of GLM-Z1-9B-0414.
The remainder of this article are my notes on setting it up as an agentic coding assistant in Visual Studio Code. The assistant can provide contextual help like code generation, refactoring, debugging, file creation and editing, and multi-step reasoning (e.g., "Plan and implement a full auth system"), powered by Ollama’s local inference performed on on your RTX 3060.
Grok recommended the Continue.dev Visual Studio Code extension, which is open-source, privacy-focused, and designed for Ollama integration. This Visual Studio Code extension turns your LLM into a Copilot-like agent, with inline completions, a sidebar chat with codebase context, and agent mode.
"Best" is a relative term. Continue.dev is what would have been called bleeding-edge in the dotcom boom. You were warned.
Run Ollama
Ensure the Ollama app is open and sllm/glm-z1-9b is pulled. One
way to test if the model has been pulled is to type the following in a CMD
or PowerShell console:
PS C:\Users\Mike Slinn> ollama run sllm/glm-z1-9b
>>> Send a message (/? for help) /help Available Commands: /set Set session variables /show Show model information /loadLoad a session or model /save Save your current session /clear Clear session context /bye Exit /?, /help Help for a command /? shortcuts Help for keyboard shortcuts
Use """ to begin a multi-line message.
>>> /show modelfile # Modelfile generated by "ollama show" # To build a new Modelfile based on this, replace FROM with: # FROM sllm/glm-z1-9b:latest
FROM /usr/share/ollama/.ollama/models/blobs/sha256-a7b407b938bdbab835e0237edbc30fb88fe8cd9342a3fe43cf3ee4c75f1dae38 TEMPLATE {{ .Prompt }}
>>> /show parameters Model defined parameters: No additional parameters were specified for this model.
>>> CTRL+D
You can halt Ollama with CTRL+D once you know it works.
Install the Continue Visual Studio Code Extension
Install the Continue Visual Studio Code extension by typing:
$ code --install-extension Continue.continue
Adjust Context Window
A computer like Bear with 12 GB VRAM and 64 GB RAM should handle contexts from 8K to 32K. User the Ollama app's settings slider for tuning the size of the context window.
Visual Studio Code Extension Settings
- Open Visual Studio Code.
-
Go to the
Continue.continueextension setup. - I enabled Enable Console and disabled Telemetry Enabled.
Configure Ollama Model Directory
On Bear, which runs Windows 11 and WSL 2, models are stored in the default directory for native Windows: %HOMEPATH%\.ollama.
The OLLAMA_MODELS environment variable can be used to override this location so WSL2 programs can use the same directory for Ollama models.
Set it from ~/.bashrc by adding the following incantation:
OLLAMA_MODELS=$(
  cd /mnt/c &>/dev/null && \
  wslpath -au "$(cmd.exe /c 'echo %USERPROFILE%\.ollama\models')";
  cd - &>/dev/null
)
Configure Continue for GLM-Z1-9B
To configure Continue to use the GLM-Z1-9B model, edit the Continue configuration file.
On macOS and Linux the file is ~/.continue/config.json.
On Windows the file is %USERPROFILE%\.continue\config.json.
Because I run Ollama on native Windows, not WSL, I only edit the file in one place.
Set the contents of this file to the following exactly as shown:
{
  "codebase": {
    "embedOnStartup": true
  },

  "contextProviders": [
    {
      "name": "codebase",
      "params": {
        "nRetrieve": 15,
        "nFinal": 5,
        "useChunks": true
      }
    },
    {
      "name": "docs",
      "params": {
        "urls": [
          "https://ollama.com",
          "https://mslinn.com",
          "https://go.dev",
          "https://developer.mozilla.org/en-US/docs/Web"
        ]
      }
    }
  ],

  "embeddingsProvider": {
    "model": "nomic-embed-text",
    "provider": "ollama"
  },

  "models": [
    {
      "apiBase": "http://localhost:11434",
      "default": true,
      "model": "sllm/glm-z1-9b",
      "name": "GLM-Z1-9B",
      "provider": "ollama",
      "roles": [
        "apply",
        "chat",
        "edit"
      ],
      "supportsTools": true,
      "title": "GLM-Z1-9B (Local Ollama)"
    }
  ],

  "rules": [
    {
      "name": "No Philosophy",
      "description": "Never give abstract or philosophical answers. Be direct and practical.",
      "prompt": "Answer in 1-2 sentences. No explanations unless asked."
    },
    {
      "name": "Use Think Tags",
      "description": "Use <think> only for complex reasoning, not simple questions.",
      "prompt": "For simple queries, respond immediately. Use <think> only when planning multi-step actions."
    },
    {
      "name": "File Names Only",
      "description": "When asked for file name, return just the name.",
      "prompt": "If asked 'what is your name' or similar, say Jeannie VaVoom."
    }
  ],

  "systemMessage": "You are a helpful coding agent. Use <think> for reasoning.",

  "tabAutocompleteModel": {
    "apiBase": "http://localhost:11434",
    "model": "sllm/glm-z1-9b",
    "provider": "ollama",
    "title": "GLM-Z1-9B Autocomplete"
  }
}
"supportsTools": true, above enables agentic tools if
"roles" are also provided as shown.
I found that the configuration file was automatically reread every time it was modified. I liked that very much. No need to request a reload, restart Visual Studio Code or reboot the computer. Grok truly loves to go into gory detail about how to reset the universe to a defined state.
Defining contextProviders above caused new context providers to
appear in the Continue dropdown that presents when you type @:
Codebase, and Docs. If you type
@codebase, your entire project is included in the context.
The complete list of contexts is:
@codebase
@docs
@files
@current
@git
@terminal
@problems
The above config.json is sufficient.
However, Continue is the midst of transitioning from JSON to YAML.
While a JSON file is currently required, the equivalent YAML file may soon be required instead.
Only provide one or the other.
BTW, here is a YAML equivalent of the above JSON file:
---
codebase:
  embedOnStartup: "true"
contextProviders:
- name: "codebase"
  params:
    nRetrieve: "15"
    nFinal: "5"
    useChunks: "true"
- name: "docs"
  params:
    urls:
    - "https://ollama.com"
    - "https://mslinn.com"
    - "https://go.dev"
    - "https://developer.mozilla.org/en-US/docs/Web"
embeddingsProvider:
  model: "nomic-embed-text"
  provider: "ollama"
models:
- apiBase: "http://localhost:11434"
  default: "true"
  systemMessage: "You are a helpful coding agent. Use <think> for reasoning."
  model: "sllm/glm-z1-9b"
  name: "GLM-Z1-9B"
  provider: "ollama"
  supportsTools: "true"
  title: "GLM-Z1-9B (Local Ollama)"
tabAutocompleteModel:
  apiBase: "http://localhost:11434"
  model: "sllm/glm-z1-9b"
  provider: "ollama"
  title: "GLM-Z1-9B Autocomplete"
Continue tries to load every .yaml file in
.continue/agents/ as an agent definition.
These files require a name: field.
The example from the installation process, .continue/agents/new-config.yaml
lacks this field, causing a fatal error.
Delete or rename the example file with a different filetype; perhaps .yaml-.
The following Bash incantation uses brace expansion to do that:
$ ~/.continue/agents/new-config.yaml{,-}
Here is the minimal structure for a valid local config.yaml:
name: Whatever
version: 1.0.0
schema: v1
Also delete rm ./.continue/mcpServers/new-mcp-server.yaml if it exists.
Use Nomic To Improve Agentic Context Awareness
For better agentic context awareness, stir in a dash of nomic-embed-text:
PS C:\Users\Mike Slinn> ollama pull nomic-embed-text
pulling manifest
pulling 970aa74c0a90: 100% ▕█████████████████████▏ 274 MB
pulling c71d239df917: 100% ▕█████████████████████▏ 11 KB
pulling ce4a164fc046: 100% ▕█████████████████████▏ 17 B
pulling 31df23ea7daa: 100% ▕█████████████████████▏ 420 B
verifying sha256 digest
writing manifest
success
nomic-embed-text is another LLM that can easily be added
to a Continue.dev configuration, resulting in a dual-model setup.
nomic-embed-text provides significant value in both single, dual
and triad LLM setups, primarily by enabling efficient Retrieval-Augmented
Generation (RAG) for codebase and docs context. It acts as a semantic search
layer, injecting relevant snippets into prompts without overwhelming token
limits—boosting accuracy and reducing hallucinations by ~20–30% on agentic
tasks (e.g., multi-file refactors). Without it, models rely on keyword search,
which is noisier and slower.
Nomic-embed-text is a lightweight (137M params, ~250 MB)
open-source embedding model optimized for long contexts (up to 8K tokens) and
multilingual RAG. It converts code and documentss into dense vectors for fast
similarity search, outperforming Ada-002 on BEIR/MIRACL benchmarks (e.g.,
65–70% recall at 8192 tokens).
The embed role in Continue.dev specifies that a model can
generate embeddings, which are vector representations of text used for
semantic search and retrieval-augmented generation (RAG) in features like
@codebase or @docs. Embeddings are created during
indexing of your codebase or documentation and enable the system to retrieve
relevant snippets based on similarity to the user's query, improving context
accuracy without loading entire files into prompts. This role is assigned to
embedding models (typically small, specialized ones) rather than full LLMs,
and it is configured in the config.json under
embeddingsProvider or per-model roles. For example,
adding "roles": ["embed"] to a model allows it to be used for
this purpose.
Without an embed-capable model, Continue falls back to keyword search, which is less accurate and slower for code-heavy queries.
If focusing on code-heavy tasks, use voyage-code-3 for a 5–10%
recall boost, but nomic is the sweet spot for your hardware.
Enable Agentic Features
-
Open the Visual Studio command palette with CTRL+SHIFT>+P,
then type
Continue: Open Settings. - Open the right side bar by pressing CTRL+SHIFT+B. Now open the Continue pane by pressing CTRL+SHIFT+L. If you press that key chord while in an editor, the current line will be deleted; you do not want that to happen. You can now drag the Continue chat pane to the right side bar; that is where I put all my agents.
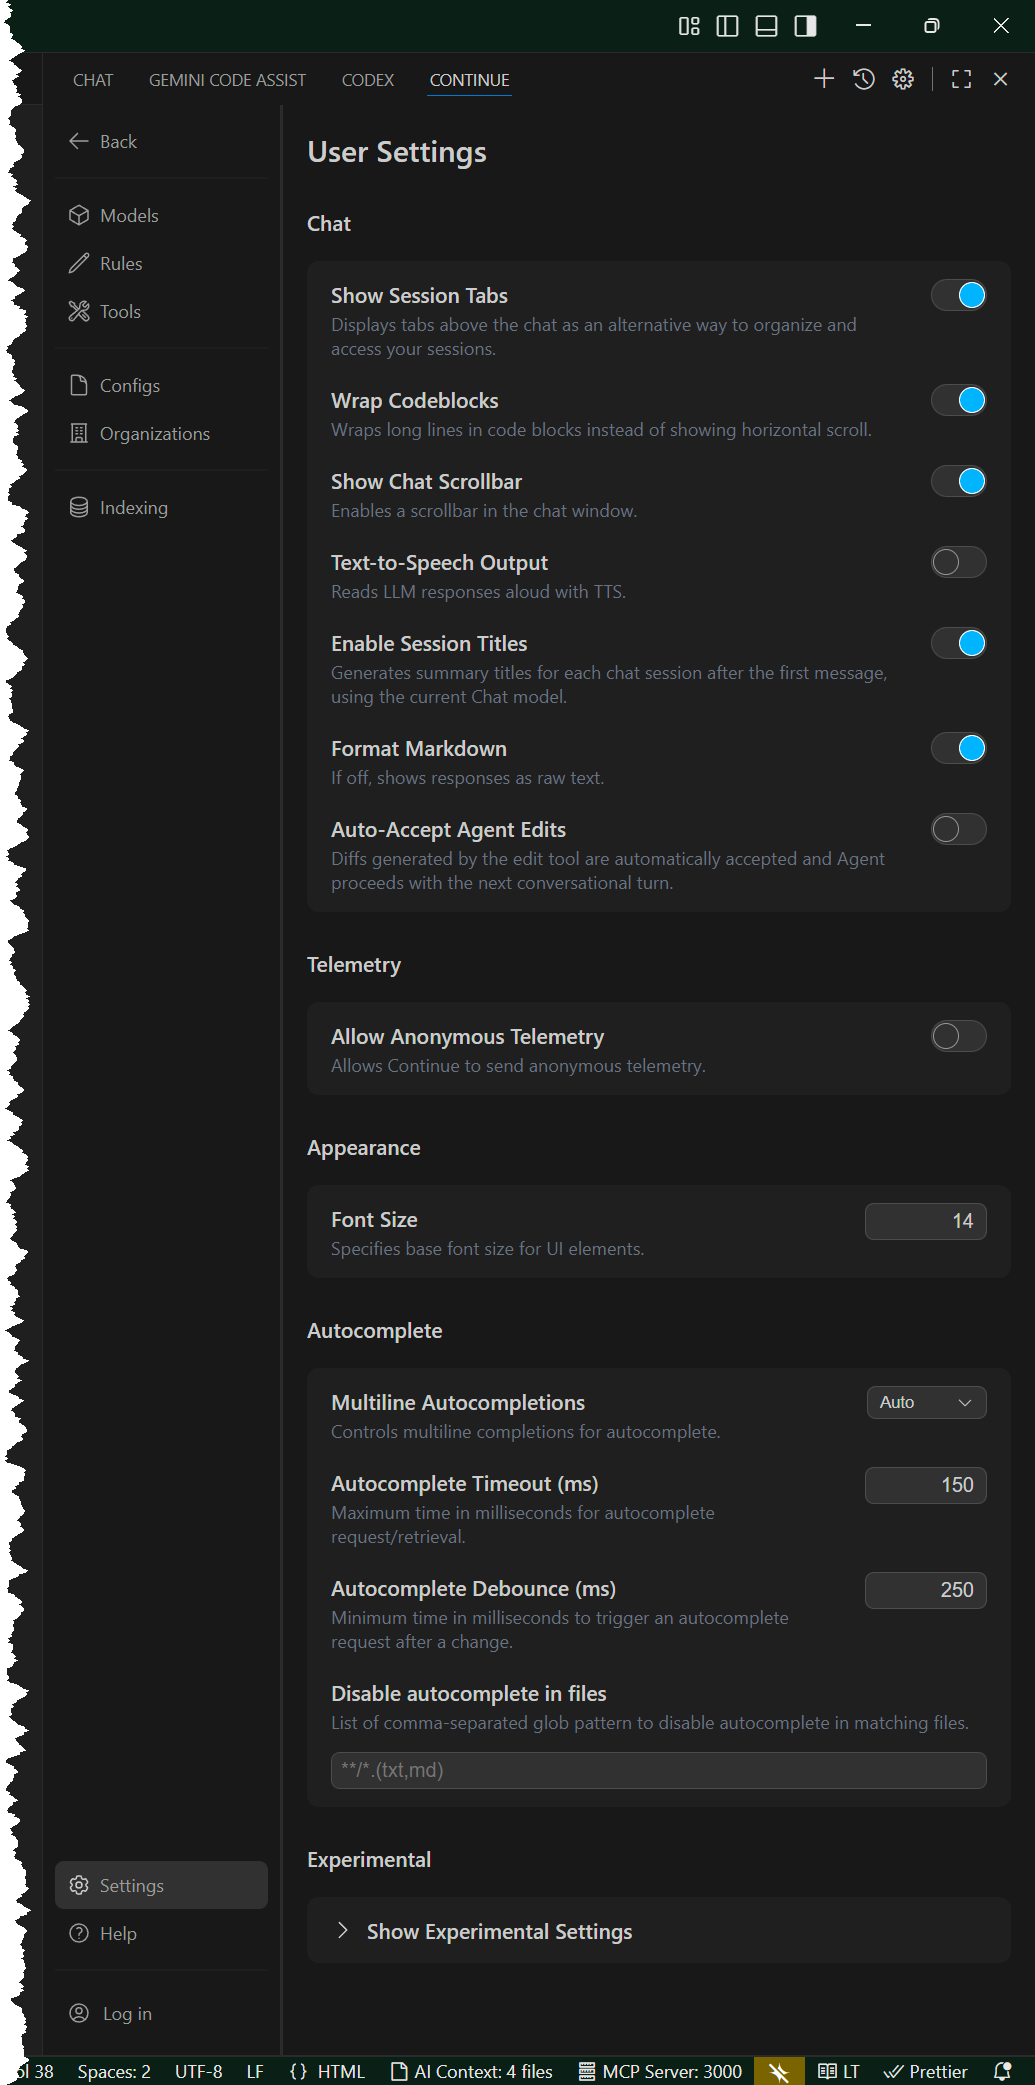
- Click the Settings icon at the bottom of the Continue pane, then you should see User Settings.
- Agent mode is the default (set by the small pull-down menu below where you type commands for LLMs. This mode allows multi-step tasks like "Create a new file and implement X".
-
In the configuration file shown below,. set
contextProvider.docsto a list of the URLs that it should treat as references. -
In chat prompts, prepend
<think>before requests to encourage step-by-step reasoning.
More settings for you to play with are shown to the right.
Now use It!


Here are all the ways you can use Continue with GLM-Z1-9B:
- Open a code file in VS Code (e.g., a Python script).
- To use GLM-Z1-9B with context:
- Highlight code
- press CTRL+I
- type
explainorrefactorinto the chat
-
Type
<think>Debug this function and suggest fixes.</think> -
In the chat area, type:
As an agent, plan and implement a REST API endpoint for user login in this Node.js project.
The LLM will reason, edit files, and ask for approval. - Autocomplete starts suggesting things as you type. Press TAB to accept the displayed suggestion.
Expected Performance on Bear
- Speed: 50–70 t/s for chat/generation (Q6_K quant); inline completions ~80–100 t/s.
- Context: Up to 128K via Ollama slider, but stick to 8K–32K for snappiness (YaRN-enabled for GLM-Z1).
- Agentic Limits: GLM-Z1-9B excels at reasoning but may need prompting for tools (e.g., "Use file edit tool to..."). For more advanced agents (e.g., browser/tool-calling), upgrade to GLM-4.6:cloud if limits allow.
Troubleshooting
- Ensure Ollama app is running (ollama serve in PowerShell if needed). Restart VS Code.
- Slow performance or VRAM Issues: Lower context in Ollama slider to 4K–8K.
- Agent mode not offered: Update the Continue Extension.
This gives you a fully local, agentic Copilot alternative—private, fast, and tailored to GLM-Z1's strengths.
Continue CLI
The Continue CLI
command stub is called cn.
$ npm i -g @continuedev/cli
added 86 packages in 11s
I could not get cn to respond.
That's fine. The more I learned about this LLM the less I cared about it.
- Claude Code Is Magnificent, But Claude Desktop Is a Hot Mess
- Gemini vs. Sonnet 3.5 and 4.6 for Meticulous Work
- Google Gemini Code Assist
- Google Antigravity
- AI Planning vs. Waterfall Project Management
- Best Local LLMs for Coding
- Running an LLM on the Windows Ollama app
- Early Draft: Multi-LLM Agent Pipelines
- MiniMax-M2 and Mini-Agent Review
- MiniMax Web Search with ddgr
- LLM Societies
- CodeGPT


