Published 2025-07-09.
Time to read: 4 minutes.
I wanted World Peace Musical Collective members to use my Windows computers without giving them access to all my private information.
Creating a new Windows user account, without Administrator privileges, and a group with the desired permissions, was the best way forward. I call these users casual because they are not dedicated, one person per Windows account. Instead, they use whatever computer is available with the necessary programs and data for their needs, then they all use the same account.
The reason for this is that some programs, like Ableton Live, are authorized per user account. Even though Windows is a single-user operating system, Ableton has locked their Live program to specific authorized accounts. Other programs allow any user account to operate them.
My setup does not utilize Active Directory, but my Ubuntu servers run Samba.
This article develops a script called new_wpmc_user.ps1, which:
- Creates a new Windows user called
wpmc. - Creates a Windows group called
wpmc_group. - Adds user
wpmcto groupwpmc_group. - Grants full control to the group over a designated directory tree.
-
Ensures that the login screen provides the ability for users to login to
the new
wpmcuser account.
Import-Module Microsoft.PowerShell.LocalAccounts

$user_path = "E:\media"
$user_name = "wpmc"
$new_group = $user_name + "_group"

Write-Host @"
`nThis PowerShell script creates an account for a casual Windows 10/11 user called
'$user_name' for the World Peace Musical Collective.`n
A new group called '$new_group' is also created.
The new user will have full control over the files and subdirectories of
'$user_path'.`n
See https://mslinn.com/blog/2025/07/09/new-windows-user.html`n
"@ `
  -ForegroundColor Green

New-LocalUser `
  -AccountNeverExpires `
  -NoPassword `
  -UserMayNotChangePassword `
  -Description 'World Peace Musical Collective user.' `
  -Name $user_name

Set-LocalUser `
  -Name $user_name `
  -PasswordNeverExpires $true

Add-LocalGroupMember `
  -Group Users `
  -Member $user_name

New-LocalGroup `
  -Name $new_group `
  -Description "World Peace Musical Collective group"

Add-LocalGroupMember `
  -Group $new_group `
  -Member $user_name

icacls $user_path `
  /grant $new_group":(OI)(CI)F" `
  /T

$ACL = Get-Acl -Path $user_path

$AccessRule = `
  New-Object System.Security.AccessControl.FileSystemAccessRule(
    $new_group,
    "FullControl",
    "ContainerInherit,ObjectInherit",
    "None",
    "Allow"
  )

$ACL.AddAccessRule($AccessRule)
Set-Acl -Path $user_path -AclObject $ACL


Write-Host @"
`nAlmost done!`n
You must manually disable the 'Hide fast user switching policy'.
See https://mslinn.com/blog/2025/07/09/new-windows-user.html#dhfus`n
You must also manually disable 'Enable User Switching Mode'
See https://mslinn.com/blog/2025/07/09/new-windows-user.html#user_switch_mode`n
Remember to restart the computer after completing the above.
"@ `
  -ForegroundColor Green
About These Commands
- The Microsoft PowerShell documentation shows command line examples that are very close to what I used.
- Note that a Windows user name should not be the same as a Windows group name. Also, a local group should not have the same name as a domain level group.
Creating A User
The following command creates a regular user called wpmc that does not have a password.
This account never expires, and does not have a password.
This user may not change their password.
All of the Collective members will use this account. I will create identical accounts on every machine on the local network that they need to access.
PS C:\WINDOWS\system32> New-LocalUser `
  -AccountNeverExpires `
  -NoPassword `
  -UserMayNotChangePassword `
  -Description 'World Peace Musical Collective user.' `
  -Name wpmc

Name Enabled Description
---- ------- -----------
wpmc True    World Peace Musical Collective user.

PS C:\WINDOWS\system32> Set-LocalUser `
  -Name wpmc `
  -PasswordNeverExpires $true
You can verify that the new user is enabled like this:
PS C:\WINDOWS\system32> Get-LocalUser

Name                 Enabled Description
----                 ------- -----------
84B04A566A0B417DBEDC True    Avid user enabler for user mode
9B84C2A851AF4C2A98F6 True    Avid user enabler for user mode
Administrator        False   Built-in account for administering the computer/domain
DAW                  True
DefaultAccount       False   A user account managed by the system.
Guest                False   Built-in account for guest access to the computer/domain
Mike Slinn           True
mslin                True
sshd                 True
Visitor              True
WDAGUtilityAccount   False   A user account managed and used by the system for Windows Defender Application Guard scenarios.
wpmc                 True    World Peace Musical Collective user.
Disable the Hide Fast User Switching Policy
The new_wpmc_user.ps1 script does not perform this step at this time.
You must perform this step manually.
- Open the Run dialog box by pressing Win-R.
- Type
gpedit.mscand press Enter. - Navigate to Computer Configuration / Administrative Templates / System / Logon.
-
Find the Hide entry points for Fast User Switching setting.
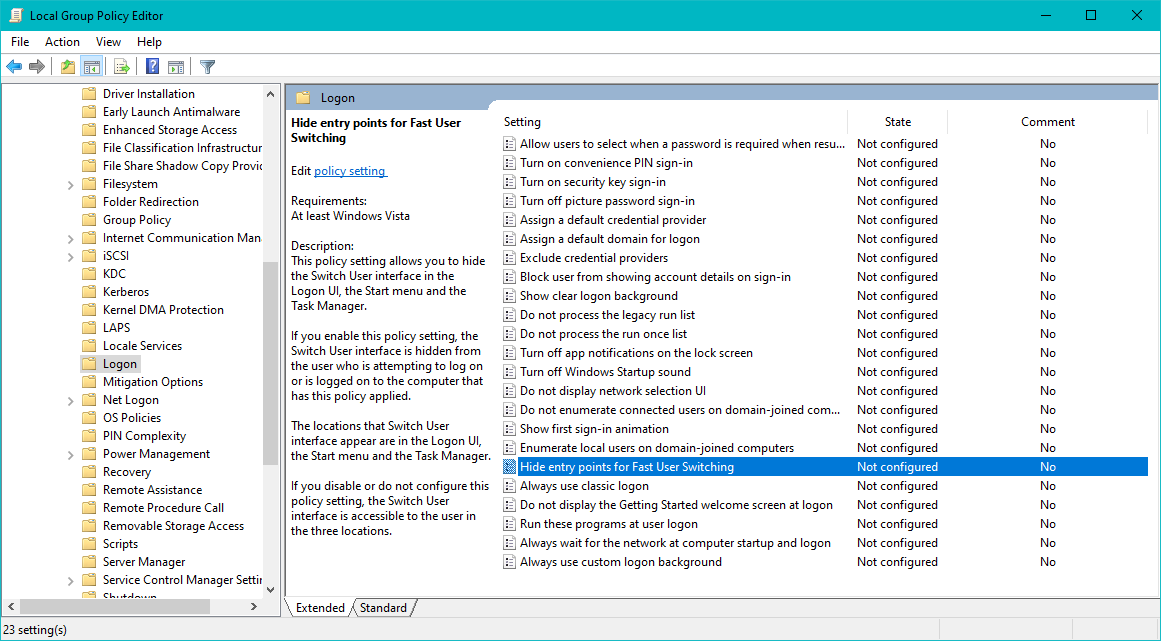
Double-click on the entry and you will see the following:
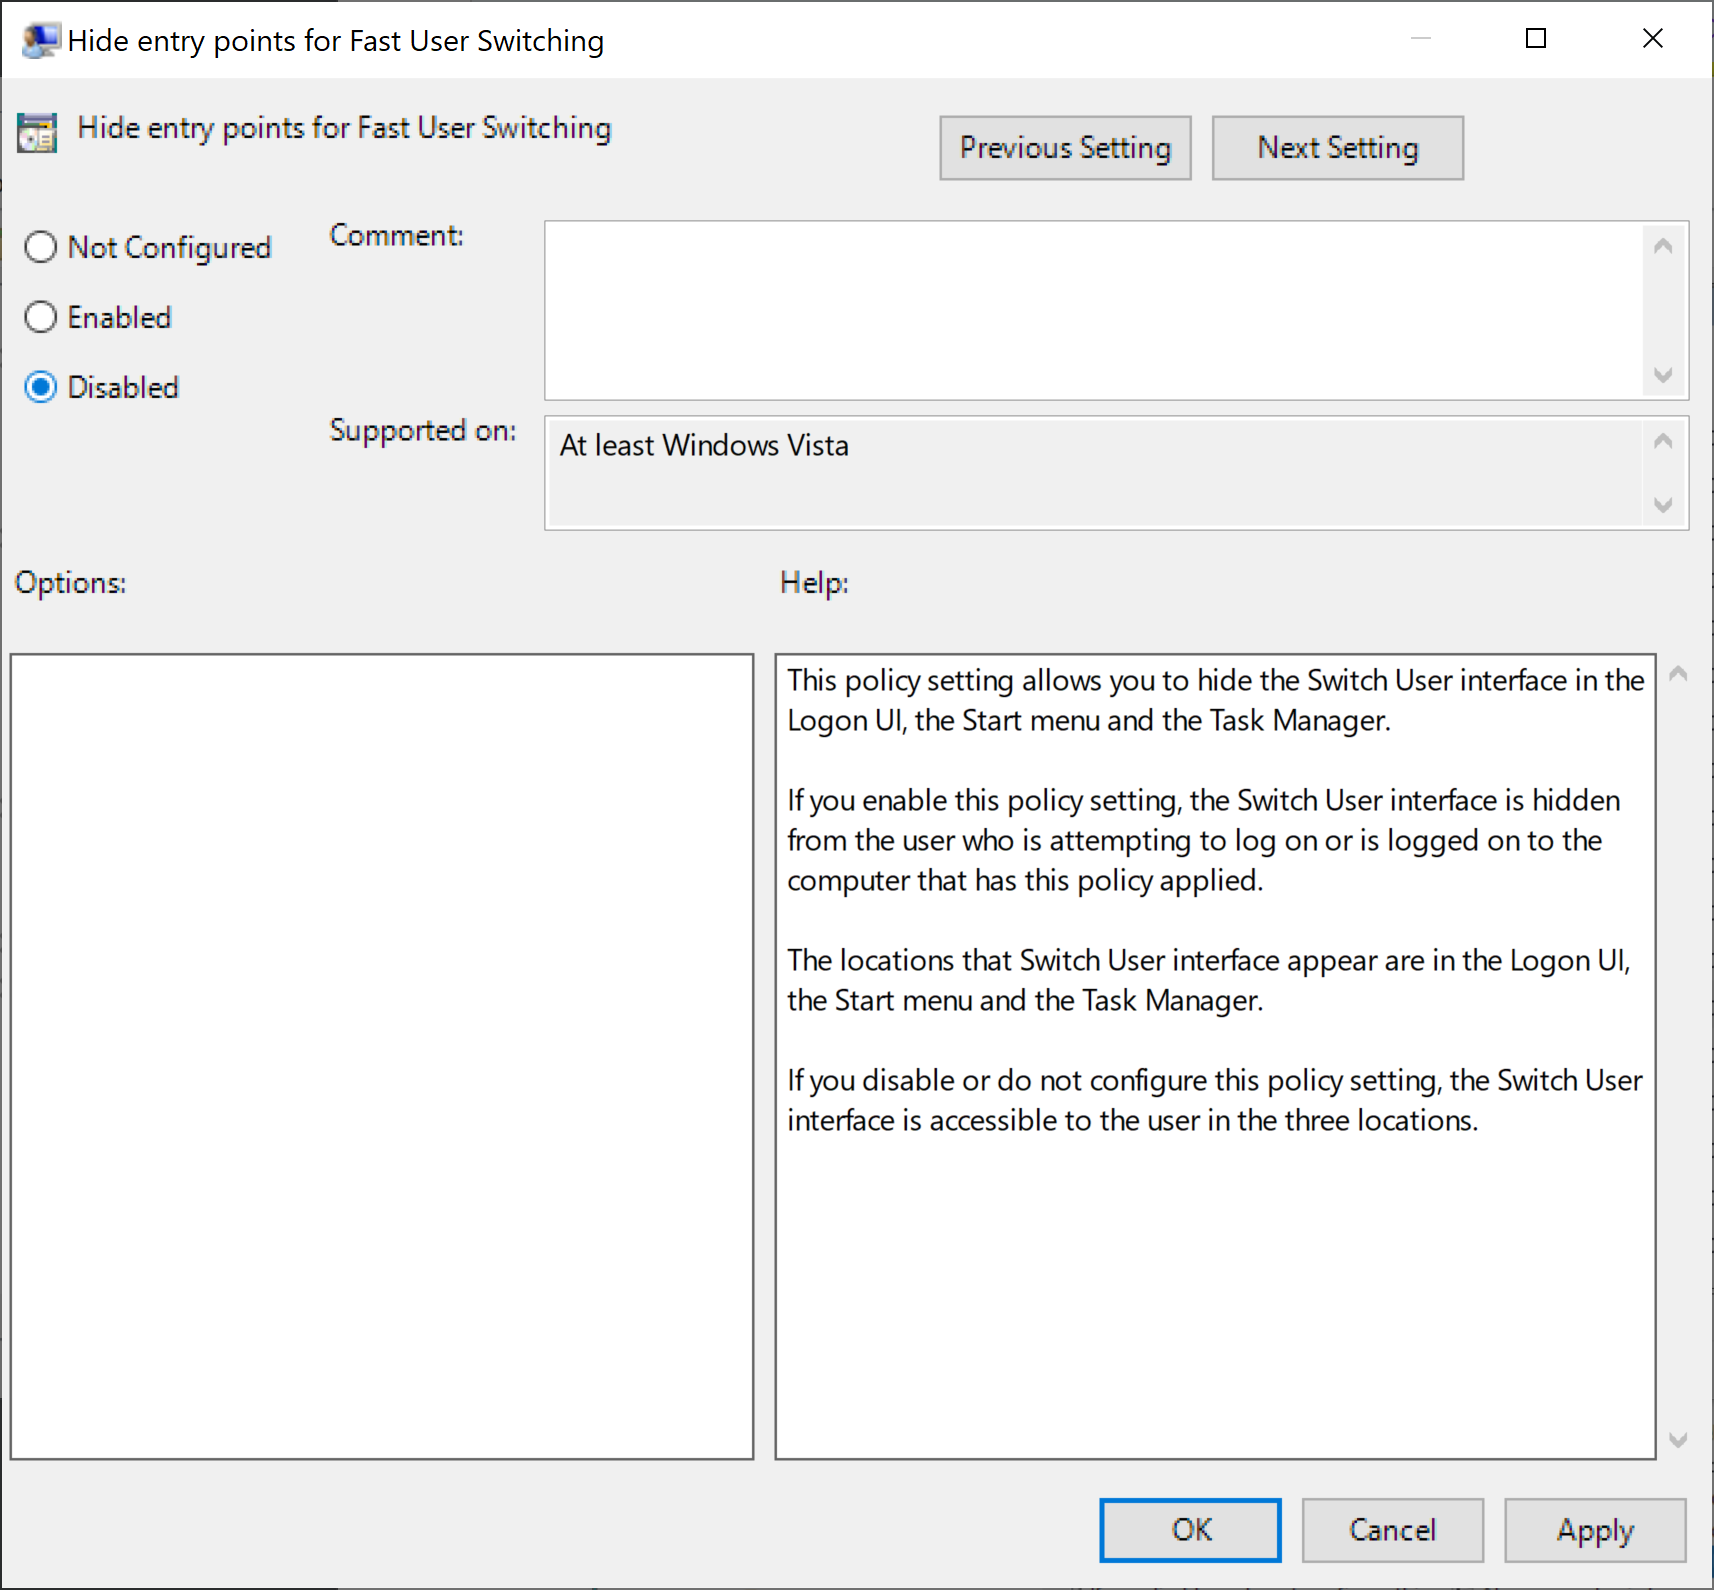
- If the value is enabled, double-click it and select to Disabled as shown above, then click Ok.
- If your computer is part of a domain, verify that the Enumerate local users on domain-joined computers is enabled.
- Exit the program.
For the above changes to take effect, the computer will need to be restarted. However, the same is true for the next section, so do not restart the computer just yet.
Add New User to Users Group
Type the following into an Administrator PowerShell to enroll user
wpmc into group Users:
$ Add-LocalGroupMember `
  -Group Users `
  -Member wpmc
For the above changes to take effect, the computer will need to be restarted. However, the same is true for the next section, so do not restart the computer just yet.
Enable User Switching Mode
The new_wpmc_user.ps1 script does not perform this step at this time.
You must perform this step manually.
If user-switching mode is not enabled you will not be able to log in as another user other than the one that was first set up.
- Press Windows, type
cmd, then click on Run as administrator. - In the shell type
regeditand press Enter. -
Paste
HKEY_LOCAL_MACHINE\into the search bar near the top of theSOFTWARE\ Microsoft\ Windows\ CurrentVersion\ Authentication\ LogonUI\ UserSwitch regeditwindow. You should see something like this:
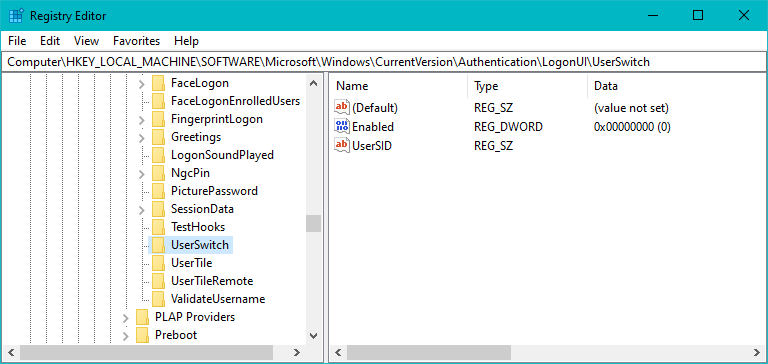
- If you do not see the right-hand panel shown above, use menu item View / Split.
- Double click on Enabled in the right-hand panel.
- Change the value to
1and click on Ok to save the change. - Close the registry editor.
- Restart the PC.
Creating A Group
To create a Windows group called wpmc_group and add user wpmc to it:
PS C:\WINDOWS\system32> Import-Module Microsoft.PowerShell.LocalAccounts

PS C:\WINDOWS\system32> New-LocalGroup `
  -Name wpmc_group `
  -Description "World Peace Musical Collective group"

Name       Description
----       -----------
wpmc_group World Peace Musical Collective group

PS C:\WINDOWS\system32> Add-LocalGroupMember `
  -Group wpmc_group `
  -Member wpmc
Granting Permissions to a User
I did not run this command because it is usually better to grant access to a group than to a user.
To grant the wpmc user full access to the E:\media subdirectory tree:
PS C:\WINDOWS\system32> icacls `
  "E:\media" `
  /grant "wpmc:F" `
  /T
The :F flag grants "Full Control" permissions.
Other common permissions include M for Modify, R for Read, and W for Write.
The /T switch applies the permission recursively to all subdirectories and files within the specified directory.
Granting Permissions to a Group
To grant the wpmc_group group full access to the E:\media subdirectory tree:
PS C:\WINDOWS\system32> icacls `
  "E:\media" `
  /grant "wpmc_group:(OI)(CI)F" `
  /T
... lots of file names scroll by ...
The inheritance and permission flags are:
-
(OI): Object Inherit. This ensures that subordinate files within the directory and its subdirectories inherit the granted permissions. -
(CI): Container Inherit. This ensures that subordinate folders (containers) within the directory and its subdirectories inherit the granted permissions.
The :F flag grants "Full Control" permissions.
Other common permissions include M for Modify, R for Read, and W for Write.
The /T switch applies the permission recursively to all subdirectories and files within the specified directory.
Restricting Directory Access to a Group
To restrict access to a directory to a specific group using Windows PowerShell, modify the Access Control List (ACL) of that directory. This involves:
- Retrieve the existing ACL.
- Creating a new access rule for the desired group with the appropriate permissions.
- Add this rule to the ACL.
- Apply the modified ACL back to the directory.
Get the existing ACL of the directory and save it as $ACL:
PS C:\WINDOWS\system32> $ACL = Get-Acl -Path "E:\media"
Create a new
FileSystemAccessRule
for the group:
PS C:\WINDOWS\system32> $AccessRule = `
  New-Object System.Security.AccessControl.FileSystemAccessRule(
    "wpmc_group",
    "FullControl",
    "ContainerInherit,ObjectInherit",
    "None",
    "Allow"
  )
Possible permissions are "FullControl", "Read", "Write", and "Modify".
ContainerInheritapplies the rule to subfolders.ObjectInheritapplies the rule to files within the directory and its subfolders.
Use "Allow" to grant permissions and "Deny" to explicitly restrict them.
"Deny" rules take precedence over "Allow" rules.
This process adds a new rule. If you need to remove or modify existing permissions for other users or groups, you may need to use RemoveAccessRule or other methods to manage the ACL more comprehensively.
Add the new access rule to the ACL:
PS C:\WINDOWS\system32> $ACL.AddAccessRule($AccessRule)
Apply the modified ACL to the directory:
PS C:\WINDOWS\system32> Set-Acl -Path $FolderPath -AclObject $ACL
Ableton Live Authorization
Ableton Live authorization is per-user account, not per-computer, but re-authorize with the another user account on the same computer does not decrement the count of authorized installations.


