Published 2023-03-02.
Last modified 2024-01-01.
Time to read: 6 minutes.
Letsencrypt certificates are only valid for 90 days. It is common practice to renew them every 60 days, a task that one should automate when the website is first published.
I wrote about setting up wildcard SSL certificates with Nginx 9 months ago. That article included a demonstration of how to create an SSL certificate manually, but did not discuss how to maintain it.
This article discusses how to automatically generate and maintain the SSL certificate using
lego,
a Letsencrypt/ACME client and library written in Go
that has become popular since I last wrote about this topic.
Lego handles many moving parts transparently.
It is much simpler than using DNS delegates with
acme-dns.
We’ll start by briefly discussing some background information.
Letsencrypt’s Certbot and Wildcard SSL Certificates
You must prove to Letsencrypt that you control the DNS for a domain before
it issues a wildcard SSL certificate for that domain.
Letsencrypt’s certbot currently uses the
DNS-01 challenge
for this purpose.
DNS-01 Challenge
The DNS-01 challenge requires that DNS TXT records for the domain be
created with specific values as part of the authentication mechanism.
Several of these TXT records can co-exist among the DNS records for a domain.
The name of the TXT records is always _acme-challenge.
When certbot requests that a new wildcard SSL certificate be created by Letsencrypt,
it sends DNS-01 TXT queries to the primary DNS.
The Letsencrypt service verifies that the required _acme-challenge TXT
records are available with the correct values.
A Technical Deep Dive: Securing the Automation of ACME DNS Challenge Validation, published by the Electronic Frontier Foundation, explains how this works in detail.
Certbot plugins have been created for various DNS providers to make this process easier.
Lego is a higher-level program that makes the entire process even easier.
Agenda
The high-level outline of the remainder of this blog is:
- Install
golanguage support. - Install
lego. - Generate the wildcard SSL certificate.
- Provide the certificate to your production web server.
- Restart the webserver and verify the new certificate is served.
- Add a new entry to
crontabto automate the SSL certificate generation.
Install Go Language Support
Lego is written in Go.
Ensure that Go language support is installed.
For Ubuntu Linux (and the default WSL distro), type:
$ yes | sudo apt install golang-go
The following NEW packages will be installed:
  golang-1.18-go golang-1.18-src golang-go golang-src
0 upgraded, 4 newly installed, 0 to remove and 0 not upgraded.
Need to get 82.2 MB of archives.
After this operation, 436 MB of additional disk space will be used.
Do you want to continue? [Y/n]
Get:1 http://archive.ubuntu.com/ubuntu jammy/main amd64 golang-1.18-src all 1.18.1-1ubuntu1 [16.2 MB]
Get:2 http://archive.ubuntu.com/ubuntu jammy/main amd64 golang-1.18-go amd64 1.18.1-1ubuntu1 [66.0 MB]
Get:3 http://archive.ubuntu.com/ubuntu jammy/main amd64 golang-src all 2:1.18~0ubuntu2 [4438 B]
Get:4 http://archive.ubuntu.com/ubuntu jammy/main amd64 golang-go amd64 2:1.18~0ubuntu2 [41.8 kB]
Fetched 82.2 MB in 2s (33.6 MB/s)
Selecting previously unselected package golang-1.18-src.
(Reading database ... 173763 files and directories currently installed.)
Preparing to unpack .../golang-1.18-src_1.18.1-1ubuntu1_all.deb ...
Unpacking golang-1.18-src (1.18.1-1ubuntu1) ...
Selecting previously unselected package golang-1.18-go.
Preparing to unpack .../golang-1.18-go_1.18.1-1ubuntu1_amd64.deb ...
Unpacking golang-1.18-go (1.18.1-1ubuntu1) ...
Selecting previously unselected package golang-src.
Preparing to unpack .../golang-src_2%3a1.18~0ubuntu2_all.deb ...
Unpacking golang-src (2:1.18~0ubuntu2) ...
Selecting previously unselected package golang-go:amd64.
Preparing to unpack .../golang-go_2%3a1.18~0ubuntu2_amd64.deb ...
Unpacking golang-go:amd64 (2:1.18~0ubuntu2) ...
Setting up golang-1.18-src (1.18.1-1ubuntu1) ...
Setting up golang-src (2:1.18~0ubuntu2) ...
Setting up golang-1.18-go (1.18.1-1ubuntu1) ...
Setting up golang-go:amd64 (2:1.18~0ubuntu2) ...
Processing triggers for man-db (2.10.2-1) ...
Scanning processes...
Scanning processor microcode...
Scanning linux images...

Failed to retrieve available kernel versions.

Failed to check for processor microcode upgrades.

No services need to be restarted.

No containers need to be restarted.

No user sessions are running outdated binaries.

No VM guests are running outdated hypervisor (qemu) binaries on this host.
View the version of go that was installed:
$ go version
go version go1.19.2 linux/amd64
Installing Lego
The official lego installation instructions are
here.
They do not mention Ubuntu instructions, but the
lego package for Ubuntu
can be installed in the usual way:
$ yes | sudo apt install lego
Reading package lists... Done
  Building dependency tree... Done
  Reading state information... Done
  The following NEW packages will be installed:
    lego
  0 upgraded, 1 newly installed, 0 to remove and 7 not upgraded.
  Need to get 5322 kB of archives.
  After this operation, 19.7 MB of additional disk space will be used.
  Get:1 http://archive.ubuntu.com/ubuntu jammy-updates/universe amd64 lego amd64 4.1.3-3ubuntu1.22.04.1 [5322 kB]
  Fetched 5322 kB in 1s (10.2 MB/s)
  Selecting previously unselected package lego.
  (Reading database ... 86044 files and directories currently installed.)
  Preparing to unpack .../lego_4.1.3-3ubuntu1.22.04.1_amd64.deb ...
  Unpacking lego (4.1.3-3ubuntu1.22.04.1) ...
  Setting up lego (4.1.3-3ubuntu1.22.04.1) ...
Here is the lego help message:
$ lego -h
NAME:
lego - Let's Encrypt client written in Go

USAGE:
lego [global options] command [command options] [arguments...]

VERSION:
dev

COMMANDS:
run      Register an account, then create and install a certificate
revoke   Revoke a certificate
renew    Renew a certificate
dnshelp  Shows additional help for the '--dns' global option
list     Display certificates and accounts information.
help, h  Shows a list of commands or help for one command

GLOBAL OPTIONS:
--domains value, -d value    Add a domain to the process. Can be specified multiple times.
--server value, -s value     CA hostname (and optionally :port). The server certificate must be trusted in order to avoid further modifications to the client. (default: "https://acme-v02.api.letsencrypt.org/directory")
--accept-tos, -a             By setting this flag to true you indicate that you accept the current Let's Encrypt terms of service.
--email value, -m value      Email used for registration and recovery contact.
--csr value, -c value        Certificate signing request filename, if an external CSR is to be used.
--eab                        Use External Account Binding for account registration. Requires --kid and --hmac.
--kid value                  Key identifier from External CA. Used for External Account Binding.
--hmac value                 MAC key from External CA. Should be in Base64 URL Encoding without padding format. Used for External Account Binding.
--key-type value, -k value   Key type to use for private keys. Supported: rsa2048, rsa4096, rsa8192, ec256, ec384. (default: "ec256")
--filename value             (deprecated) Filename of the generated certificate.
--path value                 Directory to use for storing the data. (default: "/mnt/_/work/lego/.lego") [$LEGO_PATH]
--http                       Use the HTTP challenge to solve challenges. Can be mixed with other types of challenges.
--http.port value            Set the port and interface to use for HTTP based challenges to listen on.Supported: interface:port or :port. (default: ":80")
--http.proxy-header value    Validate against this HTTP header when solving HTTP based challenges behind a reverse proxy. (default: "Host")
--http.webroot value         Set the webroot folder to use for HTTP based challenges to write directly in a file in .well-known/acme-challenge. This disables the built-in server and expects the given directory to be publicly served with access to .well-known/acme-challenge
--http.memcached-host value  Set the memcached host(s) to use for HTTP based challenges. Challenges will be written to all specified hosts.
--tls                        Use the TLS challenge to solve challenges. Can be mixed with other types of challenges.
--tls.port value             Set the port and interface to use for TLS based challenges to listen on. Supported: interface:port or :port. (default: ":443")
--dns value                  Solve a DNS challenge using the specified provider. Can be mixed with other types of challenges. Run 'lego dnshelp' for help on usage.
--dns.disable-cp             By setting this flag to true, disables the need to wait the propagation of the TXT record to all authoritative name servers.
--dns.resolvers value        Set the resolvers to use for performing recursive DNS queries. Supported: host:port. The default is to use the system resolvers, or Google's DNS resolvers if the system's cannot be determined.
--http-timeout value         Set the HTTP timeout value to a specific value in seconds. (default: 0)
--dns-timeout value          Set the DNS timeout value to a specific value in seconds. Used only when performing authoritative name servers queries. (default: 10)
--pem                        Generate a .pem file by concatenating the .key and .crt files together.
--cert.timeout value         Set the certificate timeout value to a specific value in seconds. Only used when obtaining certificates. (default: 30)
--help, -h                   show help
--version, -v                print the version
Generating the Wildcard SSL Certificate
/etc/environment
My projects are defined in a directory tree,
which is pointed to by an environment variable called work.
This is helpful when working across many machines,
each of which has a different directory layout.
I define the work environment variable in the
system-wide /etc/environment file,
where it affects all users, all scripts, and crontab entries:
PATH="/usr/local/sbin:/usr/local/bin:/usr/sbin:/usr/bin:/sbin:/bin:/usr/games:/usr/local/games:/snap/bin"
work=/mnt/_/work
sites=/mnt/_/www
$work is used in the script shown below,
and that script will be launched via crontab,
which is why /etc/environment is used instead of $HOME/.bashrc.
WSL does not run systemd services, and WSL2 only runs them if they are enabled.
You can easily convert WSL instances into WSL2 instances.
Unless systemd starts automatically at boot time,
/etc/environment will not be processed.
Read Microsoft’s announcement to learn more:
Systemd support is now available in WSL!
Generation
When working with the lego CLI with DNS authentication,
a directory is needed to hold all the files that are required.
I created a directory for this purpose at $work/lego:
$ mkdir $work/lego

$ cd $work/lego
The lego --dns namecheap option connects to Namecheap, which is my DNS provider,
and uses the Namecheap DNS for the DNS-01 challenge.
Lego supports many other DNS providers.
Namecheap Users
The Namecheap API documentation is here. For some reason, that page reloads to a different page, which is annoying. Press the Esc key right after the page opens, so you can read it.
Please also read the
FAQ.
Enable the Namecheap API
here.
You could enable the Namecheap sandbox API
here.
Here is a short script that displays your current public IP address:
#!/bin/bash

dig +short myip.opendns.com @resolver1.opendns.com
If your modem goes offline, Namecheap’s DNS will assign a new IP address the next time the modem reconnects. That will cause the scripts shown below to stop working until you manually provide the new address to the Namecheap API. Annoying! Be sure to plug your modem into a UPS to maintain the IP address even during short outages, power brownouts and voltage dropouts. A sine-wave UPS is strongly preferred, since modems are sensitive to low-quality power.
The Namecheap API needs 2 environment variables for authentication
(NAMECHEAP_API_USER and NAMECHEAP_API_KEY).
Here is how I defined those environment variables so they were available for the
lego process launched by sudo:
$ export NAMECHEAP_API_USER=asdf

$ export NAMECHEAP_API_KEY=asdfasdf
To generate a wildcard certificate, you must specify the --domains option twice:
once with the domain name, and once for all subdomains, like this:
$ lego \
  --accept-tos \
  --dns namecheap \
  --domains="scalacourses.com" \
  --domains="*.scalacourses.com" \
  --email="mslinn@scalacourses.com" \
  run
2023/03/01 13:40:03 [INFO] [*.scalacourses.com] acme: Obtaining bundled SAN certificate
2023/03/01 13:40:03 [INFO] [*.scalacourses.com] AuthURL: https://acme-v02.api.letsencrypt.org/acme/authz-v3/207409481036
2023/03/01 13:40:03 [INFO] [*.scalacourses.com] acme: use dns-01 solver
2023/03/01 13:40:03 [INFO] [*.scalacourses.com] acme: Preparing to solve DNS-01
2023/03/01 13:40:04 [INFO] [*.scalacourses.com] acme: Trying to solve DNS-01
2023/03/01 13:40:04 [INFO] [*.scalacourses.com] acme: Checking DNS record propagation using [172.19.176.1:53]
2023/03/01 13:40:19 [INFO] Wait for propagation [timeout: 1h0m0s, interval: 15s]
2023/03/01 13:40:20 [INFO] [*.scalacourses.com] acme: Waiting for DNS record propagation.
2023/03/01 13:40:35 [INFO] [*.scalacourses.com] acme: Waiting for DNS record propagation.
2023/03/01 13:40:56 [INFO] [*.scalacourses.com] The server validated our request
2023/03/01 13:40:56 [INFO] [*.scalacourses.com] acme: Cleaning DNS-01 challenge
2023/03/01 13:40:56 [INFO] [*.scalacourses.com] acme: Validations succeeded; requesting certificates
2023/03/01 13:40:57 [INFO] [*.scalacourses.com] Server responded with a certificate.
The wildcard SSL certificate and associated files are generated into the .lego/certificates directory.
$ ls -alF .lego/certificates
total 12
drwx------ 1 mslinn mslinn 4096 Mar  1 13:40 ./
drwx------ 1 mslinn mslinn 4096 Mar  1 13:15 ../
-rw------- 1 mslinn mslinn 5325 Mar  1 13:40 scalacourses.com.crt
-rw------- 1 mslinn mslinn 3751 Mar  1 13:40 scalacourses.com.issuer.crt
-rw------- 1 mslinn mslinn  239 Mar  1 13:40 scalacourses.com.json
-rw------- 1 mslinn mslinn  227 Mar  1 13:40 scalacourses.com.key
-
scalacourses.com.crtis the server certificate that nginx needs, already combined with the CA certificate. scalacourses.com.keyis the private key for the server certificate.scalacourses.com.issuer.crtis the issuing Certificate Authority's certificate.-
scalacourses.com.jsoncontains JSON encoded meta information. It looked like this:$work/lego/.lego/certificates/scalacourses.com.json{ "domain": "*.scalacourses.com", "certUrl": "https://acme-v02.api.letsencrypt.org/acme/cert/3939493849340275024024", "certStableUrl": "https://acme-v02.api.letsencrypt.org/acme/cert/738378373923492384932874932" }
Using the value for certStableUrl in the above JSON file,
we can view the generated (and combined) certificate that was saved on letsencrypt.org.
$ wget -O aw.crt \
https://acme-v02.api.letsencrypt.org/acme/cert/03b099f52b4841db17e035c5c2b390f0219b
certGenScalaCourses Script
60 days from now, when the certificate should be renewed,
the last parameter passed to lego in the above command line should be changed from
run to renew.
Here is a bash script that you can edit for this purpose;
at the end of this article this script is incorporated into a new crontab entry:
#!/bin/bash

export NAMECHEAP_API_USER=asdf
export NAMECHEAP_API_KEY=asdfasdf

ACTION=run
if [ -f .lego/certificates/scalacourses.com.crt ]; then
  ACTION=renew
fi

cd $work/lego

lego \
  --accept-tos \
  --dns namecheap \
  --domains="scalacourses.com" \
  --domains="*.scalacourses.com" \
  --email="mslinn@scalacourses.com" \
  "$ACTION"

sudo systemctl reload nginx
Viewing a Certificate
For Ubuntu 22.10, the filetype associations are defined in a hierarchy of files called mimeapps.list:
$ locate mimeapps.list
~/.config/mimeapps.list
~/.local/share/applications/mimeapps.list
/snap/core/14447/usr/share/applications/mimeapps.list
/snap/core/14784/usr/share/applications/mimeapps.list
/snap/core18/2679/usr/share/applications/mimeapps.list
/snap/core18/2697/usr/share/applications/mimeapps.list
/snap/core20/1778/usr/share/applications/mimeapps.list
/snap/core20/1822/usr/share/applications/mimeapps.list
/snap/core22/509/usr/share/applications/mimeapps.list
/snap/core22/522/usr/share/applications/mimeapps.list
/usr/share/gdm/greeter/applications/mimeapps.list
/snap/
contains the default association for *.crt files:
[Default Applications]
x-scheme-handler/http=xdg-open.desktop
x-scheme-handler/https=xdg-open.desktop
x-scheme-handler/mailto=xdg-open.desktop
x-scheme-handler/help=xdg-open.desktop
The above associates a program called
xdg-open
with CRT files.
Double-clicking on a crt file displayed by an Ubuntu file manager such as Nautilus causes
xdg-open to open the file.
You can also use the command line to open the file in xdg-open.
For example, typing the following causes aw.crt to open:
$ xdg-open aw.crt
This is what xdg-open displays:
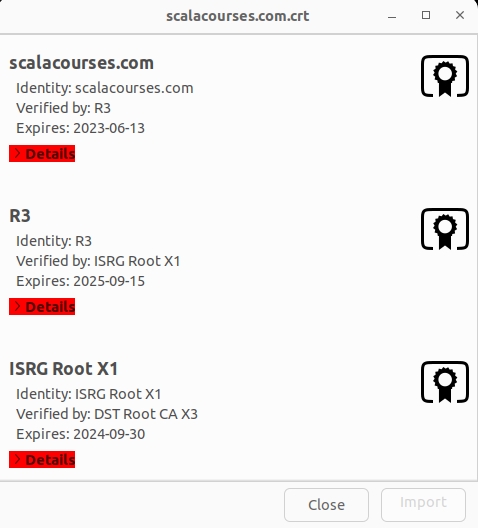
As you can see, this is a combined certificate, containing not just one certificate, but an entire certificate chain. Clicking on any of the red > Details buttons causes more information to be displayed about the corresponding certificate in the chain.
Warning
If you forget to include the domain, and just specify the wildcard for subdomains,
the certificate will not be valid for the domain.
For example, if above I had only specified one --domains option, like this:
--domains="scalacourses.com"
--domains="scalacourses.com" \
--domains="*.scalacourses.com"
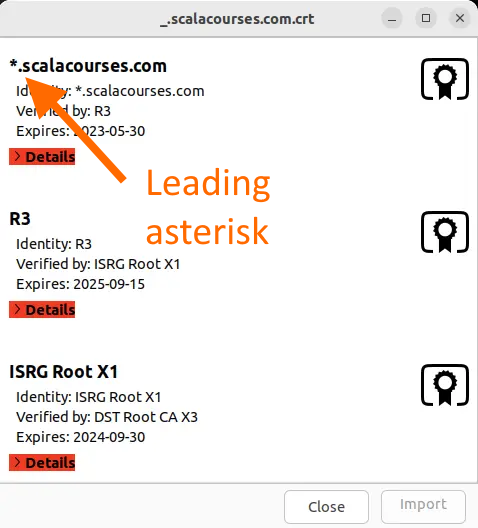
-
The name of the generated certificate will start with an underscore (
_), for example_.scalacourses., instead of being namedcom. crt scalacourses..com. crt -
When you examine the certificate,
the domain listed will show the subdomain wildcard, as shown below,
with a leading underscore asterisk (
*).
-
When you open the certificate, the section entitled Subject Alternative Names
will just contain the subdomain wildcard, like this:
Subject Alternative Names
DNS: *.scalacourses.com
Or just the domain, without a wildcard:
Subject Alternative Names
DNS: scalacourses.com
Instead of both being present, like this:
Subject Alternative Names
DNS:  *.scalacourses.com

      DNS:  scalacourses.com
Provide the certificate to Nginx
Previously,
before working with lego, I used raw certbot to generate the SSL wildcard certificates.
That process generated files in ~/.certbot/:
-
fullchain.pem(thessl_certificate) -
privkey.pem(thessl_certificate_key)
ssl_certificate     /home/mslinn/.certbot/scalacourses.com/config/live/scalacourses.com/fullchain.pem;
ssl_certificate_key /home/mslinn/.certbot/scalacourses.com/config/live/scalacourses.com/privkey.pem;
Now I need to modify /etc/
to reference the files generated by lego:
-
scalacourses.com.crt(thessl_certificate) -
scalacourses.com.key(thessl_certificate_key)
If the webserver had access to the directory containing the new wildcard certificate, it would be simplest to provide the full path to the certificate and its key, like this:
ssl_certificate     /mnt/_/work/lego/.lego/certificates/scalacourses.com.crt;
ssl_certificate_key /mnt/_/work/lego/.lego/certificates/scalacourses.com.key;
Restart Nginx
I tested the nginx configuration:
$ sudo nginx -t
nginx: the configuration file /etc/nginx/nginx.conf syntax is ok
nginx: configuration file /etc/nginx/nginx.conf test is successful
Then I reloaded nginx:
$ sudo systemctl reload nginx
The new SSL certificate needs to be checked to make sure it was installed properly. I just visually examine the start and expire dates:
$ curl -Lvs https://www.scalacourses.com \
  2>&1 1>/dev/null | \
  grep '\(start\|expire\) date:'
*  start date: Mar  1 17:40:56 2023 GMT
*  expire date: May 30 17:40:55 2023 GMT
Add a New Entry to Crontab
Automating the regeneration of the SSL wildcard certificate is easy.
Edit your crontab:
$ crontab -e
Add the following reference to the
certGenScalaCourses script
that I gave you earlier to crontab:
# Runs every 2 months / 60 days (more or less)
30 0 1 */2 * $work/lego/certGenScalaCourses
The above only works because
we defined the work environment variable
in /etc/.
Checking the Certificate With A Web Browser
Microsoft Windows caches SSL certificates, which can prevent your web browser from detecting newly updated SSL certificates. To clear the Windows SSL cache:
- Press the Windows key, type
Internet Options, and press Enter. - Select the Content tab.
- Click the Clear SSL state button.
- Click the OK button.


