Published 2024-02-02.
Last modified 2026-04-08.
Time to read: 9 minutes.
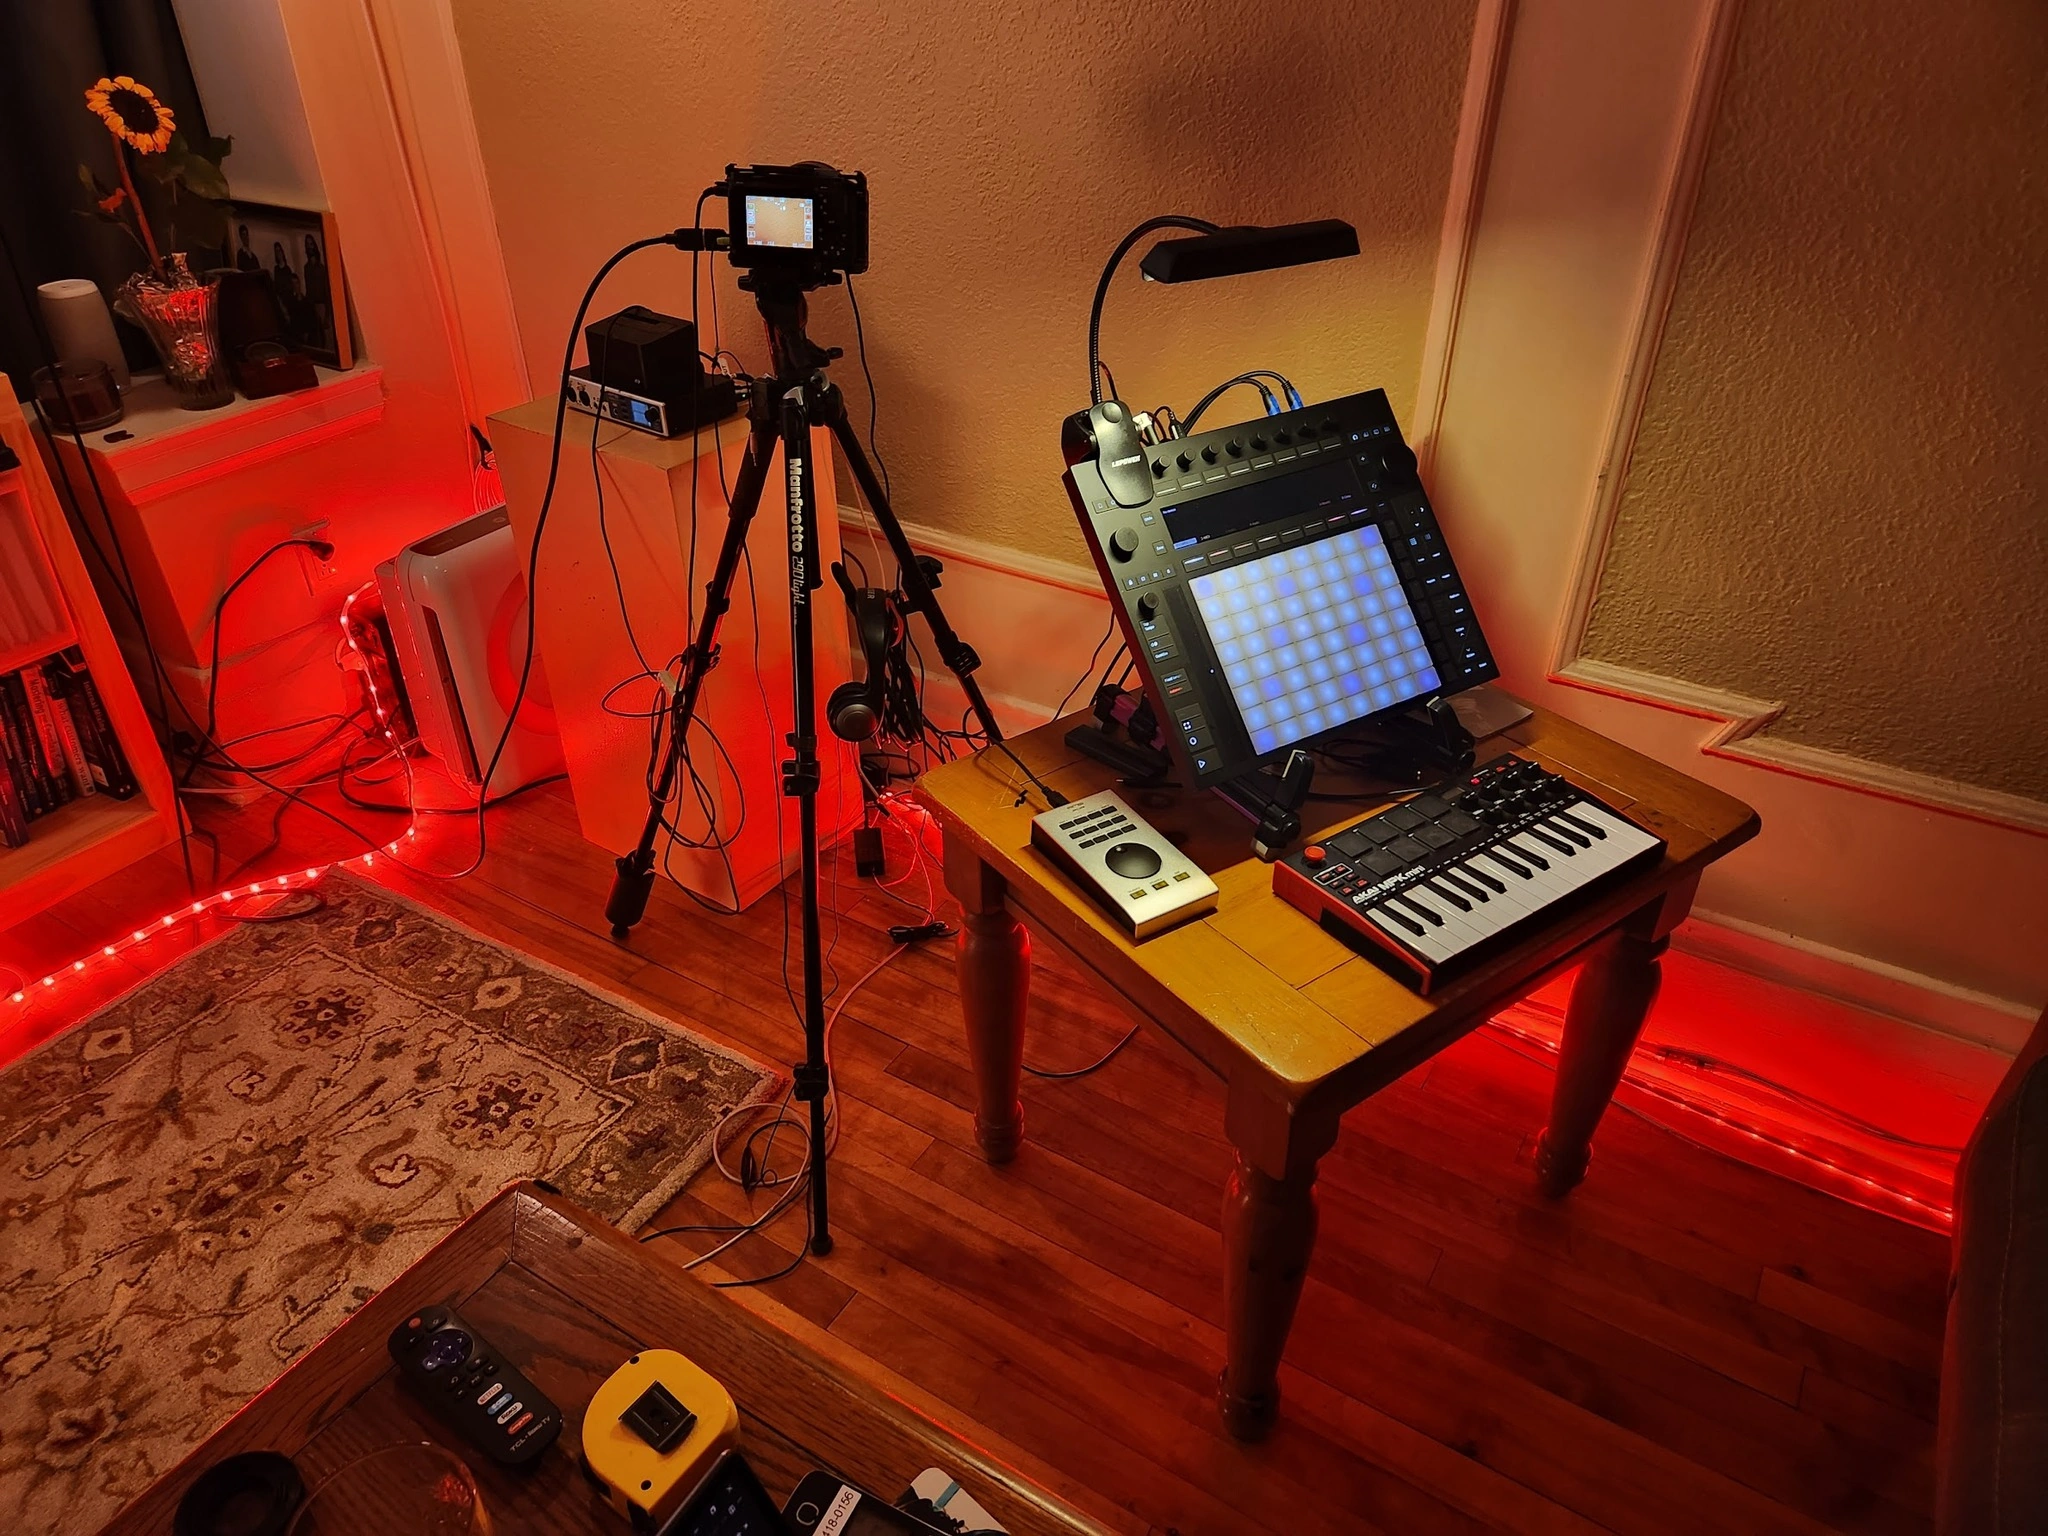
av_studio collection.

Ableton is based in Berlin, Germany, as are Beatport, LANDR, Lofelt/Meta, Neumann, Native Instruments, SoundCloud, and Universal Music Group. Steinberg is based 300 km (180 miles) away in Hamburg.
Ableton Live Simplified
For a fun, intuitive experience of the essence of Ableton Live,
try the learningmusic webapp.
Upgrading to Ableton Live 12
I have been playing with Live v12 beta, which can be downloaded from CenterCode. Live v12 is quite solid; I did not experience any v12 crashes, and there are lots of new and improved features. I prepaid my license upgrade and got a discount.
You will notice an option to update your Live Packs at the bottom of the browser. While you should undoubtedly update them, if you plan to keep Live 11 or earlier installed alongside Live 12, please watch this video first to avoid issues. If not, you might discover that the previous version of Live will no longer support your presets.
Don't worry if you've already updated your Live Packs; I'll also go over how to resolve the issue where presets that were in Live 11 no longer function after you update them to Live 12.
This video is quite helpful:
Upgrading to Ableton Live 11
I started using Ableton Live, version 6, in February 2007. I upgraded to Live Suite for version 9.
Ableton Live v10 was an upgrade targeted at Mac users, certain control surfaces and internationalization. I am not a Mac user, I do not have any of those control surfaces, and I prefer to use English, so I did not upgrade from Ableton Live v9 to v10. Version 10 also has an upgrade for Ableton Link that makes the feature actually usable, but I had no need for that feature then. The need arose recently.
However, many Ableton Live v11 features addressed general capabilities, and that interested me. I decided to upgrade my Ableton Live v9 Suite to the v11 Suite. Live Suite v11 gave 9 more instruments, 7 times as many sounds (75 GB!), 40% more audio effects, and 2 more MIDI effects. All for $289 CAD, plus the Canadian and Quebec taxes, totaling $43.28. I found the upgrade experience to be very smooth.
The Ableton Live Help is one of the most user-centric and well-thought-out pages of this type I have ever seen. My hat is off to you, Ableton! Respect.
The Ableton Live Manual is available in HTML and PDF formats. I find the PDF version to be easier to work with.
😠 😠.nki, .eks, .sf2, and .gig files into Sampler.
This was not mentioned in the release notes.
Some of my older sessions use .gig files, and they no longer work properly.
This should have been mentioned! NOT HAPPY!
Push 3 Standalone
I purchased a Push 3 Standalone 7 months after the product was released. It only supports a subset of Live. You can read more about the disappointing user experience this product currently provides. Kinda like a hazing one might experience when being initiated into a closed social group. My article on the P3S is here.
Directories
For Windows users, recordings are stored in %UserProfile%\.
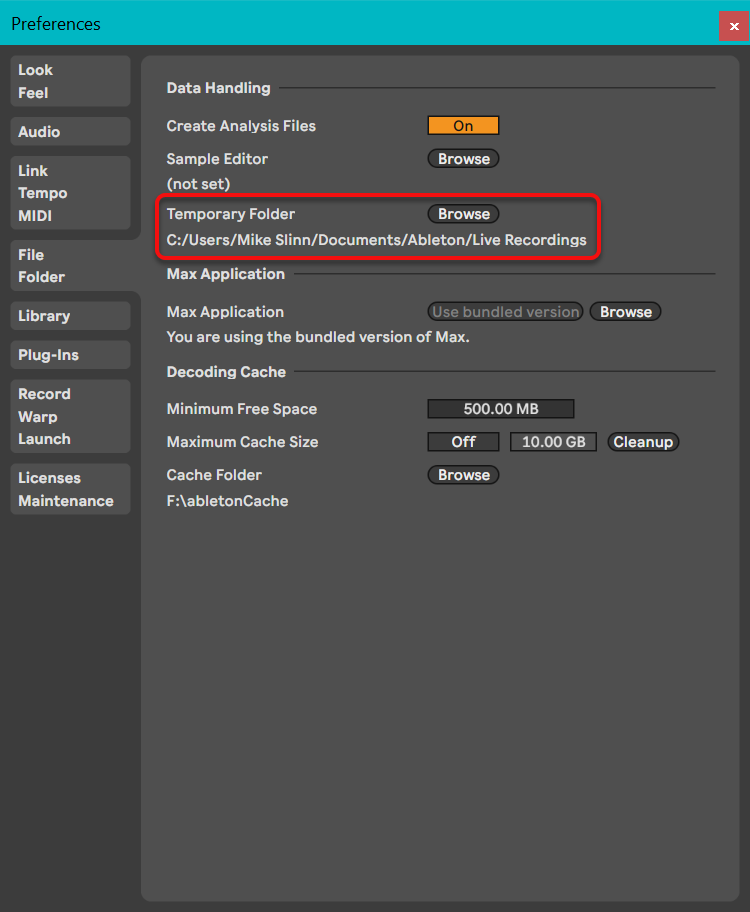
Crashes are stored in %AppData%\.
I moved directories that cause a lot of I/O to individual drives as much as possible, to improve performance.
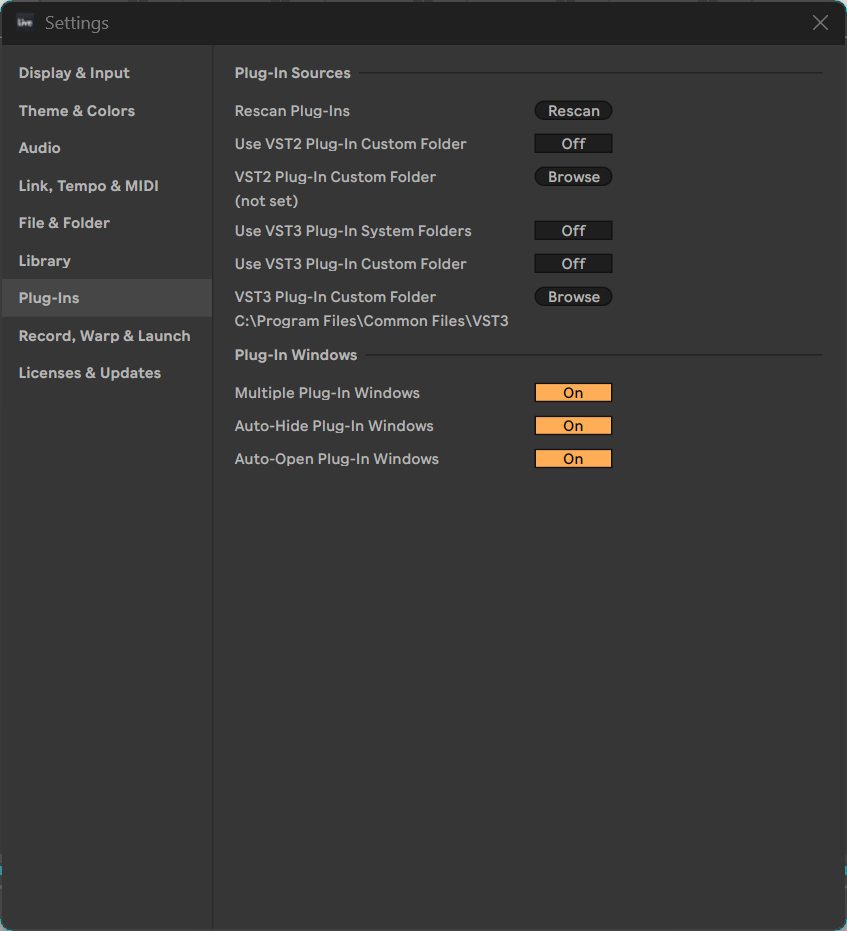
For WPMC members, my directories of VSTs and media are documented in Production Infrastructure Directories. Ableton Live Suite comes with many VSTs, so there is less need for VSTs than with Live Standard. Here is how to turn off all plugins:
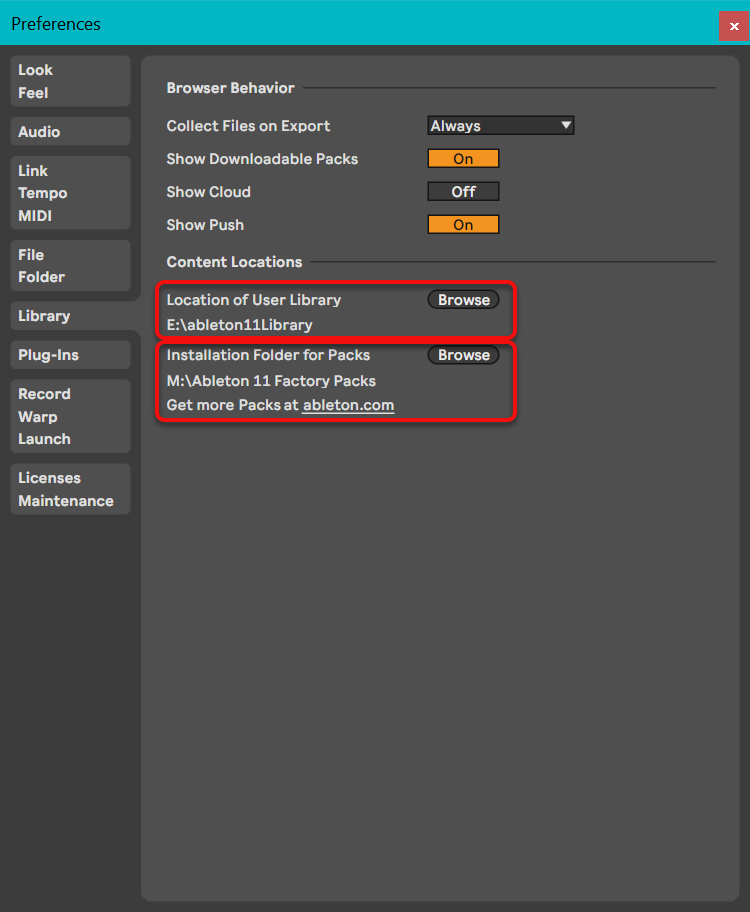
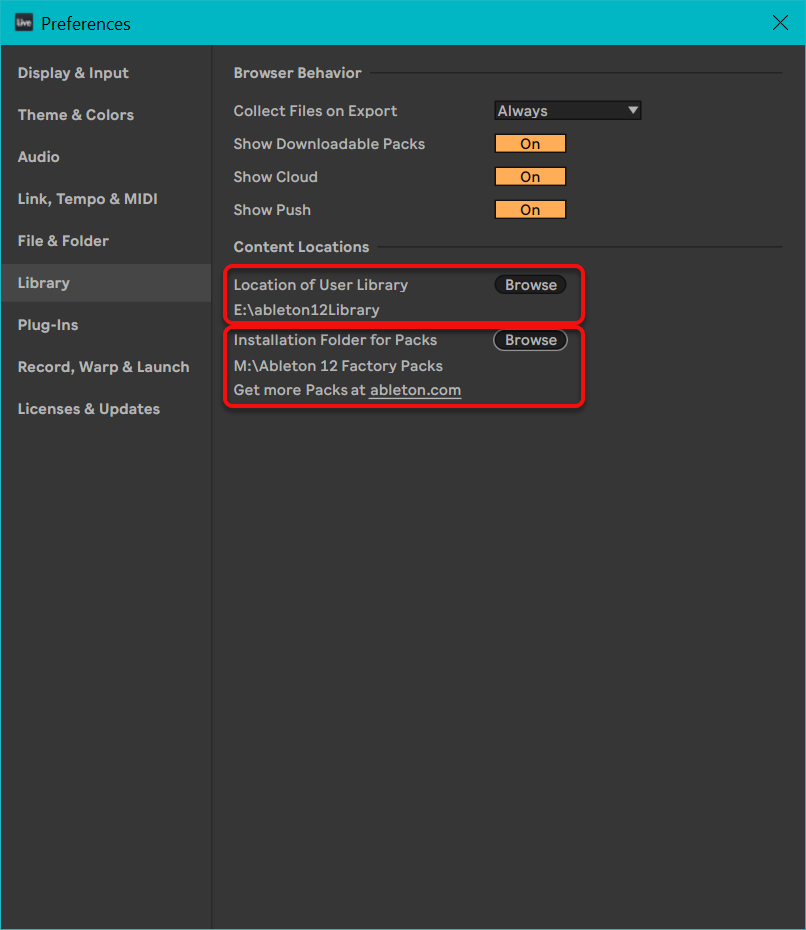
I separated the Live 11 and Live 12 libraries to avoid pollution.
Max for Live
- The global library is at
%ProgramData%/.Max 8/ Library - The user library is at
%UserProfile%/.Documents/ Max 8/ Library - The default folder for Max for Live devices is
%UserProfile%/Documents/ Max 8/ Max for Live Devices - The default folder for Max for Live projects is
%UserProfile%/Documents/Max 8/Projects. - Max for Live examples are stored in
%AppData%/.Cycling '74/ Max 8/ examples - Snapshots are in
%UserProfile%/.Documents/ Max 8/ Snapshots
Installed Ableton Live Data
I store Max for Live files in top folder of this directory tree.
These files have an .amxd extension, which stands for Ableton Max Patch.
I have another, very similar tree for Ableton Live v12 called E:\ableton12Library.
├── Clips
│   ├── Construction Kits
│   ├── Drums
│   ├── Latin Percussion
│   └── Suite 8 Demo
├── Defaults
│   ├── Audio Effects
│   ├── Audio to MIDI
│   ├── Creating Tracks
│   ├── Dropping Samples
│   ├── Instruments
│   ├── MIDI Effects
│   └── Slicing
├── Grooves
│   ├── Hip Hop
│   ├── Latin Percussion
│   ├── Logic
│   ├── MPC
│   ├── Notator
│   ├── Other
│   ├── Percussion
│   ├── Quantize
│   ├── Rock
│   ├── SP1200
│   └── Swing
├── Lessons
│   ├── LivePackBanners
│   ├── Samples
│   └── Sets
├── Presets
│   ├── Audio Effects
│   ├── Instruments
│   └── MIDI Effects
├── Samples
│   ├── Components
│   ├── Loops
│   └── Waveforms
└── Templates
Factory Packs
I have another, very similar tree for Ableton Live v12 called M:\Ableton 12 Factory Packs.
├── 64 Pad Lab by Mad Zach
├── APC Step Sequencer by Mark Egloff
├── Beat Selection by Sample Magic
├── Beat Tools
├── BeatSeeker by Andrew Robertson
├── Bomblastic
├── Brass Quartet by Spitfire Audio
├── Break Selection by Sample Magic
├── Breakbeats by KutMasta Kurt
├── Build and Drop
├── Building Max Devices
├── CV Tools
├── Chop and Swing
├── Classic Synths by Katsuhiro Chiba
├── Connection Kit
├── Convolution Reverb
├── Creative Extensions
├── Cyclic Waves
├── DM-307A Free Pack by Heavyocity
├── Designer Drums
├── Digicussion 1
├── Digicussion 2
├── Drive and Glow
├── Drone Lab
├── Drum Booth
├── Drum Essentials
├── Drum Machines
├── Drumdrops Recording Hybrid Kit
├── Electric Keyboards
├── Expressive Choir by Spitfire Audio
├── Glitch and Wash
├── Grand Piano
├── Gratis Hits by Max for Cats
├── Guitar and Bass
├── Inspired by Nature by Dillon Bastan
├── Instant Haus by Alexkid
├── Kapture by Plastikman and Liine
├── Kasio by Oli Larkin
├── Konkrete Breaks
├── Latin Percussion
├── Loopmasters Mixtape
├── M4L Big Three
├── M4L Building Tools
├── M4L Granulator II
├── M4L Pluggo for Live
├── Max for Live Essentials
├── Microtuner
├── Mood Reel
├── Orchestral Brass
├── Orchestral Mallets
├── Orchestral Strings
├── Orchestral Woodwinds
├── PitchDrop by Mormo
├── PitchLoop89
├── Probability Pack by Sonic Faction
├── Punch and Tilt
├── Retro Synths
├── Samplification
├── Schwarzonator 2 by Henrik Schwarz
├── Session Drums Club
├── Session Drums Studio
├── Skitter and Step
├── Sound Objects Lite
├── Spectral Textures
├── Stray Cats Collection by Max for Cats
├── String Quartet by Spitfire Audio
├── Surround Panner
├── Synth Essentials
├── The Forge by Hecq
├── Unnatural Selection
├── Upright Piano by Spitfire Audio
├── Vinyl Classics
└── Voice Box
Lessons, Projects, Support
PDF manuals are saved in E:\media\Ableton\Support
├── Lessons
│   ├── Demo Songs
│   ├── Samples
│   └── Sets
├── Projects
│   ├── Celestina
│   ├── Crazy Shit
│   ├── GalleryProject
│   ├── GardenWalk
│   ├── House Funk Project v1
│   ├── House Funk Project v2
│   ├── IDM_Ableton_Practice_Ep_1_Remove_Creative_Block_Generate_ideas Project
│   ├── Ninajirachi - In The Rain (Live 11 Suite Demo) Project
│   ├── OMNIA Poetree - Grone Lunden Project
│   ├── Opening the Arc Project
│   ├── Push 3 Standalone Demo Set Project
│   ├── ReChorder
│   ├── Secret Eclipse Project
│   ├── Surpassing Beside the Vortex Project
│   ├── The Possessed Opulence Project
│   ├── TogetherYeah
│   ├── melodic_probability_fun Project
│   └── noodling Project
├── Session Drums Studio
│   ├── Ableton Folder Info
│   ├── Ableton Project Info
│   ├── Clips
│   ├── Drums
│   ├── Lessons
│   └── Samples
└── Support
    ├── ASK Video
    └── Live 8 Tutorial Bundle
Recording
Recording with Live is described in the Live manual.
To control Ableton Live recording behavior, type CTRL-, and adjust the highlighted preferences:
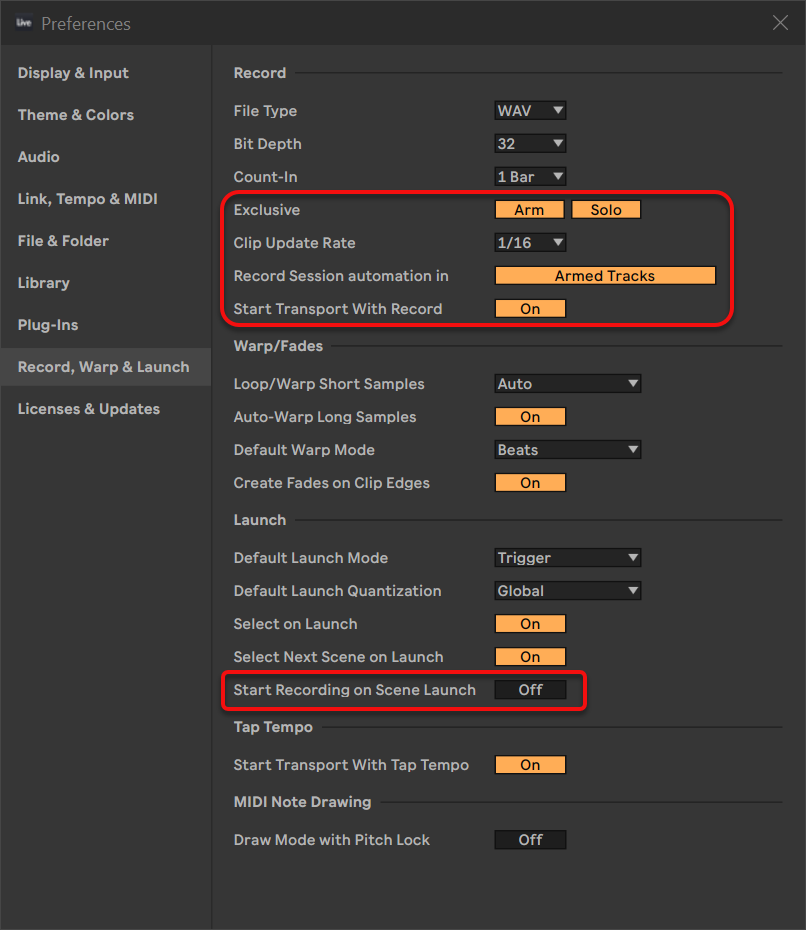
I like to change Record Session automation in from Armed Tracks to All Tracks.
Recording multiple takes is described in the manual in the Recording Into Session Slots section. The Live Info View panel has this to say about the session record button:
The above is not entirely accurate. A toggle alternates between two states. Instead of toggling its behavior, the session record button initially records audio or MIDI notes, and then for all subsequent takes of the recorded clips, pressing this button creates an overdub, not a new clip.
Pause Recording
- Press F9 to start recording.
- Press Space to pause recording.
- Press Shift-Space to resume recording.
Letting Only the Talent Hear The Metronome
Ableton published a useful article entitled How to route the Metronome to a second output.
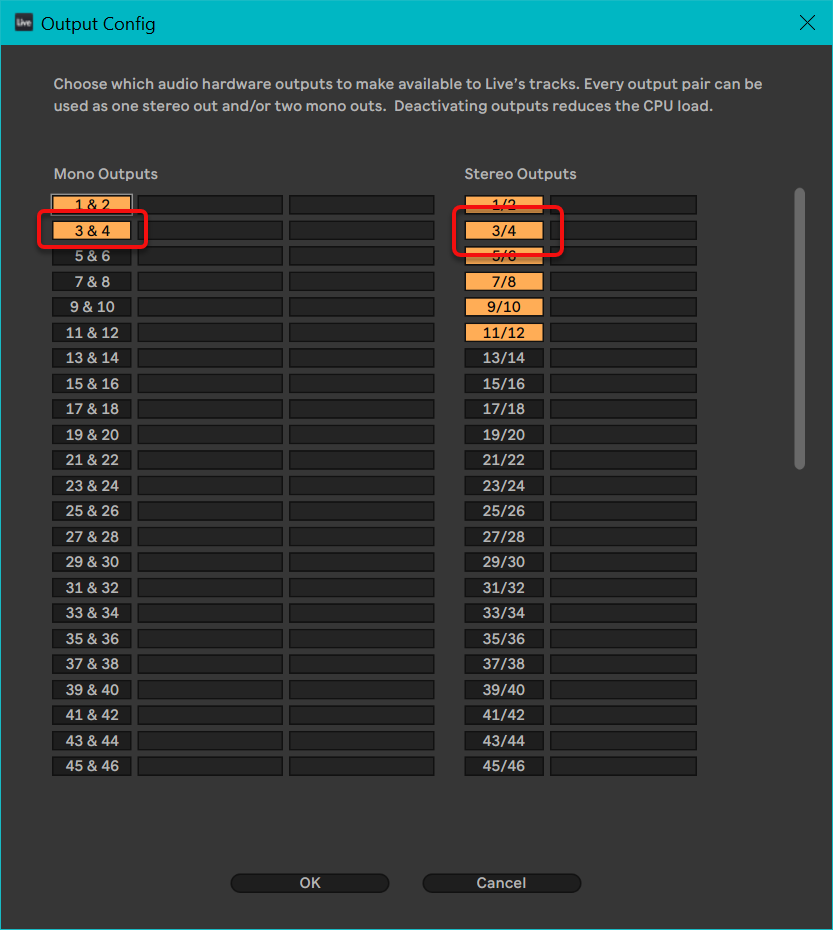
First type CTRL-, to bring up the Ableton Live configuration window, then click on the Output Config button.

Now enable outputs 3 and 4:
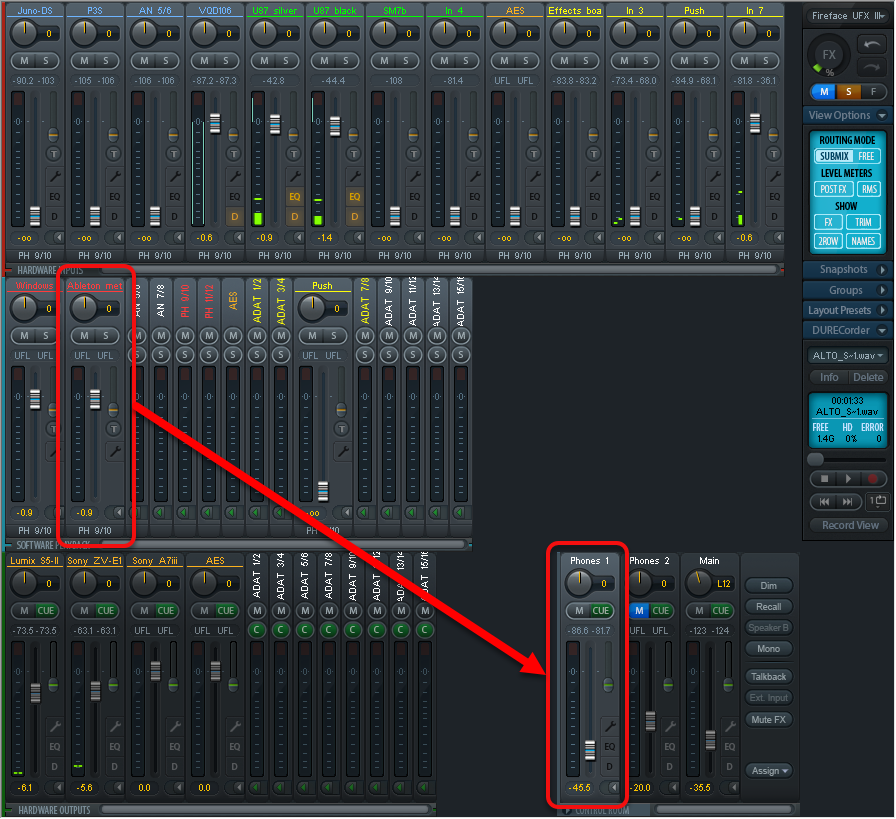
Now route TotalMix Software inputs 3/4 to the headphone output used by the talent and adjust the levels to suit.
Takes and Take Lanes
Google Gemini provided this information.
To set up for recording takes in Arrangement View, you need to configure your loop settings and ensure your tracks are properly armed. Ableton Live (version 11 and later) will automatically create a new Take Lane for every pass you record over a specific section.
1. Configure Your Recording Area
- Select Time Range: Click and drag in the Arrangement timeline to highlight the section you want to record.
- Set the Loop Brace: Press Cmd+L (Mac) or Ctrl+L (Windows) to set the loop brace to your selection and activate the Loop switch in the Control Bar.
- Tip: Add an extra measure before or after your selection to give yourself “breathing room” to prepare between takes.
- Enable Punch-In/Out (Optional): If you want to record strictly within the loop boundaries without overwriting surrounding clips, activate the Punch-In and Punch-Out switches near the loop settings.
2. Prepare Your Track
- Arm the Track: Click the Arm button (square with a circle) on the track header. It will turn red, indicating it is ready to record.
- Set Input: Ensure the correct input (e.g., Ext. In for a microphone) is selected in the track’s In/Out section.
- Turn Off Automation Mode: Take lanes are hidden when Automation Mode is active. Press A to toggle it off so you can see your takes as they appear.
3. Record Multiple Takes
- Enable Metronome: Click the Metronome icon in the top left and set a Count-in (e.g., 1 bar) from the dropdown menu to help you start on time.
- Start Recording: Press the Arrangement Record button (solid circle) in the top Control Bar.
- Perform Passes: Live will loop the section. Each time the playhead returns to the start of the loop, a new take lane is automatically created for that pass.
- Stop: Press the Spacebar or the Stop button when you are finished.
4. View Your Takes
If you don’t see the recorded passes immediately:
- Show Take Lanes: Right-click the track header and select Show Take Lanes, or use the shortcut Cmd+Option+U (Mac) / Ctrl+Alt+U (Windows).
- Audition: Click the speaker icon on a take lane to hear it instead of the main track.
Promoting Takes to the Main Lane
In Ableton Live 11+, “promoting” a take refers to the process of moving selected material from a Take Lane to the Main Lane (the audible track). This is the core workflow of Comping, which was introduced in Live 11.
There are several ways to promote sections of your recordings depending on your preferred workflow:
- Keyboard Shortcut: Highlight a time selection on a Take Lane and press Enter. This immediately copies that selection to the track’s Main Lane.
- Draw Mode (B): Enable Draw Mode (shortcut B) and simply click and drag over the desired material in a Take Lane. The highlighted area will be instantly “painted” onto the Main Lane.
- Single Click: In standard selection mode (with Draw Mode off), making a selection and then single-clicking it will promote that specific segment to the Main Lane.
- Context Menu: Right-click a selection in a Take Lane and choose Copy Selection to Main Lane.
Essential Setup for Take Lanes
To see your takes and manage them, ensure you are in Arrangement View:
- Show/Hide Take Lanes: Right-click the track header and select Show Take Lanes, or use the shortcut Cmd+Option+U (Mac) / Ctrl+Alt+U (Windows).
- Auditioning: Click the Audition Take Lane button (speaker icon) in the take lane header or press T to hear a specific take before promoting it.
- Cycling Takes: Select a clip on the Main Lane and press Cmd/Ctrl+Up/Down Arrow to quickly cycle through all available takes for that selection.
Quick Shortcuts for Managing Comping
| Action | Windows Shortcut | Mac Shortcut |
|---|---|---|
| Promote Selection | Enter | Enter |
| Show/Hide Take Lanes | Ctrl+Alt+U | Cmd+Option+U |
| Insert New Take Lane | Shift+Alt+T | Shift+Option+T |
| Cycle Takes | Ctrl+Up/Down Arrow | Cmd+Up/Down Arrow |
Options.txt
You can create a file called
%AppData%\.
This file controls a few
experimental and unsupported Live features.
I am unaware of any interesting or useful Live 12 options that can be controlled in this manner.
Custom Drum Rack
To make a custom drum rack in Ableton Live 12:
Drag an empty drum rack (from Collections / Instruments / Drum Rack), and drag it into the session. If you have not defined a default drum rack, this creates a new track with an empty drum rack assigned to it. Otherwise, the default drum rack is used and you will need to delete all the samples from it. Be sure to rename it before saving, or your default drum rack will be modified by the following.
Drum racks have groups of 16 cells. You can move between the groups of cells with the PgUp and PgDn keys when the instrument is selected at the bottom of the screen, or clicking on a group.
You can drag a sample from the Windows File Explorer or the Ableton Collections / Sounds browser into a cell in the empty drum rack. To delete a sample from a selected cell, click on the cell and press Delete.
The auto-select button at the lower left of the drum rack allows you to press a pad on a MIDI device to select the matching cell in the drum rack. The selected cell will be highlighted, so you will know the cell to drop the sample into. I did this with a Roland TD-07 drum module and a Novation Launchkey 49 MK3 MIDI Keyboard.
Click the Save icon at the top right corner of the drum rack to save it in the User Library.
Live 12 XML Schema
The Live 12 schema is 3.3 MB.
I created it by feeding the Ableton Live 12 demo project .als set file to
this online XML to XSD converter
References
- Search ableton.com
- Online Ableton forum
- Keyboard shortcuts
- Production Infrastructure Directories
- Live file types
- Transport Time (Max4Live Device)
- GitHub.com/Ableton
- Ableton Live Ultimate Assistant, a ChatGPT application by Charalampos Tenis. Expert in Ableton Live guidance, troubleshooting, offering interactive, user-centric support for all versions.
- Notepad for Live
Keyboard Shortcuts
The Live manual shows the keyboard shortcuts. Here are links to the shortcut categories:
Showing and Hiding Views
Accessing Menus
Adjusting Values
Browsing
Transport
Editing
Loop Brace and Start/End Markers
Session View Commands
Arrangement View Commands
Comping
Commands for Tracks
Commands for Breakpoint Envelopes
Key/MIDI Map Mode and the Computer MIDI
Zooming, Display and Selections
Clip View
Clip View Sample Editor
Clip View MIDI Note Editor
Grid Snapping and Drawing
Global Quantization
Working with Sets and the Program
Working with Plug-Ins and Devices
Audio Engine
Using the Context Menu
Here are selected keyboard shortcuts for Windows:
- Space
- Start / pause playback
- CTRL-Space
- Restart playback from the Start Marker
- Shift-Space
- Resume playback from the current position
- F9
- Count in and record on all armed tracks. Pressing F9 again toggles recording but continues playing.
- CTRL-D
- Duplicate clip.
- CTRL-mouse wheel
- Zoom in and out
- Shift-mouse wheel
- Scroll left and right
- CTRL-+ and CTRL--
- Zoom the GUI larger and smaller
Defining Hot Keys
To cause the s key to stop playback and rewind to the start of the set:
- Press the Stop button twice to rewind to the start of the set.
- Click the Set button.
- Right-click on the marker at the start of the set and choose the option for Set Song Start Time Here.
- Enable the Key button.
- Press the s key.
- Click on the marker.
- Disable the Key button.
Now you can press Space or s to stop the set playing. Press s (again) to rewind to the marker at the start of the song.
Videos


