Published 2023-10-16.
Last modified 2023-12-26.
Time to read: 5 minutes.
av_studio collection.
I purchased an RME Advanced Remote Control (ARCUSB) to control talkback and cueing. Once I plugged it into the USB port on the back of my RME UFX III, it worked immediately.
Although this device can do many things, I felt that the talkback feature alone was worth the price. All the other features were bonuses. Here is the user manual.
ARC USB Defaults
The RME ARC USB is immediately useful without any setup. Out of the box, it can:
- Control the volume of speakers A and B (if present).
- Reduce the volume (dim) of speakers A and B (if present).
- Control talkback (if talkback is set up).
- Control cueing (if cueing is set up on Phones 3).
Cueing a Submix
This section explains what cueing is and how it can help make better audio recordings.
Sending A Submix To A Video Camera
I turn off the studio speakers when recording live music in the studio. Everyone in the studio uses headphones to listen to a different submix tailored for their needs. Submixes generally include feeds from studio microphones, instruments plugged into the RME audio interface, and backing tracks.
A separate submix is sent to the camera’s external microphone jack. This means that when recording video, a high-quality submix is directly captured on the video. To achieve this, I connect analog outputs 7 and 8 of my UFX III to my Sony A7iii camera’s external microphone jack.
Never assume that a submix is properly set up without checking it. That is the main purpose of cueing: to temporarily listen to a submix before recording.
Virtual Headphones
TotalMix allows any output submix channel to be deemed a headphone. Yes, you could actually attach headphones to the hardware output in question; however, designating an output to be virtual headphones allows that output to be used for cueing purposes.
If this abstract concept sounds confusing or complicated, I will show you how and why it is helpful later in this article. Hopefully, after you finish reading this article, the concept will seem practical and less abstract.
ARC USB Setup
You can view and edit the ARC USB settings in TotalMix. Select menu items Options / ARC & Key Commands...:
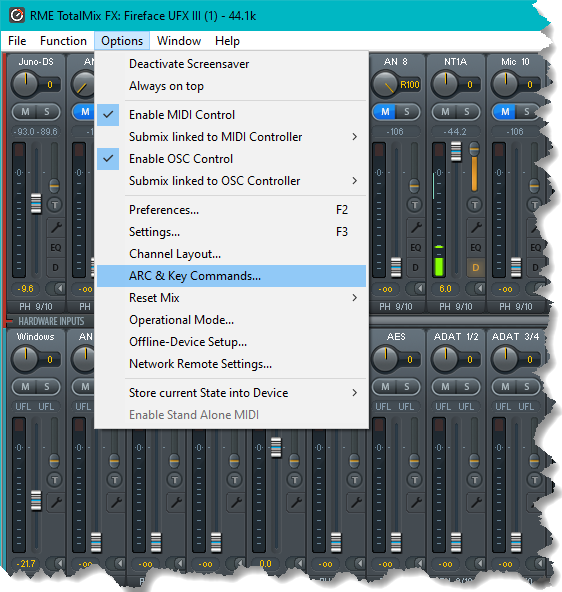
... and the following dialog will appear:
ARC & Key Command Settings
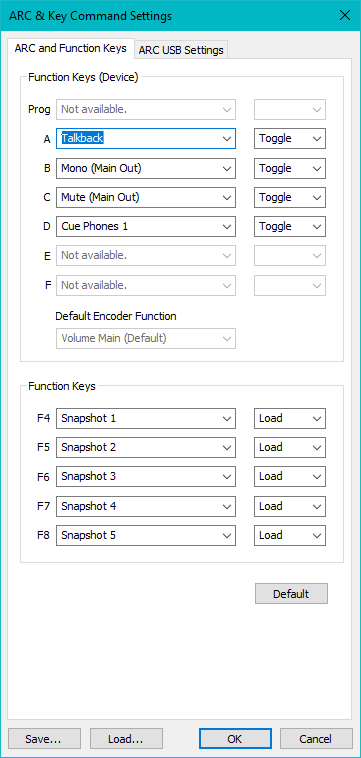
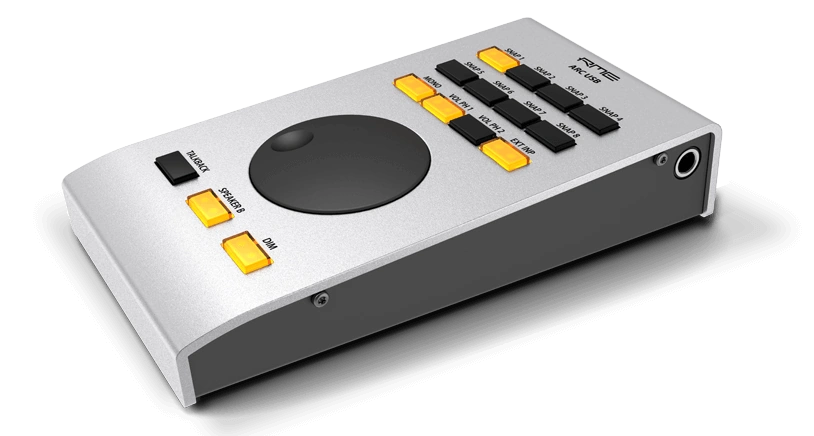
The upper Function Keys (Device) section in the above image relates to the following 4 buttons on the front of the RME UFX III. These buttons can have their functions reassigned by the above TotalMix dialog.
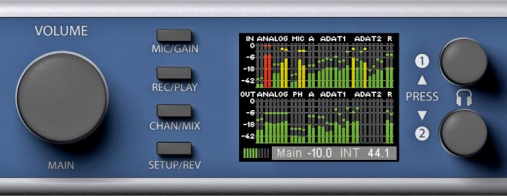
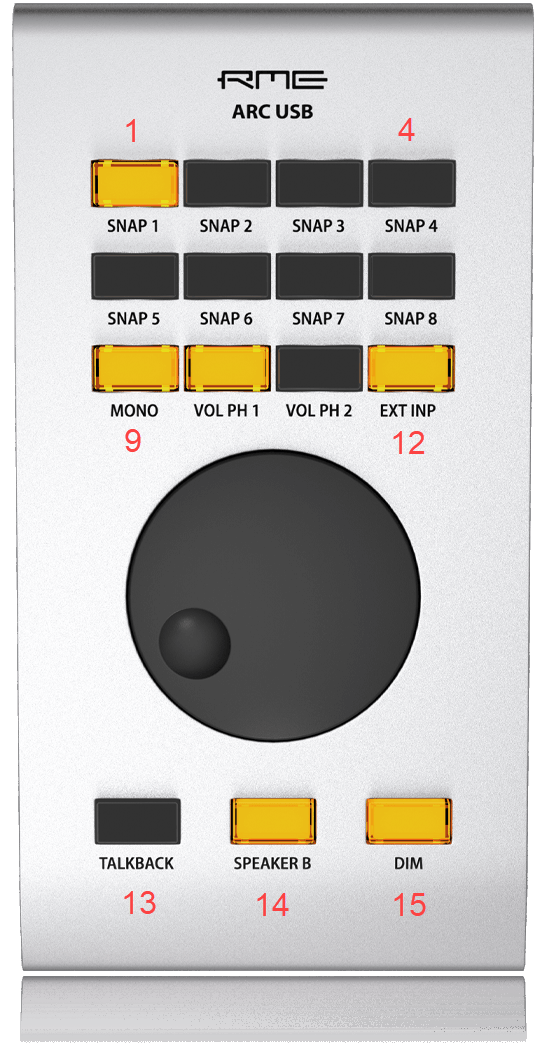
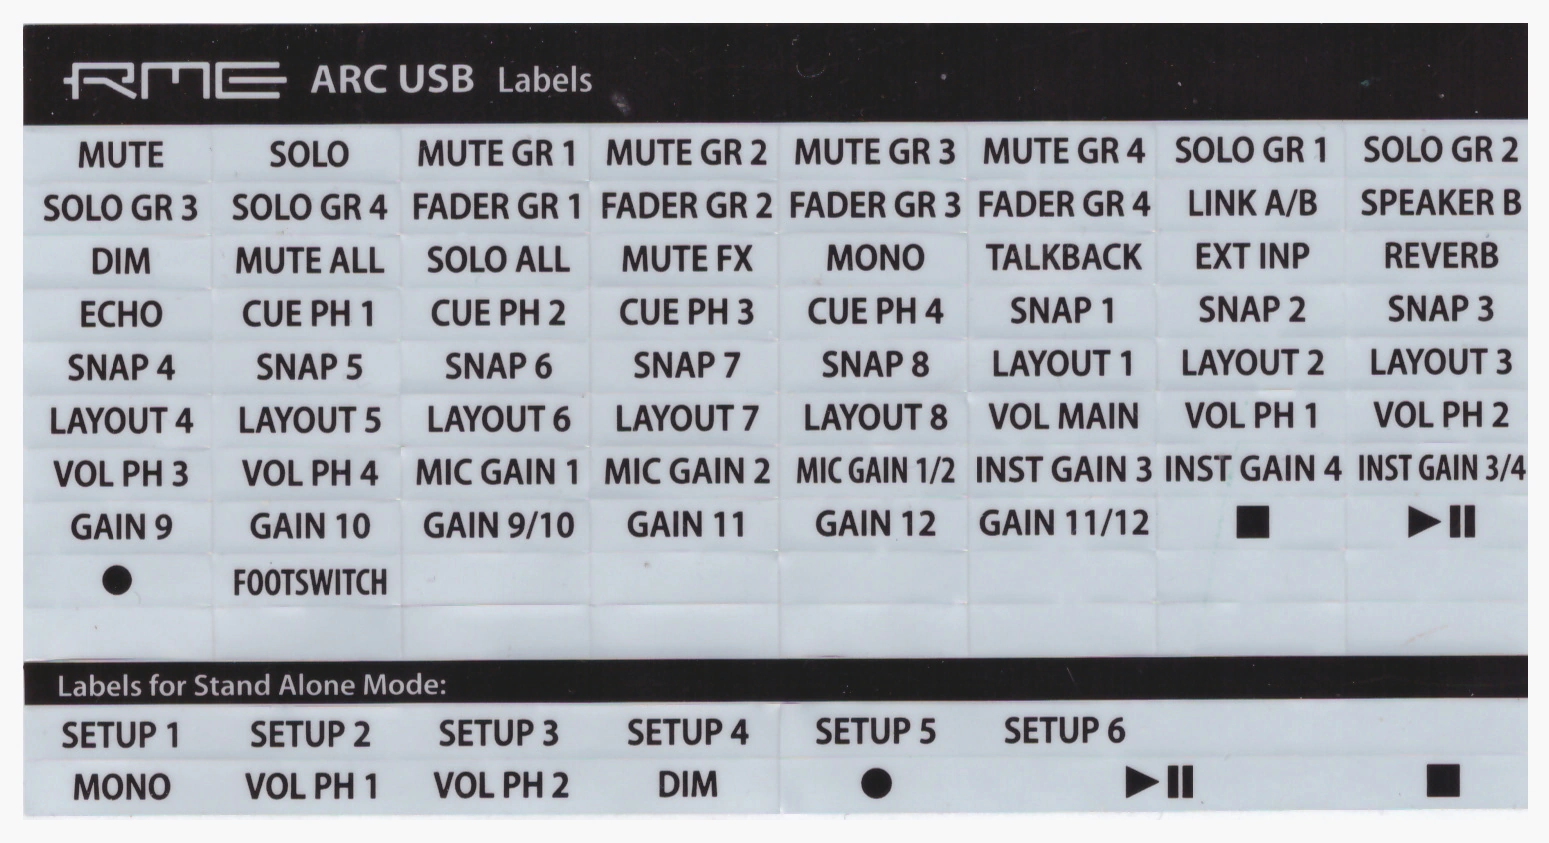
The ARCUSB manual does not have any photographs or diagrams of the device, and I could not find any documentation that stated the numbering scheme for the buttons. I labeled seven buttons in the following photograph.
The lower Function Keys section in the ARC & Key Command Settings image above allows you to use your computer’s function keys F4 to F8 to control TotalMix, but only when TotalMix is the currently active application. These are not global function keys, unfortunately.
OBS Studio allows for the definition of global hot keys by setting File / Settings / Advanced / Hotkey Focus Behavior to Never disable hotkeys. MusicBee also allows for the definition of global hot keys by defining new hotkeys using CTRL-O / Hotkeys. Hopefully, a future version of TotalMix will include this feature. Until then, Windows Power Toys provides this functionality.
Redefining ARC USB Button Actions
The RME ARC USB button assignments are shown on the dialog tab labeled ARC USB Settings. Oddly, the ARC USB buttons are called ‘Keys’ in the dialog. Factory settings are as follows:
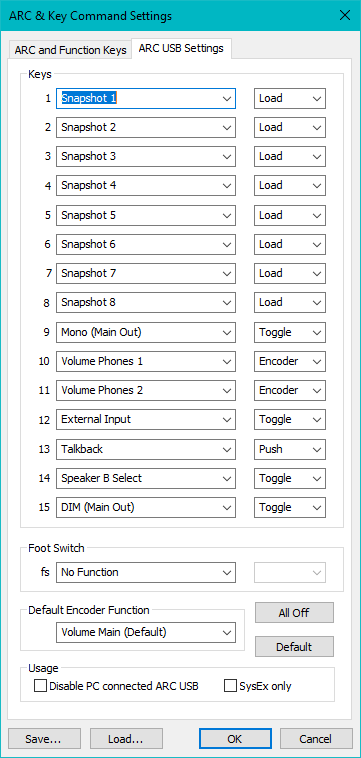
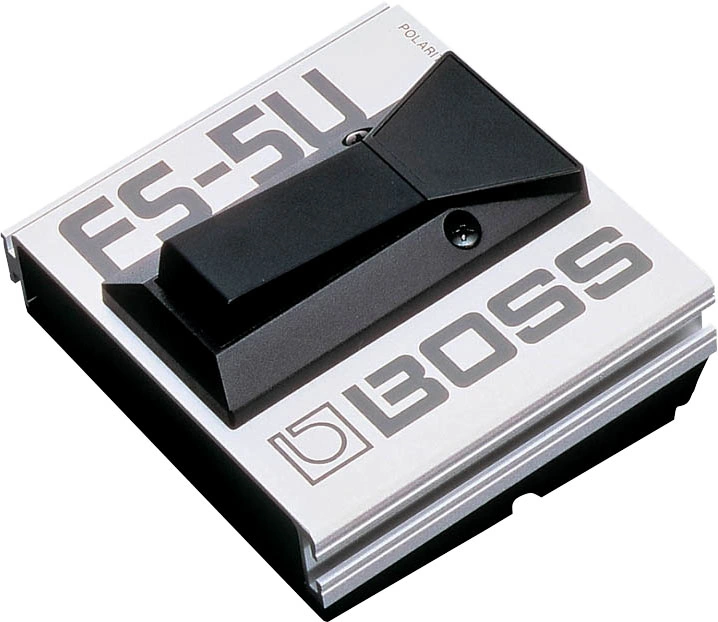
I changed the function of some of the ARCUSB buttons as shown in the following image. I also defined an action for a Boss FS-5U footswitch that I connected to the side input of the ARCUSB.
- I changed the actions associated with buttons 1 and 2 because I often adjust the gain on the microphones attached to channels 9 and 12.
- I changed the action associated with button 9 to Cue Phone 3, because I have mapped the Phone 3 output to analog 7/8, and that output is connected to my Sony A7iii camera’s audio input jack.
- Button 14 now mutes the main output.
- The footswitch toggles the visibility of TotalMix.
These are the current settings for the ARC USB connected to my workstation.
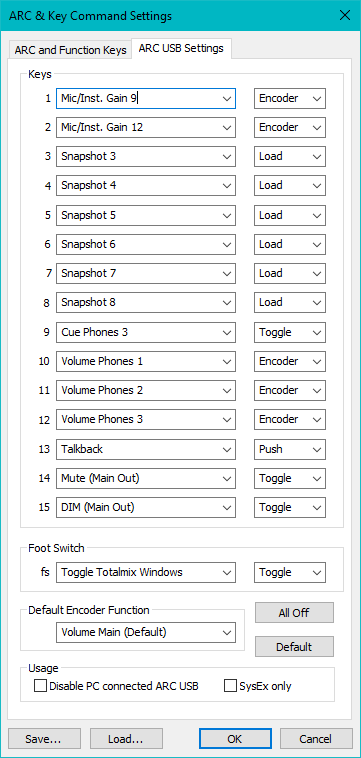
Notice the Save... and Load... buttons at the bottom of
the screen shot. They save and load .tmarc file types.
<Preset>
	<CommandKeys>
		<ProgramKeys>
			<val e="ProgramKey00" v="5888"/>
			<val e="ProgramKey01" v="9984"/>
			<val e="ProgramKey02" v="-9472"/>
			<val e="ProgramKey03" v="-7680"/>
			<val e="ProgramKey04" v="-2560"/>
			<val e="ProgramKey05" v="-2816"/>
			<val e="ProgramKey06" v="9216"/>
			<val e="ProgramKey07" v="9984"/>
			<val e="ProgramKey08" v="-5376"/>
			<val e="ProgramKey09" v="-5632"/>
			<val e="ProgramKey10" v="-5888"/>
			<val e="ProgramKey11" v="-6144"/>
			<val e="ProgramKey_12" v="-23040"/>
			<val e="ProgramKey_13" v="-23808"/>
			<val e="ProgramKey_14" v="-5632"/>
			<val e="ProgramKey_15" v="-5888"/>
			<val e="ProgramKey_16" v="-6144"/>
			<val e="ProgramKey_17" v="-6400"/>
			<val e="ProgramKey_18" v="-6656"/>
			<val e="ProgramKey_19" v="-6912"/>
			<val e="ProgramKey_20" v="-3072"/>
			<val e="ProgramKey_21" v="-20480"/>
			<val e="ProgramKey_22" v="-20736"/>
			<val e="ProgramKey_23" v="-20992"/>
			<val e="ProgramKey_24" v="9987"/>
			<val e="ProgramKey_25" v="-7680"/>
			<val e="ProgramKey_26" v="6656"/>
			<val e="ProgramKey_27" v="-9472"/>
			<val e="ProgramKeyDefEncArc" v="0"/>
			<val e="ProgramKeyDefEncArcUsb" v="0"/>
			<val e="ProgramKeyDefDisableUSB" v="0"/>
			<val e="ProgramKeyARCSysExOnly" v="0"/>
		</ProgramKeys>
	</CommandKeys>
</Preset>
Now when I want to adjust the gain for my Neumann U87 Ai microphone on channel 12, I just press the second button from the left on the top row, and it lights up to tell me that I can now use the rotary dial to change the gain. Pressing that button a second time turns off the light, which signifies that the gain has now been set, and the rotary dial reverts to its default purpose.
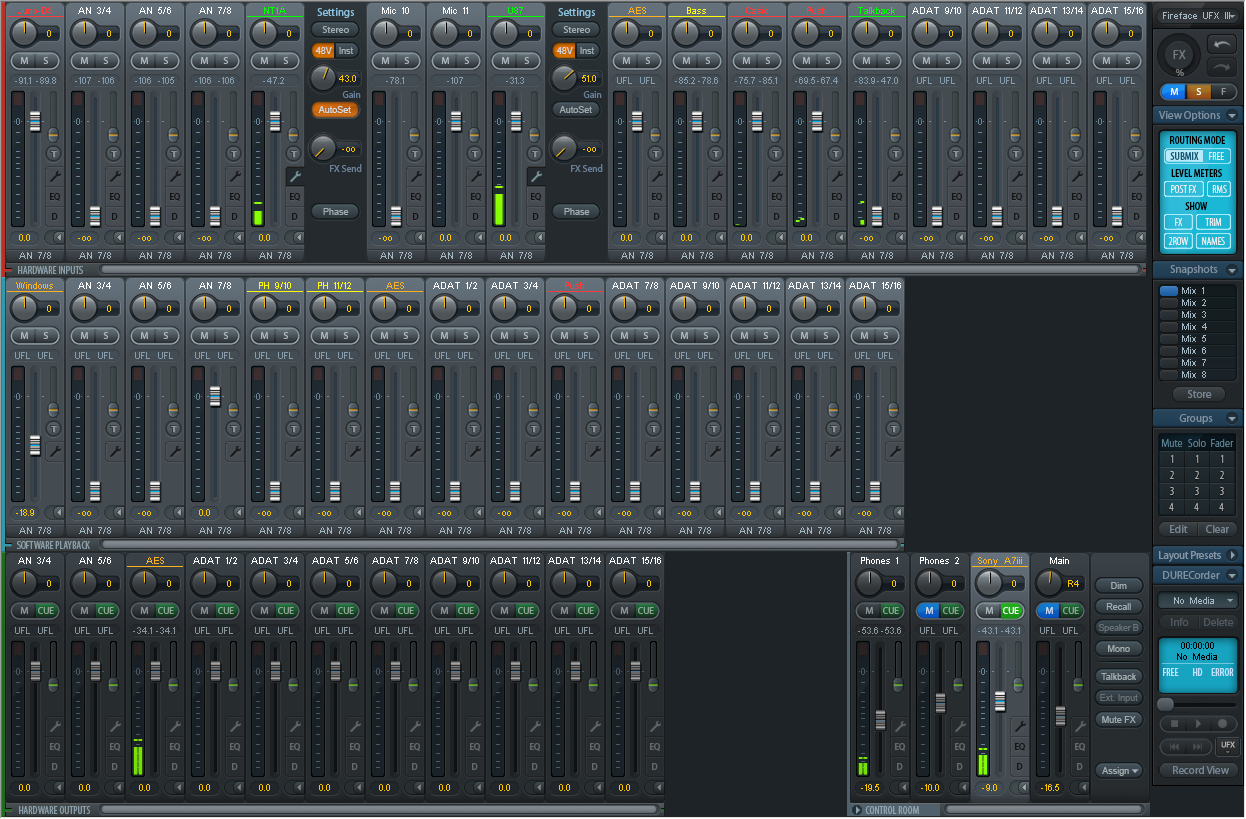
This is what TotalMix usually looks like on my workstation:
Working With ARC USB Limitations
Convenience often comes at the expense of generality. ARC USB can only cue phones 1-4, and cannot cue any other outputs. Never fear; this limitation can be easily overcome.
Because I wanted to use ARC USB to enable cueing for the outputs 7 and 8, and ARC USB’s button 9 is factory predefined for cueing virtual Phones 3, I assigned (aliased) output 7 and 8 to virtual phone jack 3. To accomplish this, I used Assign ▼ / Phones 3 / AN 7/8.
To verify the cueing worked, I pressed the little wrench icon for the Sony A7iii output (aka Phones 3, aka AN 7/8). This displayed the Settings for that submix. The TotalMix Control Room area now looked as shown in the image below.
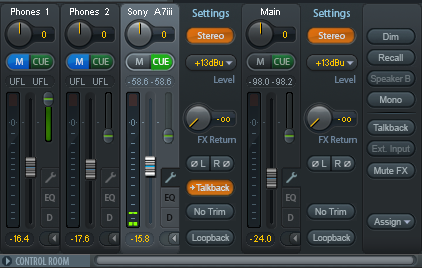
Now when I pressed the ARC USB’s left-most button on the bottom row (button #9), TotalMix changed the dark green CUE button for the Sony A7iii output to bright green (CUE), and I was able to listen to that submix. Pressing button #9 on the ARC USB again turned off cueing, and the CUE button in TotalMix reverted to its usual appearance to reflect the change.
Saving a Snapshot
Now that everything was set up, I saved the TotalMix configuration as a snapshot. This is important, because sometimes TotalMix gets reset; all inputs are set to zero, mappings are forgotten, etc.
Making a snapshot, then saving it to a file, allows you to easily restore the working setup.
On the other hand, workspaces are backups of all the existing data TotalMix FX – including all Snapshots you create.
- Press the Store button in the Snapshots area of TotalMix.
- All the buttons next to the 8 mixes should now be flashing.
- Save the settings to Mix 1 by pressing the flashing blue button to the left of that label.
- Select TotalMix menu item File / Save Snapshot As...
- I name my snapshot files according to the date, for example:
2023-12-26.tmss.
Software Playback AN 1/2 Volume Control
I posted this question to the RME User Forum.
I want to use ARCUSB to control the volume of my computer audio (Software playback channels AN 1/2, labeled as "Windows" in the image below).
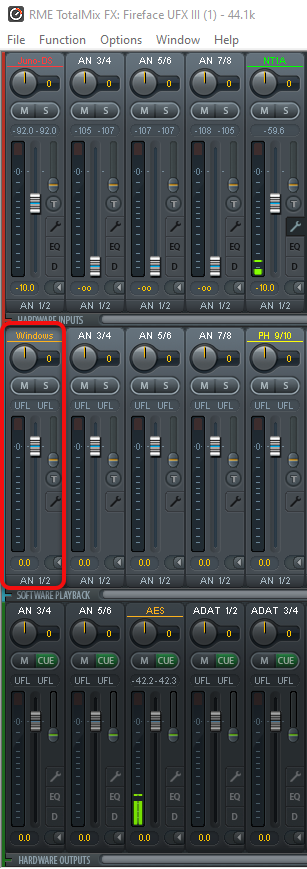
At present, my ARCUSB has encoders configured for controlling gains for 2 microphones, output volumes for headphones, a feed to a video camera, and the speaker volume.
ARCUSB is set up with a fixed number of encoders, and I have used them all. The number of encoders, toggles, and push buttons depends on the specific RME audio interface the ARCUSB is connected to. Obviously, this means that there is a higher level programmability for the ARCUSB than I have found in the product documentation.
I need to assign one more encoder to control the volume of the computer audio as it appears in the AN 1/2 channel of Software Playback for my UFX III. Is there a way to redefine the default capabilities?

